 |
|
#151
|
||||
|
||||
|
Jay -
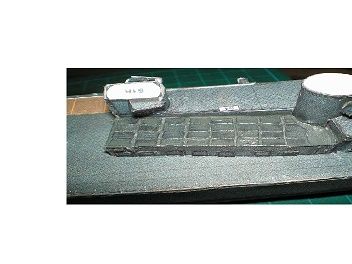
Is that a degaussing cable running along the edge of the deck? Don |
|
#152
|
||||
|
||||
|
Hi All,
Yes, that is where a degaussing cable is to run once I get around to it. They give you a lovely white line so you can have loads of fun lining up the carefully cut out tiny strips of gray card to cover the white up. I am rapidly learning that a gray Sharpie lined over the edges of these white lines can serve you well when it comes time to add these little details. After months of being in and out of the hospital for this and that, getting back to work a few times and re establishing my bills to a degree that they aren't all clamoring for my attention, I can finally turn my attention back to my hobbies. This is one that I have been wanting to get done but for various reasons have not been able to. I have saved all the printed parts in a file folder, the up to this point finished pieces were put away in a large box so I haven't lost any of those either. I am working on the aft deck housing structure and will have some photos to show in a day or so.
__________________
Jay Massey treadhead1952 Las Vegas, NV |
|
#153
|
|||
|
|||
|
Good to see you again Jay. Hope you're healthy and well now. Glad to see that the Akizuki is still an in-progress build. Welcome back!
__________________
This is a great hobby for the retiree - interesting, time-consuming, rewarding - and about as inexpensive a hobby as you can find. Shamelessly stolen from a post by rockpaperscissor 
|
|
#154
|
||||
|
||||
|
Yes, welcome back! I like your build and am picking up lots of tips for my Fubuki builds. Stay healthy! ---Mike
|
|
#155
|
||||
|
||||
|
Thanks Guys, I have been tinkering at the after deck house and torpedo storage magazine, lots of tiny pieces to make up such a small amount of deck space! But it is a detail rich area. I'll have a couple of pictures up later and a play by play account of the fun stuff.
__________________
Jay Massey treadhead1952 Las Vegas, NV |
| Google Adsense |
|
#156
|
||||
|
||||
|
Hi All,
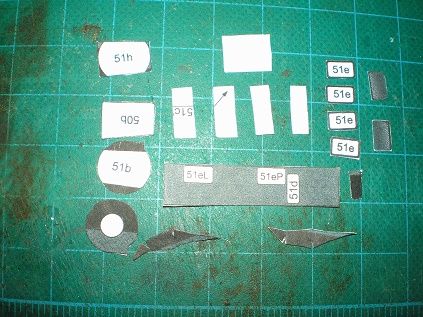
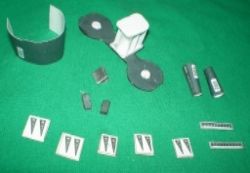
Working over this one again I am going back over all the references and photos that I have dug out on the net. This showing me a few of the reasons why I have managed to stretch this build out so long. Finding builds from 1/700 scale all the way up to even 1/72 scale by a bunch of different and creative modelers all over the world has given me a lot to think about as I work over this ship. As this is in 1/200 scale it offers a lot of possibilities that the smaller scales just can't match. It also offers a lot of different ways to go about arriving at a finished project. The Torpedo Storage Magazine on the deck consists of no less than 47 separate parts. Once assembled into a unit unless you show a great deal of restraint in cutting out the parts and assembling them it also leaves a great lot of room for problems. I wound up just touching up the upper surface with a coat of Model Master IJN Naval Gray to make things look a bit more correct than leaving a lot of white spaces here and there that just didn't have any place on there. After it dries I will overcoat that with a coat of Flat Clear Coat to make it blend in.  The Searchlight Platform at the forward section of the after deckhouse presents another area of opportunity for some added detailing. There are two ventilator fairings on either side of this little part that they give you the parts to make them project outwards. The problem is that these were opened up so that there was a rectangular open area in the center of what appears to be flat with what you are given. An easy modification to deal with if you do a little planning ahead and make an extra copy of the required parts. Our selected type of modeling is so easy and forgiving in this respect, just run the area of parts you need through an inkjet copier on some cardstock and you are set to go. Trim out the sections on the outer layer and use the trimmed out bits to set into the recesses. A bit of card stock trimmed out and colored black set into the opening to frame this bit you recess and it looks as it is supposed to. There is also a section of railing that will need to go around the circumference of the Searchlight Platform and a section of ladder to add to the kit provided flat spot on that same decking platform. I will be using some of the railing and ladder stock that I have on hand from an after market vendor to fill these two holes.  On the second circular deck house level that has a twin AA mount on the top is another one of these ventilators just aft of the Searchlight Platform. It will get the same treatment to open it up an provide more detail and relief to that area. As in the case of all the hatch doors in the sides of all the parts of the deck house and platforms, I have doubled the thickness to give a bit more detail at those locations. Later on in the process of adding details I will also use some copper wire to run hand rails and ladder way rungs at the various locations on these deckhouses and platforms where I have noticed them in the different photo essays of other models of the ship. Researching ship models by other modelers on the net is one of the easiest ways I know to help you add details to your own ship models. Looking for the larger scales of model will usually lead to more detailing. Consulting actual photos of the real vessels in some cases is possible but in other cases where the vessel represented the cutting edge of technology for a particular nation in time of war these tiny details may not be available. There is also the detail books and 3D type books on separate classes of ships. I am using the Kagero book by Mariusz Motyka and Lukasz Stach on the Akizuki to aid me in this build. At this early stage of the build process it offers a little information, but as it progresses and the actual kit parts get skinny, I can add more with the aid if the books excellent drawings.
__________________
Jay Massey treadhead1952 Las Vegas, NV |
|
#157
|
||||
|
||||
|
Glad to see work continuing, Jay. Thanks for the info on your research.
Don |
|
#158
|
||||
|
||||
|
Thanks Don,
After clipping and trimming and fiddling on the midship twin mounted AA Platforms I started assembling parts and pieces. They make a top and bottom part for the main deck section to which everything else is attached. They have upper and lower plates that the main deck house wraps around which glue to the bottom of the deck section. I made these two parts out of two sections of card glued into a double thickness. Then the two wing deck mounting areas are supported by two conical round bits outboard of the deck house. To make it a bit more sturdy I added vertical pieces to the upper and lower plates to join them together and to have an area to glue the skin of the deck house bulkhead to. For the two conical bits that go in the center of each deck mount piece I punched out a disk that would act as an upper attachment point and glued them in the center of the round deck sections. These are also made from two stacked pieces of card for added thickness. Add to this main assembly the supporting wedges that go on the underside of each round deck mount structure and two beams that go to the forward part of the corner of each side of the deck house and then to the top underside of the two round deck parts make all of the underneath the mounts just as busy as the top! The support pieces have printed openings which I am going to drill out for a better appearance. There are also two door hatches in either side of the deck house bulkheads and a single door hatch on each of the conical supports. Once all of these parts are assembled I can glue it down to the deck and then add the AA Mounts, radio mast, ammunition lockers and railing sections to make the top just as busy as the undersides. 
__________________
Jay Massey treadhead1952 Las Vegas, NV |
|
#159
|
||||
|
||||
|
Hey Jay, was thinking recently hadn't seen you around here for awhile. Glad to see you back at it, hopefully healthy and well.
|
|
#160
|
||||
|
||||
|
Hi Whulsey,
Yeah, it started out innocently enough, my yearly need to take some of the gun collection out and get a little trigger time. That lead to going to some of my old stomping grounds that required 4 wheel drive. Un fortunately, not having 4 wheel drive in what was the then current vehicle lead to a couple of long hikes to get it rescued. Those long hikes lead to hip problems from a misspent youth riding motorcycles, bulls, wild horse stock and well you get the picture. From the hip surgery we had more issues and lots of time recuperating. Fortunately for me, I have a decent job with excellent insurance so it all more or less worked out. I did have to forego the computer for a time when my old unit bit the big one. I cobbled together this unit that I am using now just so I could get back online. The latest problem with it was a Nvidia Video card that went belly up. I scored an up to date ASUS unit to replace that and here I am, ready to irritate one and all in the cyber world again.  At any rate, I am still working over this old ship model, intent on seeing it through to completion. Having completed Gremir Models RN Destroyer model of the HMS Savage, the IJN Nagatsuki, the USS Selfridge and the Novgorod as well as Answer Models PC-335, I do know that these ship models can be completed. It just takes some perseverance and patience to get it done. Seeing all the excellent craft that our fellow model builders perform here just makes me all that much more determined.
__________________
Jay Massey treadhead1952 Las Vegas, NV |
| Google Adsense |
 |
|
|