


|
|
|
#51
 01-29-2009, 09:59 PM
|
||||
|
||||
|
threadhead1952, your build is looking great for a 1st timer in paper, but as you have already discovered, a lot of the skill you already have comes into play, just a different medium than plastic or resin. I too had trouble understanding what to do from the instructions, so I looked for and downloaded a Polish dictionary, this just helps me to get the general idea, but none the less, that is better than blindly trudging thru the build like I did the first time. But you have already seen, just ask and the fellas will help as much as they can. Looking forward to your plating, I have found that this helps, make you a fairing strip, cut a piece of paper and tape togeather if needed, to run the complete length of the hull about a inch wide, lay across all the ribs from front to rear starting at the lowest point working up to the deck and if a rib is too far out you will see, if the rib does not touch the paper strip you will see this as well, if too wide sand down, too narrow, add a filler strip. This is a ole planking trick to keep all copeastetic. Hope this helps. Rick

|
|
#52
01-30-2009, 08:30 AM
|
||||
|
||||
|
Thanks for the tip Rick, I got sidetracked yesterday, something to do with a member of the fair sex and by the time I got back home it was too late to do anything with the Akizuki. I have broken the telephone, doorbell, planted claymores around the perimeter and refuse to stick my head out the door today so I can have that day of relaxation and pursuit of the hobby without any further interuptions.:D
Jay Massey treadhead1952 Las Vegas, NV
|
|
#53
01-30-2009, 01:58 PM
|
||||
|
||||
|
Ahoy Shipmates,
Well, I did the deed. My Akizuki now has her bottom plates on. It was no mean feat either. When I started, I cut out enough single width strips from the sheets to run down the length of the forms, carefully centered and glued each in place with Aleene's Tacky Glue. I clipped out the plates and after fitting the bow and stern sections got the rest of the plates ready by using the edge of the scissors to draw the plates over the straight edge to impart an initial curve to them. 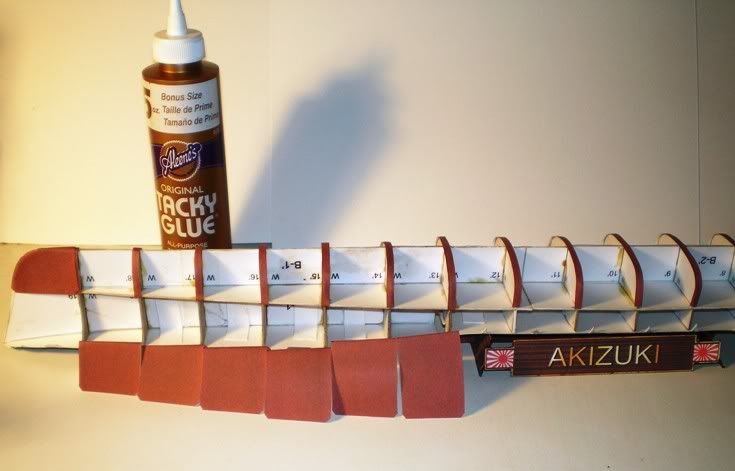 By the time I got to about the third plate with all my gluing and attatching, I discovered that the single width of the strips was just not going to make it. Even though I had made sure to center them over the bulkhead forms, there just was not enough room left once the plates were in place. To ensure a good fit and leave enough room, I changed my plan a little and cut out double width strips. After removing the originals from the forms, doing a little trimming and sanding to make sure that things wouldn't be out of line, I reglued the new double wide strips and got back to work. 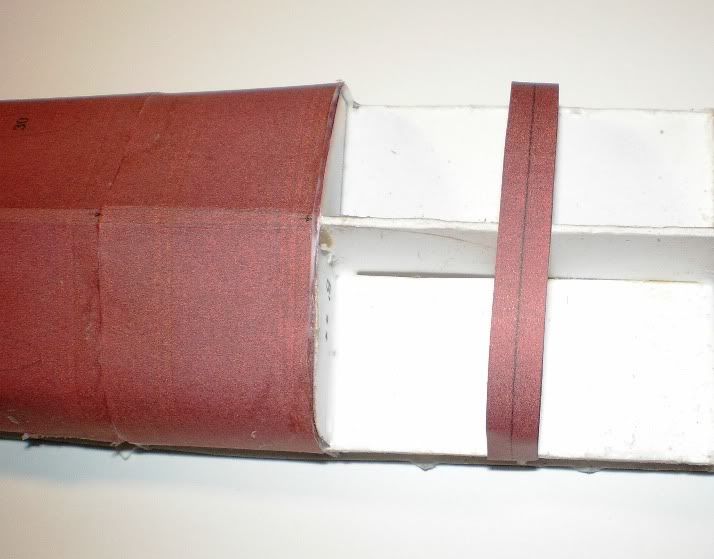 Working from one end to the other, I soon had the hull plated and looking pretty fair. I had made sure to number each plate from the back side so I wouldn't be confusing any with their proper locations. Before putting any glue on the forms, I checked for fit. I precurved each one so that it wouldn't have any divots or depressions. Even with all that careful planning, I still had a few of the plates that were hanging over the top edge of the waterline long form. Once the glue had dried, I used the hobby knife to trim them all even with the waterline form. 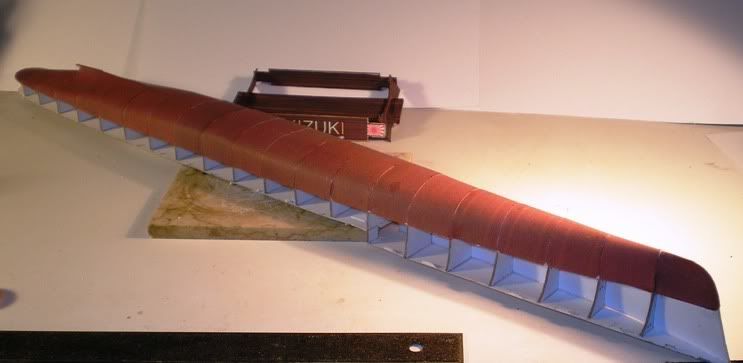 Now that I have the plates in place, I am going to give it some time to dry a bit more then attack things with a shot of Testors Dullcote out of a rattle can first. Once it dries over night, I can do a little sanding and fairing up so I have a smooth surface all the way down the length. Once that is done I will shoot a coat of Model Master Hull Red Acrylic over all so that it is all one color. While waiting on all that glue to dry, I am going to attack the props, prop shafts, rudder and the related parts. Apparently answer gives you a bit of a reprieve from paper rolling with the shafts, just calling for S-1 which I figures means shaft of wood or plastic since I can't find any parts labeled S-1 on any of the sheets. Jay Massey treadhead1952 Las Vegas, NV
|
|
#55
01-30-2009, 02:21 PM
|
||||
|
||||
|
Not sure about the dia. of the shafts, learned this trick here on the Forum, for perfectly round prop shafts, spaghetti noodles. Hey it works and when painted, looks great, I prefer meatballs with mine, but I have learned with paper modeling, anything goes.:D
|
| Google Adsense |
|
#56
01-30-2009, 10:58 PM
|
||||
|
||||
|
Thanks Douglas, I have to admit it was all the help that I got here that helped me get this far. Great bunch of modelers who are willing to share their tips and tricks make this a great place to learn the ropes in this end of the hobby.
Papercut, I will have to pass on the spaghetti trick, if it were a Pola or a Roma I might have considered it.  Like you, I prefer mine with some sauce and the occassional meatball. Like you, I prefer mine with some sauce and the occassional meatball.I whittled away at the hull bottom after a dose of Dullcote or two, smoothed things over a bit, added some more Dullcote and hit it again. I shot on some Flat Hull Red and now that it has dried, I can go over it a couple more times with some putty and sand paper to make it come out a little better than what it started out as. I spent my time today working up the props and their related bits as well as the rudder. I am surprised that the props came out looking as good as they have so far. Rolling the end pieces that the props attach to was a test, but using various diameters of styrene rod for mandrels to finally arrive at a slightly undersized tube then mounting the tiny tab they give for glue and rolling them between the fingers while applying pressure with a toothpick inside got them together. Once I had them shaped round I used another piece of styrene rod to hold the shape of the base as I worked the closed ends together between my fingers into a cone shape. I dribbled some Aleene's Tacky glue inside the tips and rolled and formed them until it set and I had that part ready. I used the Aleene's Tacky Glue to add the blades over the marks on the ends and let it set up. Punching the disks out for the backs once I had them added to a bit of 100 lb. Bristol paper got the correct size handled. I glued them inside the hollow ends of the props and then drilled out the holes for the shafts with successively larger sized minidrills. Once I got them mounted on the shafts, styrene rod in this case, I turned my attention to the rest of the hardware to mount the assemblies to the hull. I also added some glue to the fronts of the blades of the props to give them a little dimension and curvature, spreading things out with a toothpick. It also serves to strengthen the glue joints that hold a five part assembly into one unit. The rudder was four pieces on the sheet, two sides and a thin sliver at the top with a tiny hole to be drilled out to mount a shaft and an even tinier sliver at the bottom of it. Looking at the width of the two slivers I figured I had better stuff something on the inside of the halves of the rudder to make it a little thicker or adding the slivers was going to be a dicey proposition at best. I cut two pieces of Bristol paper just a bit smaller than the size but the same shape as the rudder panels then glued them together, that left me enough room to add the top and bottom slivers in their respective place and still pinch the front and end of the rudder shape together to make it look somewhat aerodynamic or in this case I suppose it would be hydrodynamic. Minidrills in successively larger sizes provided the hole to add another styrene rod to the top of the rudder so I can mount it to the bottom of the hull when the time comes. Once the glue has had a chance to set up on the various parts I can construct the shaft bearings and then paint them and the rudder the same hull red as the hull. After I finish my ministrations to the hull, I can add all the parts and have that bit out of the way. I must admit that there is a whole lot more to this than first meets the eye. With a plastic kit, all this is handled in one sitting with a little trimming and parts clean up, with a paper kit, you are just about constructing the whole thing like the shipyard. I can hardly wait to get to adding the sides of the hull so I can wrap that part of it up and get started on working on the upperworks. I have also noticed that the pocket where the anchor sits is another one of those areas that gets a little work as well. The electrical circuit on the outboard of the hull is just represented by a printed line, I can see where I get to add that little bit of dimensional detail as well. Jay Massey treadhead1952 Las Vegas, NV
|
|
#58
01-31-2009, 12:26 PM
|
||||
|
||||
|
Well I like the look of that hull. It really does not look like a beginner's piece of work. A lot of the experience in other materials has served you well.
Mike
|
|
#59
01-31-2009, 01:50 PM
|
||||
|
||||
|
Ahoy, Jay!
Great work on the hull. Even before the smoothing and painting, the hull work is exceptionally smooth. I really appreciate your narrative (prose like a windowpane, in the words of George Orwell) and the outstanding large, close up photos. A truly great build! Don
|
|
#60
01-31-2009, 03:33 PM
|
||||
|
||||
|
Thanks Guys,
Yes, they are a lot more entertaining than a molded plastic hull, I will have to admit. Looking through the other threads at some of the kits that are going on has convinced me that what can be done with a card model or paper model beats a styrene build all hollow. Looking at your Isuzu build and then at my last try at it with the old Fujimi kit in 1/700 scale is like night and day. Of course, a lot of the same skills that are used in styrene kit assembly come in quite handy with paper models and the differences that there are is like learning a whole new ball game. As I work my way through this first one I am trying to pick up a few things here and there from all the excellent builds that are going on here. The assistance and tips from all of you are going a long way to educate me for which I am grateful. Patience and perseverance are the biggest requirements that I am finding out right now, the patience to prefit things to see the best way to approach them and the perseverance to see it through. I can 't wait to get off work so I can continue on with this bad boy. And thanks again for all the assistance everyone. Jay Massey treadhead1952 Las Vegas, NV
|
| Google Adsense |
 |
|
|


 Linear Mode

