


|
|
|
#1
 01-22-2009, 10:31 PM
|
||||
|
||||
|
1/200 Scale answer Models IJN Akizuki
Ahoy Shipmates,
As the title suggests, this is going to be my build blog of answer Models 1/200 scale IJN Akizuki. This will be my first attempt at making a paper model kit after some 40 years of abusing styrene and resin, so please be gentle. I have been reading through many of the ship model threads here to try and figure out just how to go about this project and that has been an education in itself. Many thanks to all the talented folk out there who devote themselves to this form of modeling for the information I have discovered thus far. 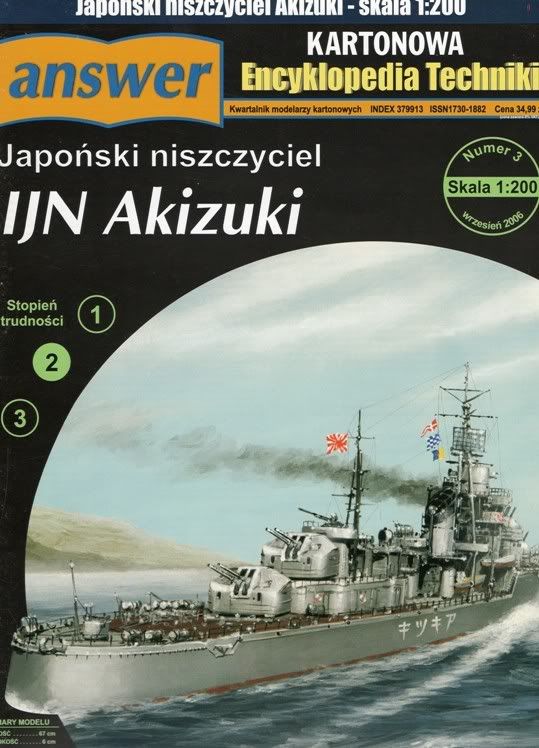 I ordered this when I was doing some research for what was going to be a 1/700 scale build of the Aoshima kit from the Paper Models Store site located in Chicago. I have a great fondness for IJN destroyers, they all looked so purposeful and more to my way of thinking a proper warship should look. Having built a number of them in that diminutive scale, adding some scratched up and photoetched details and trying my best to get it right has been one of the things that I really enjoyed here lately in my sojourn of the hobby. When the opportunity presented itself to try building one in a much grander scale even though in a completely untried method of construction for me, well, being a former Marine it was time to adapt and overcome, as it were. I must commend the Paper Models Store for their excellent service, I recieved my kit in 10 days even with the Martin Luther King holiday. When it arrived in my PO Box it was wrapped in a sturdy fabric backed paper envelope sandwiched in between heavy cardboard sheets with two large "DO NOT BEND" labels front and rear. After reading through the threads here and tracking down some information online, I decided to get right into it. After carefully removing the staples from the center and separating the pages, I decided that my best course of action would be to copy the inner hull plans' shapes on my trusty Epson Printer/Scanner so I could cut out the various parts from plain typing paper and preserve the originals for future reference as well as making up duplicates in case I have any problems, something for which I am deservedly famous (see screen name):D After much copying of the thinest paper sheets and clipping with a freshly sharpened set of my favorite scissors I have arrived at this result. This in itself proved a bit of a revelation as I discovered even more "inner" parts that are located on the colored and thicker sheets when I did a parts inventory against the printed sheets. But for the inner hull these are the parts I will have to start with. 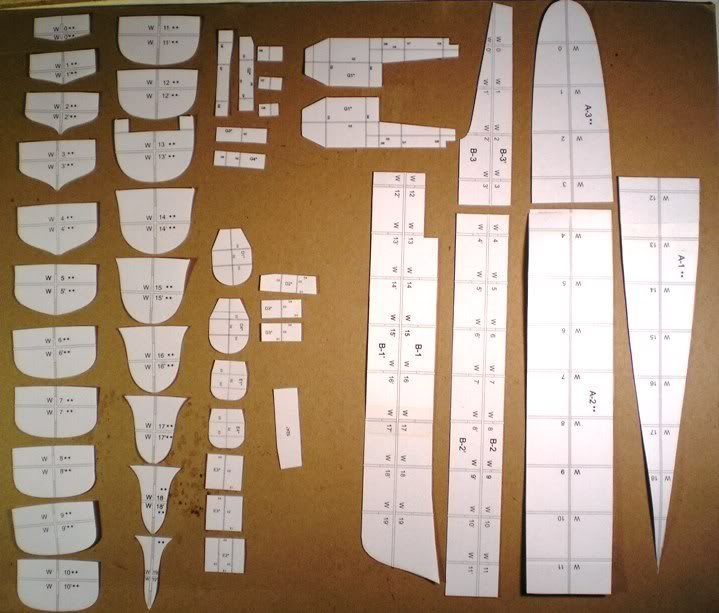 Being as curious as a pair of new parents, I wanted to see just how big my "baby" was going to be so I laid out the six vertical and horizontal forms for the keel and mid deck sections for a little measurement. I am proud to say that this is going to be a "big" girl at 26 and 1/8th inches long. Considering that most of my 1/700 scale efforts in styrene thus far have been a mere 6 to 7 inches in length for IJN Destroyers, this in itself is cause for celebration. 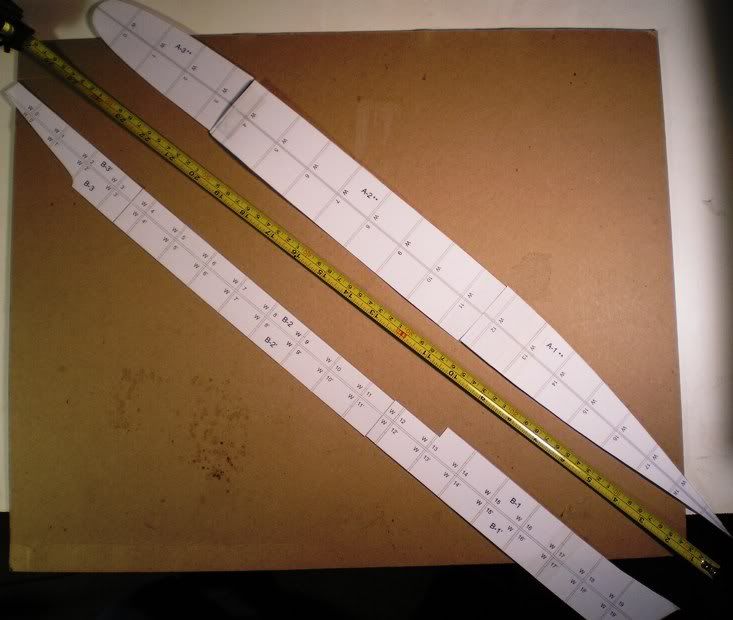 As I have discovered from my reading of the threads in the forums, these parts will have to be attatched to some sort of underlayment to form the actual parts. I work for the largest photography companys' here in Las Vegas and one of the divisions we have is the Wedding Sales Office. Part of the things they do is print and frame wedding photos for customers and for mounting these prints, they use various thicknesses of cardboard. We order the stuff precut in different sizes as well as thickness so I have a ready supply at hand since any that is damaged or cut off is just so much trash to them, it is a veritable gold mine of parts for me. Since the inner hull is such an important part of the build I have chosen some 2mm stock for my underlayment. I also have a quart sized can of DAP Weldwood Contact Cement that I will be using to bond the parts to the cardboard here in the next week. From there as you all know will be cutting and trimming to arrive at the parts to start my project. If any of you have any suggestions or comments I would appreciate hearing them, as I said, I am a newby at this form of modeling and want to get this project off to a good start. Jay Massey treadhead1952 Las Vegas, NV 
|
| Google Adsense |
|
#2
01-22-2009, 11:03 PM
|
||||
|
||||
|
Hi Jay,
Good luck with your build. I'm very much looking forward to it. I've got the kit too and I'm looking at it right now. Some of the frame parts aren't labeled for thickness but quite a few are and it looks like you'll need to use 1mm card for laminating. It seems to be basically the same kit as Modelik's Fuyuzuki and that calls for 1mm throughout the frame. If you look at the inside front cover to the lower right you'll see a key: b - laminate to bristol, * - laminate to 0.5 mm card & ** - laminate to 1 mm card. Thanks for posting the build! I love these Japanese ships 
__________________
Jim
|
|
#3
01-22-2009, 11:48 PM
|
||||
|
||||
|
Hi Jim,
Thanks for the heads up on the lamination key. I was wondering what the little asterisks printed on the plan forms were for. I was trying to judge the thickness by the slot cuts indicated on the forms. So what the heck is Bristol? I have seen it mentioned but not described as yet. By the way, I am completely blown away by your build on the Isuzu, had to read through the whole thing to date this morning. Jay Massey treadhead1952 Las Vegas, NV
|
|
#4
01-23-2009, 12:24 AM
|
||||
|
||||
|
Bristol board is similar to poster board that is available in the stationery sections of most department stores. You might also try manila folders as a good substitute for Bristol. I recommend you get yourself a good, flat board (or a piece of plate glass) to use as a building board for construction of the framework. Stick the hull base platform to the building board with small pieces of double-backed Scotch tape or those adhesive dots that most crafts stores carry. The big trick is to keep the base firmly held to a flat surface until the hull egg crate is glued together and thoroughly dried. Use a thin filleting knife to remove the framework from the building board (a second option is to run fishing leader between the framework and board (like using a cheese slicer). Nothing will hex a successful build faster than a twisted or bowed framework. If necessary, you could resort to pinning the platform to the building board, but getting the sucker unpinned after the deck is glued on gets pretty tricky.
__________________
It's not good to have too much order. Without some chaos, there is no room for new things to grow.
|
|
#5
01-23-2009, 05:27 AM
|
|||
|
|||
|
Jay,
Welcome to the hobby. I'm not a ship guy, but I DO love Japanese Navy, just the winged part :D I see that you cut out all the formers - it is easierto first laminate them to heavy cardboard and then cut them out. Which glue are you planning to use? Water based glues require some skill in applying to avoid warpage of the laminated parts...
__________________
Constructive criticism of my builds is welcome - if I messed up and allowed others to see it, I certainly deserve it  Michael Krol
|
| Google Adsense |
|
#6
01-23-2009, 07:14 AM
|
|||
|
|||
|
When they say Bristol usually they mean just laminitae to scrap paper of the same stock/thickness. Others can jump in on this, but that's my experiece.
__________________
Fred Bultman
|
|
#7
01-23-2009, 07:41 AM
|
||||
|
||||
|
Looking forward to watching you progress on this initial card build. Lots of good people here should be able to answer questions.
Mike
|
|
#8
01-23-2009, 08:02 AM
|
||||
|
||||
|
Jay -- Thanks for sharing your build with us.
I'm one of the ones who have an interest in Japanese warships and the Akizuki class were particularly interesting warships. I anticipate that this will be a very informative thread since you clearly have a lot of modeling skills to start with and yet are working your way through the basics of paper modeling. Your questions are sensible and should elicite a lot of good information. There is always something to be learned about the basic skills, as well as from those who can share the more advanced techniques. Welcome to the Forum and best wishes for this exciting and interesting build. Don Boose (boosed)
|
|
#9
01-23-2009, 09:31 AM
|
||||
|
||||
|
Quote:
__________________
Jim
|
|
#10
01-23-2009, 10:27 AM
|
||||
|
||||
|
Ahoy Shipmates,
Thanks for the warm welcome and speedy reply to my queries. I have some 1mm stock in the stash from the job so that is easily dealt with. I will have to drop by Office Depot to add some card stock to the stash for those parts requirements calling for Bristol. I will have to avail myself of Yahoos' Babelfish translation services with some copy/paste work to see if there is anything else I am missing on the instructions page of my kit. My fascination with IJN subjects is a long one, I have some 70 or so builds under my belt in styrene, mostly in the divine scale. Paper modeling seems to offer a much more interesting way to go into the larger scales which will allow for greater opportunities to detail things up a bit. As I am a newby and my skillset is a little on the light side for the moment, I plan on availing myself of the benefits of Photo Etched parts courtesy of Toms' Model Works for the railings, ladders, doors, hatches and other smaller parts I can get from his 1/200 scale IJN Destroyer Set, IJN Cables and Reels, and IJN Doors and Hatches. The last two offering enough items to do more than one or two builds. Since it is payday for me, I have also ordered two more kits from the Paper Models Store Website, answer Models 1/200 scale IJN Kiji, currently my screen saver from Sky Wave Models and their 1/200 Mutsuki Cargo Ship. In for a penny, in for a pound as they say. As to my last attempt at paper modeling that got perverted to a styrene scratch build using the plans from Digital Navy, I am not sure how Roman may have felt about it, but I had a lot of fun for about six months arriving at one of my favorite models to date. Hopefully taking my time with this project will yeild a similiar result. Here is a shot of what happened with my Admiralty Class "paper" model. 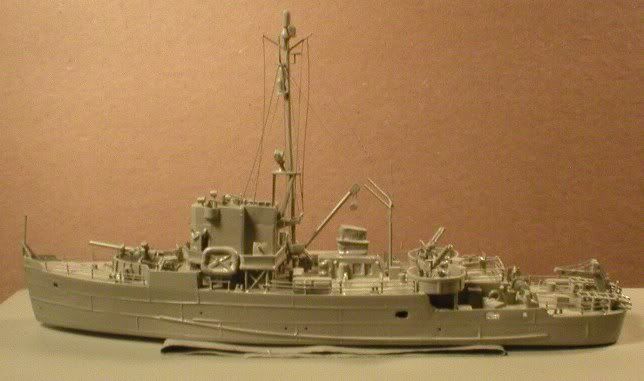 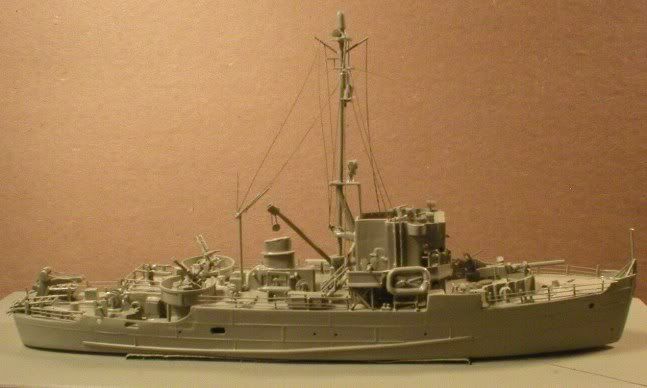
|
| Google Adsense |
 |
| Thread Tools | |
| Display Modes | |
|
|


 Linear Mode

