
 |
|
#1
|
||||
|
||||
|
USS Selfridge DD-357 Porter Class Destroyer
Hi All,
Being of unsound mind and shaky constitution, I have decided to set to work on yet another Destroyer model. This one as the title suggests being the USS Selfridge, DD-357, a Porter Class US Destroyer. The original ship was laid down in December of 1933, launched in April of 1936 and commissioned on 25 November 1936. Under command of Commander H.D. Clarke she performed her shakedown cruise in the Med in January and February of 1937. After returning to the East Coast of the US for post shakedown overhaul she participated in training exercises until she was called up for Presidential Escort Duty in September of 1937. She was released to go to the West Coast after that but before she made it through the Panama Canal she was recalled for another Presidential Escort in November of 1937. After that she did make it to the West Coast and spent two years there as Flagship of DesRon 4 in San Diego. She worked through training missions and Fleet problems until 1940 when she was reassigned to Pearl Harbor. On December 7th she was moored in Berth X-9 in Pearl Harbor having just returned from an Escort run to Palmyra Island. Five minutes after the attack of the Japanese aircraft she had her guns in action firing on the enemy. By 1300 she was under way with a mixed crew made up of members of more than a few ships patrolling off Oahu. She was assigned to the Air Craft Carrier Saratoga's Task Force, participated in the abortive attempt to relieve Wake Island and continued on with the Saratoga until she was torpedoed 500 miles out from Oahu. After escorting the stricken carrier back to Pearl she was assigned to other duties including escort of merchant vessels. After performing part of the escort for Saratoga back to Washington for permanent repairs to be made to the Air Craft Carrier she returned to Hawaii for more merchant ship escort duty. In 1942 she participated in training for the operations off of Guadalcanal and on August 7, 1942 she arrived in the Guadalcanal area to participate in the battles around the islands in that area. By the end of the month she was reassigned to the Australian Naval forces (TF 44) in the Brisbane area, continuing to operate with them in the Coral Sea to prevent the Japanese from making a successful landing in Port Moresby and covering Allied Shipping in that area. In May of 1943 she was reassigned to the 3rd Fleet and served with various task force units and in late September she escorted an LST convoy to Vella Lavella. She participated in nighttime patrols in the area to prevent the Japanese Naval forces from running up the Slot with reinforcements. On the night of October 6, 1943, the Selfridge, the O'Bannon and the Chevalier intercepted six Japanese Destroyers, three Destroyer Transports and several smaller vessels attempting to evacuate land forces from Vella Lavella. The Chevalier was torpedoed and damaged beyond repair having to be sunk by and American torpedo the next day and the Selfridge and O'Bannon both were heavily damaged. The Selfridge by torpedo and the O'Bannon by enemy action and a collision with the Chevalier after she was damaged. The Selfridge received temporary repairs at Purvis Bay and Noumea including a temporary bow structure to get her back to the West Coast of the US where she was permanently repaired with a new bow and rearmed with a complete new armament system at Mare Island. She soldiered on through 1944 in the Pacific participating in many actions with various Task Forces. In August of 1944 she was ordered back to the Atlantic. She participated in Convoy Escort duty through 1945 until the end of hostilities with Germany. She returned to New York on 7 June 1945 then performed training and upkeep exercises until September when she returned to New York to prepare for inactivation. She was decommissioned on 15 October 1945, struck from the Navy Lists on the 1st of November and finally sold for scrap in October of 1947. I purchased the old Pro Model of the ship a while back and when Mike at Gremir Models came up with her in the Late 1944 paint job I bought it again. I much prefer Mikes' offerings as I can just print them right off of my home printer and enjoy as many copies of the various parts as I require to perform various tricks and details. I also found a set of gun barrels for the USS Porter from one of the Polish kit suppliers that I use. A few 20mm Oerlikon single mounts will also come in handy as well as a some 40mm Bofors barrels. I started off by printing and laminating the hull formers then gluing them up to the proper shape. 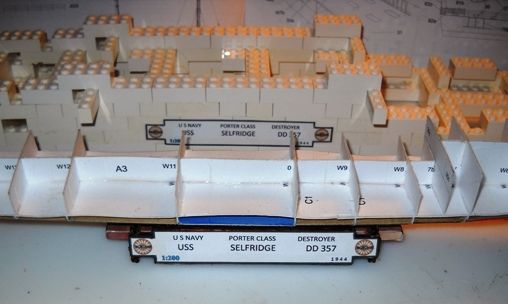 While I like the base that Mike provides with his kits, I also like to make up a Lego form to handle building duties as I add parts to the hull form to help it keep it's shape prior to adding the hull plates, sides and decks. Adding strips of cardboard to the bottom of the hull form makes for a much sturdier model. I was always denting them before doing this. I also added balsa wood to fill out the rest of the hull and deck areas to give me something a bit more formidable to glue things to. 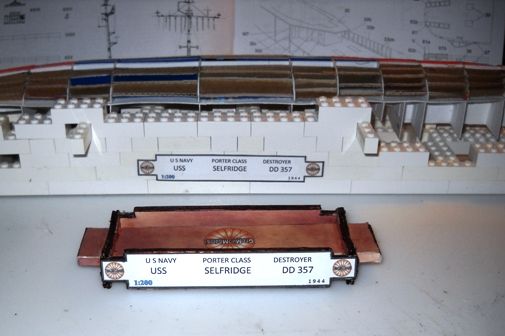  Once the hull form is filled out I can start adding the hull bottom plates, sides of the hull and decks.  
__________________
Jay Massey treadhead1952 Las Vegas, NV |
| Google Adsense |
|
#2
|
||||
|
||||
|
Outstanding!
I'm delighted to see another Treaty-era U.S. destroyer on the ways. Many thanks for the ship history, Jay. Although I think the Porters looked their best in the pre-war fit, the 1944 version with the reduced main armament, multitudes of 20mm and 40mm, and the (to my eye) beautiful late war disruptive color scheme is both historic and eye-appealing. Looks like a great start. Don |
|
#3
|
|||
|
|||
|
Have you experience with building a Gearing Class DD?
I am trying to build up the gumption to try converting the ECards Higsbee (DDR) to Rupertus (DD). Have scanned some of my father's photos of the Rupertus. My initial attempt at the full hull looked like a snake, so I am leaning towards a waterline model... |
|
#4
|
||||
|
||||
|
Thanks Don, always fun to start another project and with a somewhat short lived ship (from launch in 1937 to breaking up in 1947) that was so rich in her history, it is always interesting. The Treaty Era US Navy ships were limited in what they were allowed to carry, but getting so damaged in combat, the Selfridge got rebuilt with a completely refreshed weapons suite in the last year of the war. And who could resist such an interesting paint job as the disruptive scheme she carried.
Aansorge, I also have the USS Higbee model from E Card Models to be built one of these days. One of the problems that I have discovered with most ship models in 1/200 scale is once you construct the hull form, it is difficult to keep things straight. Just from gluing things together to the vagaries of weather conditions can cause them to warp and twist in some mighty weird ways. The cure for these ailments for me is to use card board and balsa wood to fill the voids in the hull form to provide a much more solid platform to add the rest of the parts to. Here is the hull former for the IJN Kiji, a small torpedo boat model that once I got the forms put together, before I had a chance to do much else with it, things rapidly tweaked right out of shape. 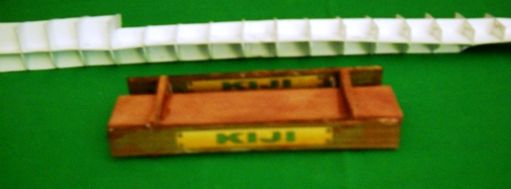 This is what I do to these things to keep them straight long enough to plate over the basic form with the bottom hull plates, side panels and decks. Cutting up sections of card board from shoe boxes, old model kit boxes and such items then gluing them into the hull former to stiffen and keep things straight makes them stay nice and straight. Once the outer plates are added it also makes handling these parts a whole lot easier, no collapsed sections or dented in areas as the whole thing is much more solid. Using Balsa Wood to fill up the upper areas and front and rear on the bottom also allows you to sand these down smooth with the formers to follow the shape of the hull to be filled out yet keep it straight and doesn't allow it to get tweaked out of shape. 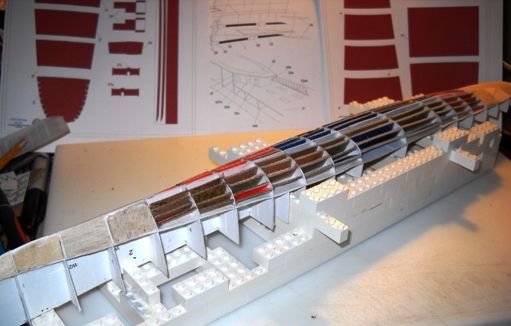  Yes, it does take some time to do all this additional work, but the benefits of not having a hull that gets dented up and warps at the drop of a hat while handling it to complete the construction are far better than the hollow hull shape. 
__________________
Jay Massey treadhead1952 Las Vegas, NV |
|
#5
|
|||
|
|||
|
Hey Jay,
Glad to see the modeling urge is on the mend also. This looks like another interesting build I will follow. John O |
| Google Adsense |
|
#6
|
|||
|
|||
|
Jay,
Great job so far. Provided kit stand is more for the display purposes than acting as dry dock to build the ship, but I see you have great solution for that - aren't those Legos wonderful? 
__________________
Constructive criticism of my builds is welcome - if I messed up and allowed others to see it, I certainly deserve it  Michael Krol |
|
#7
|
||||
|
||||
|
Hi Guys,
Yep, Legos are a model builders answer to a number of issues. I still like your provided model stands Michael. I will even admit to using the design for ship kits that lack a better stand. Of course, repurposing requires a bit of creative redesigning of the name plate. but that is easily accomplished. In case any of you can't tell, I am wa-ay sold on Gremir Models stock of ships and aircraft. 
__________________
Jay Massey treadhead1952 Las Vegas, NV |
|
#8
|
|||
|
|||
|
Thanks for the insight. There can be no arguing with your results (from blocking the hull).
Now I am looking forward to the winter. |
|
#9
|
||||
|
||||
|
You are most welcome.
I too look forward to the winter months for my modeling habit. The spring, summer and fall are all spent shooting, fishing and having fun out of doors. 
__________________
Jay Massey treadhead1952 Las Vegas, NV |
|
#10
|
||||
|
||||
|
After having some fun with working on the unit motivation equipment with this one, I got the propellers installed as well as the rudder and the tail end of the keel and the two side rails on the lower hull. There was only one real issue that I was having at that point. The color of the lower hull was a sort of dull brownish red that really didn't fit with the red lead that most ships carried. I have had this problem with a couple of ships in the past and decided to do something about it on this one.
I had to go pick up some fine brass rod to use for the stanchions around the deck at the local hobby store and while I was there I scored a bottle of Anti Fouling Red from the Model Master Acryl line of paints. I used a wide brush and went over the whole lower hull and parts to change the color to something that suits my tastes a bit better than the brownish red that came out of my printer. I used Model Master Metalizer in Steel and Brass for the shafts and propellers. While the Anti Fouling Red color will require a shot of some Dull Cote out of a rattle can to tone down the shine, I prefer the color change. 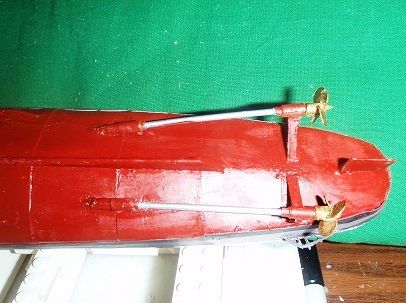
__________________
Jay Massey treadhead1952 Las Vegas, NV |
| Google Adsense |
 |
|
|