


|
|
|
#1
 11-28-2023, 04:58 AM
|
|||
|
|||
|
Pogoria (JSC, 1/100)
What, Siwi is posting in the ships section?
For something different than aircraft I am building the JSC kit of the Polish barkentine Pogoria. I chose this model because: It is a beautiful ship, and we don't see so many models of large sailing ships; the kit was very good value at only about £7 (I did get the lasercut parts and the wooden deck as well); and it will be a good way to acquire some new skills but not be too much difficulty overall. I have only found one other (unfinished) build thread on a Polish forum, so I include plenty of pictures for anyone else making this. The kit is from 2007 and is modern quality, with crisp computer-drawn lines and clear printing. Full marks there. Instructions are in Polish and in clear idiomatic English, including all the correct terms for the sails and ropes, and graphic diagrams. The parts are on thicker paper for the main part of the ship and thinner sheets for the sails so they are realistic. It will be required to make the masts from wood and to make the ropes and rigging from templates. The ship itself dates from 1980 and is a sail training ship, built as a barkentine. This means it has a square-rigged foremast with yards and sails perpendicular to the direction of the hull, and the other two masts have triangular sails that are moreorless parallel to the hull. The ship also has a small engine for docking and calm conditions. The first part of construction is likely familiar to ship models: the 'egg box' of the framework that will give a strong and stiff structure. As this is a waterline model I plan to display this ship on a sea base, and so stuck a piece of mounting board under the bottom to give it more strength and so it can be slotted into the eventual diorama base. Most of the formers are self-explanatory, only the ones at the stern and bow are a little different. The prow has some rope attachments that need to be strengthened: whilst the kit says to put metal sheets in, I used superglue to harden them and drilled out the holes with micro drill bits, and coloured them metal with a marker pen. Overall this is a very well engineered kit and the former structure is very strong. I did find a tiny mistake in the instructions which prints to use part '56' rather than 5 and 6. You can see in the last picture how the deck is curved convex both left-right and also concave between bow and stern. I am already learning more about ship design from this model.  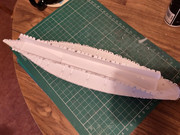       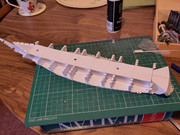  
__________________
Currently in the hanger: Thaipaperwork Martin B-26 'Flak-Bait' In the shipyard: JSC barkentine 'Pogoria' Recently completed: TSMC F-16, S&P Kawanishi N1K1 Kyofu diorama 
|
| Google Adsense |
|
#2
11-28-2023, 06:53 AM
|
||||
|
||||
|
Looking forward to it.
Since I was not familiar with this ship, I found some information and a photo of Pogoria. Elegant looking ship. I think the biggest challenge will be the masts, sails and rigging. Mike
|
|
#4
12-03-2023, 08:28 AM
|
|||
|
|||
|
The deck comes in two halves due to its size. There is an wider lower deck and then the planked section on top, plus the modeller has to make over 40 brackets to hold ropes later on, with are pushed through from below. Rather than trace the templates to many times and use metal, I scanned them with a ruler, resized to correct size and duplicated them digitally. They then need painting. You also get to learn some Polish doing this!
The wooden deck is a great addition for realism. It does have a join line as it comes in two parts probably because of the size of a laser cutter, and tends to curl the wrong way when glue was applied, but I got it well stuck with superglue. I also gave it a wash with diluted grey for more realistic colour and to hide the wood grain of the balsa and bring out the panel lines. This did cause some warping but luckily this disappeared when it dried out. Also cut out the parts from the card deck parts that were not planked and stuck them in the openings, since we need the colour and the guide marks for deck details later. You can see in the last image the difference between card and wooden decks. The deck edging seemed a bit too bright so I painted over the orange with vermillion to get a shade more like that in reference images and a tiny bit of wear from being walked on and repainted. Might depend what light conditions the real ship was photographed in.       
__________________
Currently in the hanger: Thaipaperwork Martin B-26 'Flak-Bait' In the shipyard: JSC barkentine 'Pogoria' Recently completed: TSMC F-16, S&P Kawanishi N1K1 Kyofu diorama
|
|
#6
12-03-2023, 11:23 AM
|
|||
|
|||
|
JSC offer it as an accessory to the kit, and lasercut small parts are also available.
__________________
Currently in the hanger: Thaipaperwork Martin B-26 'Flak-Bait' In the shipyard: JSC barkentine 'Pogoria' Recently completed: TSMC F-16, S&P Kawanishi N1K1 Kyofu diorama
|
|
#7
12-03-2023, 06:32 PM
|
|||
|
|||
|
Fascinating project. Hatsoffti you forgoing for a sailing ship, its the rigging that gives it the wow factor but I think it could be an Oh, God
. Factor as well!
Many moons ago I assembled a Heller Thermopylae tea clipper. Had my doubts if Id complete it, but complete it I did and was very proud of it!
|
|
#9
12-06-2023, 05:07 PM
|
|||
|
|||
|
The next stage was making the sides of the hull. On the one hand these are a big step as the hull looks like it could float, on the other gluing such a big piece in place would be a challenge.
First the transom is added to the stern, this lined up almost perfectly. I cut the openings (for mooring ropes I guess) and added the inner red-orange strip. The sides come in two pieces to fit on the printed sheets and are joined by a seam. This is fairly well hidden as the parts are butt joined close together, and the print also avoids an ugly black cut line and instead indicates where to slice at the edges of the parts. The portholes are printed but I always wanted them to look better so I cut them out and added film to the reverse side with tape. Now they catch the light like real windows. I cut away some parts of the glue tabs so they would not be right behind the portholes. At the front the opening for the anchor must be cut and the shaft and surround slotted in. More intelligent design here as the overlap in parts means the bow can be bent to conform to the formers later without damaging this structure. I did paint some subtle chipping and corrosion here but it is very subtle indeed. Next the kit says to add three rope stays - it would have been easier to cut the slots for these before the anchor hawse. Finally, and again out of instruction order, the inside strips are added, again in two halves to fit on the printed sheets. Then came the big operation - glueing the side to the hull. I did some test fits with masking tape to check and then started gluing from the bows. It is more important to get the bow lined up with the chain loops that stick out, and also to allow a small overlap so the skin can curve around the former at the very prow of the structure. Gluing in stages, I worked backwards, checking the stern colours were still lined up. As it turned out there was a small overlap when I got to the stern, so I trimed it away slightly and used fingernail to burnish it around the corner with the transom. With the extra base layer the bottom glue tabs don't fold over where the score line is, so I just bent them under. This and other untidiness will all be hidden when slotted into the display base at the waterline... You can see that the attachement process has caused the 'starving horse' effect of the skin being buckled against the formers. Normally I would try to avoid this, but here it adds to the realism as the real ship has this quite noticibly, where waves have stressed the metal. This is shown quite clearly on the cover photo of the kit.   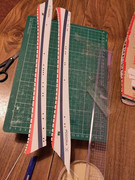     
__________________
Currently in the hanger: Thaipaperwork Martin B-26 'Flak-Bait' In the shipyard: JSC barkentine 'Pogoria' Recently completed: TSMC F-16, S&P Kawanishi N1K1 Kyofu diorama
|
 |
| Tags |
| 1/100 scale, jsc, sailing ship |
| Thread Tools | |
| Display Modes | |
|
|


 Linear Mode

