PaperModelers.com

Go Back   PaperModelers.com > Card Models > Model Builds > Ships and watercraft

Reply
 
Thread Tools Display Modes
  #51  
Old 05-14-2018, 06:23 PM
PaperLab PaperLab is offline
Member
 
Join Date: Nov 2007
Location: Toronto, Ontario
Posts: 121
Total Downloaded: 0
What you did is very hard to accomplish but you managed an excellent result. Impressive.

Returning back to that scarf joint. I draw another diagram which should make things obvious... I hope... It also shows V-grooves instead of scoring on the outside which usually damages printed color. Cutting V shaped groove on the inside, assuming you won't cut through, make folds look much cleaner and preserve color continuity.

And regarding hull assembly, there is another method of fake ribs and fake skin. Basically you trace rib outlines and laminate those transparencies on 1 mm thick card stock cutting around .5 mm off the outside edge allowing fake skin made out of .5 mm or less card to be inserted between ribs and flash with their outer rib edge.

It's time consuming and bit tricky but if done well you'll end up with solid base on which proper hull skin can be applied to. Sometimes cautious sanding and even additional laminating might be required in order to achieve smooth and continuous hull curvature.

It's similar to what I'm trying to accomplish when providing 3D printed Hull Core for my project, except in above scenario you doing it on your own using paper...

Darius
Attached Thumbnails
S.M.S. Emden (1910), HMV, 1:250-scarf_joint.jpg   S.M.S. Emden (1910), HMV, 1:250-fakeskin.jpg  
__________________
Paper Lab
Reply With Quote
  #52  
Old 05-15-2018, 02:10 AM
drg drg is offline
Member
 
Join Date: Nov 2012
Posts: 291
Total Downloaded: 0
Quote:
Originally Posted by PAPER FAN View Post
Angry, com is my phone auto correct for eggcrate.

Thanks rickstef perfect definition. The hull is beautiful and expect the ship will be a masterpiece.

Thanks for the clarification!
Reply With Quote
  #53  
Old 05-15-2018, 02:16 AM
drg drg is offline
Member
 
Join Date: Nov 2012
Posts: 291
Total Downloaded: 0
Quote:
Originally Posted by PaperLab View Post
What you did is very hard to accomplish but you managed an excellent result. Impressive.

Returning back to that scarf joint. I draw another diagram which should make things obvious... I hope... It also shows V-grooves instead of scoring on the outside which usually damages printed color. Cutting V shaped groove on the inside, assuming you won't cut through, make folds look much cleaner and preserve color continuity.

And regarding hull assembly, there is another method of fake ribs and fake skin. Basically you trace rib outlines and laminate those transparencies on 1 mm thick card stock cutting around .5 mm off the outside edge allowing fake skin made out of .5 mm or less card to be inserted between ribs and flash with their outer rib edge.

It's time consuming and bit tricky but if done well you'll end up with solid base on which proper hull skin can be applied to. Sometimes cautious sanding and even additional laminating might be required in order to achieve smooth and continuous hull curvature.

It's similar to what I'm trying to accomplish when providing 3D printed Hull Core for my project, except in above scenario you doing it on your own using paper...

Darius

It makes sense, but I still can't imagine being able to do it on such thin paper. I'll try it on some scrap.


I guess the other way would be to apply strips to the ribs in order to form a bigger surface area to apply the sides to. I think some of the larger HMV models might use that method?
Reply With Quote
  #54  
Old 05-19-2018, 03:09 PM
PaperLab PaperLab is offline
Member
 
Join Date: Nov 2007
Location: Toronto, Ontario
Posts: 121
Total Downloaded: 0
Those who warned about rubber glue coming apart were correct I'm afraid. Few months back I started test builds of my new design, just a quick proof of concept, printed straight out of the CAD without adding any colors and than many tabbed elements were joined by means of rubber cement only. Six months later I can see these joints are now starting to separate. If I press them back they hold except couple of days later they move apart again. Not a good sign. Be careful with your model.

Darius
__________________
Paper Lab
Reply With Quote
  #55  
Old 05-20-2018, 04:48 PM
drg drg is offline
Member
 
Join Date: Nov 2012
Posts: 291
Total Downloaded: 0
Quote:
Originally Posted by PaperLab View Post
Those who warned about rubber glue coming apart were correct I'm afraid. Few months back I started test builds of my new design, just a quick proof of concept, printed straight out of the CAD without adding any colors and than many tabbed elements were joined by means of rubber cement only. Six months later I can see these joints are now starting to separate. If I press them back they hold except couple of days later they move apart again. Not a good sign. Be careful with your model.

Darius
Thanks for the update. I must admit I was a bit wary of it after testing on scrap, but found it useful as an alternative to strips of masking tape to hold things in place before committing to PVA. Funnily enough I put it in my ‘not often used’ container in my modelling cupboard only this morning...
Reply With Quote
Google Adsense
  #56  
Old 05-23-2018, 03:59 PM
drg drg is offline
Member
 
Join Date: Nov 2012
Posts: 291
Total Downloaded: 0
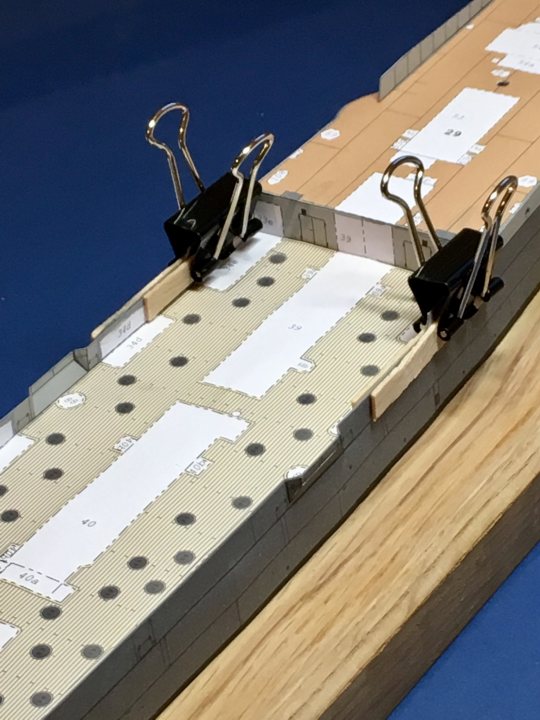
Main deck inner sides are on, including the gun bulges. I used some wooden strips clamped with bulldog clips to keep the sides ship shape while the glue set:


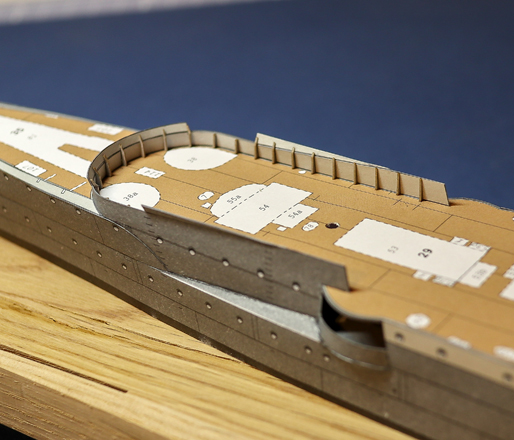
And the upper deck inner sides, fillet plates and water deflector:


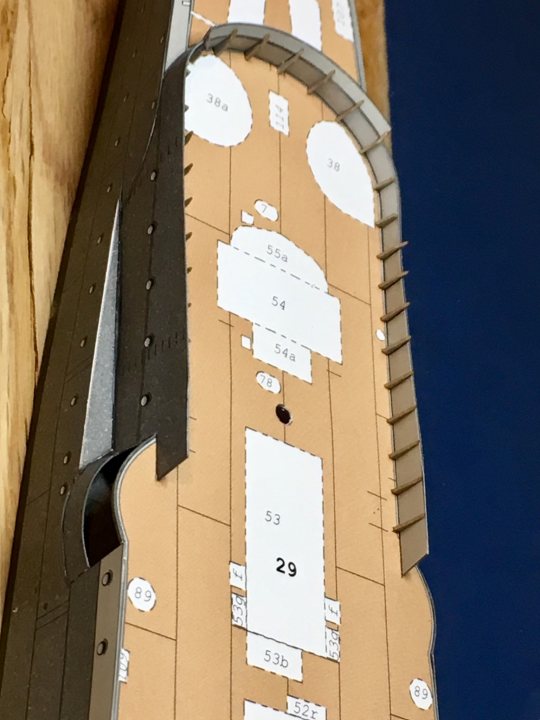
Still got some angled strakes to fit to the top side edges.
Reply With Quote
  #57  
Old 05-23-2018, 08:06 PM
Doug J Doug J is offline
Member
 
Join Date: Sep 2008
Location: Northeast Ohio
Posts: 404
Total Downloaded: 205.96 MB
You've got a sweet build going!!
Reply With Quote
  #58  
Old 05-24-2018, 04:39 PM
drg drg is offline
Member
 
Join Date: Nov 2012
Posts: 291
Total Downloaded: 0
Angled strakes fitted:


The original inner pieces were incorrectly marked for the stiffeners so I cut them off and made new ones from spare light grey paper.
Reply With Quote
  #59  
Old 05-25-2018, 02:01 PM
PaperLab PaperLab is offline
Member
 
Join Date: Nov 2007
Location: Toronto, Ontario
Posts: 121
Total Downloaded: 0
Great looking hull. It's fascinating watching your methods working with this not too easy model.

Darius
__________________
Paper Lab
Reply With Quote
  #60  
Old 05-25-2018, 02:10 PM
drg drg is offline
Member
 
Join Date: Nov 2012
Posts: 291
Total Downloaded: 0
Quote:
Originally Posted by PaperLab View Post
Great looking hull. It's fascinating watching your methods working with this not too easy model.

Darius
Thanks! It’s certainly lives up to its “very difficult” rating, but enjoyable none the less.

BTW there’s a model design related grumble/question incoming in my next update... :-)
Reply With Quote
Google Adsense
Reply


Posting Rules
You may not post new threads
You may not post replies
You may not post attachments
You may not edit your posts

BB code is On
Smilies are On
[IMG] code is On
HTML code is Off

Forum Jump


All times are GMT -6. The time now is 04:50 PM.


Powered by vBulletin®
Copyright ©2000 - 2024, Jelsoft Enterprises Ltd.

Parts of this site powered by vBulletin Mods & Addons from DragonByte Technologies Ltd. (Details)
Copyright © 2007-2023, PaperModelers.com