


|
|
|
#1
 07-16-2007, 05:36 AM
|
||||
|
||||
|
Geebee R1 1/33
Ok - so after muddling around with some other builds, I realized that I really want to build planes. I have the most experience with them and have always felt they were the coolest models. So, in order to get back to speed, I printed out the free GeeBee R1 from Gremirmodels.com. At this point I'd like to thank Gremir Models and the designer for allowing this model to be a free download. I'm having great fun building it.
Now - there are numerous build threads out there on this model, and I'm certainly not going to add anything to those builds - so this won't be a full build thread. I did want to post up some pic's of the cockpit, since it gets closed up pretty tight and won't really be seen once it's installed in the fuselage. 
|
| Google Adsense |
|
#2
07-16-2007, 08:46 AM
|
||||
|
||||
|
Neat start - This has been on my 'to do' list for a while (and will prpbably stay there for another while.... too many models, not enough time :( )
__________________
Cheers Mark
|
|
#3
07-16-2007, 09:24 AM
|
|||
|
|||
|
Quote:
All credit should go to the designer, Rafal Ciesielski - I only provided a bit of server space for this little gem 
__________________
Constructive criticism of my builds is welcome - if I messed up and allowed others to see it, I certainly deserve it  Michael Krol
|
|
#4
07-17-2007, 06:56 AM
|
||||
|
||||
|
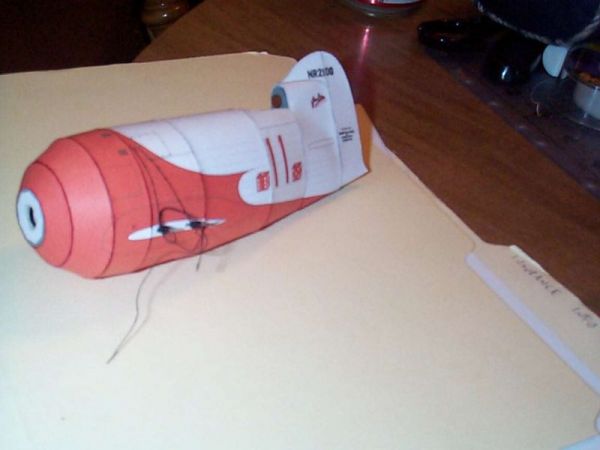
Well, ran into my first issue with this build yesterday. It was my own fault - in my haste to get started I laminated the formers too thick (about 1.5mm). Where I ran into troubles was assembling fuselage part #4. Specifically one of the rigging holes was over the former. In order to get around this, I used a straight pin and bored into the former. I then took my black thread, soaked the tip in glue and forced it into the former on both sides, gluing it into place. I think I have them sturdy enough - but I may drop a bit more glue in the hole to be sure. I cut them pretty long to be sure I can string them the rest of the way around. Sorry - no pic's, was tired and was just doing the one part before I went to bed (that's always when you run into problems, isn't it
). Now I'll have a fuselage with long strings of thread hanging out. Since the one set ended up this way, I may go ahead and start the other rigging now while that piece is separate and it's easier.
|
|
#5
07-17-2007, 08:14 AM
|
|||
|
|||
|
Ouch! Thick formers may also give you problems when installing the cockpit. It is a snug fit to start with and was difficult for me because of my slightly overthick formers ahead and behind the cockpit.
|
| Google Adsense |
|
#6
07-17-2007, 08:25 AM
|
||||
|
||||
|
I'm hoping it won't be an issue. My plan is to glue the cockpit to the back former, cut out that section (6?), wrap the former with the joining strip , and then position the front former on the cockpit based on the front of the cockpit section. Then when that former is glued, wrap section 6, then I'll be able to wrap section 5 and then join this whole assembly with the front section. The reasons why I think this will work is 1) I can fudge the instrument section of that former since it gets cut off and 2)I'll base the position of that former off the length of the section that's wrapping it.
If I can't make it work, I may get out a single edge razor blade and shave thickness from the formers - but I'm going to dry fit everything and see if I can make it work.
|
|
#10
07-26-2007, 10:37 AM
|
||||
|
||||
|
That's a beautiful looking plane! Keep posting the details, please!
|
| Google Adsense |
 |
|
|


 Linear Mode

