


|
|
|
#11
 06-02-2012, 08:39 AM
|
||||
|
||||
|
Create a Word document (or a powerpoint slide) and paste the jpeg into the document. In Microsoft products, you can then format the inserted picture to a specific size (right click on the inserted picture and chose format picture from the options, use the size tab). I assume just about any other graphics or word processing program has a similar feature for sizing pasted in pictures.
Yogi 
|
|
#12
06-08-2012, 09:33 PM
|
||||
|
||||
|
Cmags hit the nail on the head.
Used to print several photos, some were ortho-rectified, some weren't. These photos were of project areas. To get them to work properly they had to be scaled, the only way to do that was to measure photo and multiply the dpi count times that number. Mike
__________________
Cardstock Property Tables and Terms Flying Cardstock Models http://www.papermodelers.com/forum/m...uers-projects/
|
|
#13
06-09-2012, 06:57 AM
|
||||
|
||||
|
There is also a twist and that I had some improvements made to some parts and when I got the files back, I had to experiment. I really do not want to experiment. If you print a PDF file in 100% it really prints it in 100%, so I don't understand why it is different for a JPEG file.
I may have to purchase a copy of Photoshop. Thanks Isaac
__________________
My gallery [http://www.papermodelers.com/gallery...v-r-6&cat=500] Recent builds  Meteor F1, Meteor F8, Mig-Ye8, NA Sabre, A-4E Skyhawk,Mig-15 red, Mig-17 repaint Meteor F1, Meteor F8, Mig-Ye8, NA Sabre, A-4E Skyhawk,Mig-15 red, Mig-17 repaint
|
|
#14
06-09-2012, 07:17 AM
|
||||
|
||||
|
I'm also a little confused here.
If you print an image file at 100%, it will print at 100%. Question being...what exactly is 100%? 100% usually relates to the real world dimensions of the image. What are the original dimensions of the image? I think this is what cmags was getting at. Just because an image is 1024x768 on your screen, that doesn't relate to inchesXinches in the real world. ...unless you know the actual dpi and the print dpi. Make sure your print output is 100% but also make sure there is no other scaling options being used.. eg "print/fit to page" If you need to resize your image before printing to get a specific output size then check and adjust the dpi. A 4" x 6" photograph at 72dpi requires a 288 x 432 pixel image. ...print at 300dpi, and you need a 1200 x 1800px image You may need to up the dpi to get a larger print image but remember this affects the visual quality of the image too.
__________________
SUPPORT ME PLEASE: PaperModelShop Or, my models at ecardmodels: Dave'sCardCreations
|
|
#15
06-09-2012, 07:59 AM
|
||||
|
||||
|
Guys
Here is a little excersize for you all. Put a small thin ruler ( scale ) on your scanner bed. Scan it and save as .jpeg format. Print it at 100% with no other options like fit to page etc. Then lay your ruler on it and see what the difference is. This is not rocket science I know. It is just frustrating. What is more frustrating is if you do not know what the original size of the scan is. Anyhow, thanks for all your input. Isaac
__________________
My gallery [http://www.papermodelers.com/gallery...v-r-6&cat=500] Recent builds Meteor F1, Meteor F8, Mig-Ye8, NA Sabre, A-4E Skyhawk,Mig-15 red, Mig-17 repaint
|
| Google Adsense |
|
#16
06-09-2012, 10:02 AM
|
||||
|
||||
|
If you don't know what the original dimensions are,
then why are you determined to print it at 100%? You must be trying to achieve a certain output size or scale. You must be assuming that the image you are looking at is a certain size or scale. If you don't know the original image size or scale then I have no idea why you are worrying about printing it at exactly the same size(100%). Realistically you need to print it at the scale or dimensions that you need. re: your exercise. I just recently scanned the face of my Laptop. I scanned it at 100%, and 300dpi. I then imported that image into Coreldraw and used it to draw a vector template over the image. (I am creating a decal to cover up the entire worn face of my Laptop.) The Corel layout is 300dpi...thats the only important thing I have to worry about, since my scan was at 300dpi. If I print the vector template that I have now created, without any scaling or resizing yes...it comes out at exactly the same scale as my Laptop. With exactly the same dimensions (100%)! If your Ruler scan does not reprint at 100%, then somewhere along the process you are changing a scale or dpi or dimension. When you save your Ruler scan as a jpeg...are you saving it at the same dpi as your scan dpi? If not, you could run into a problem with maintaining the same dimensions.
__________________
SUPPORT ME PLEASE: PaperModelShop Or, my models at ecardmodels: Dave'sCardCreations
|
|
#17
06-09-2012, 04:22 PM
|
|||
|
|||
|
Quote:
absolutely. and then take a sharpie and right on the scanner, what result you get when you scan to jpg. for example I know if I scan a ruler at 300dpi on my scanner, take that image and print it at 100% from paint shop pro and then hold up my ruler back up to the printed image, I know for sure what its off by. I keep resizing the image by 110%, or 93% whatever until the ruler prints out exactly correct. At that point I write the instructions down right on the top of scanner: 1) scan at 300dpi image mode. 2) open resulting image in paint shop pro, 3) resize image to 93% 4) print at 100% using paint shop pro. P.S. On the inside of my paper tray on my cheapie laser printer, I write down which way to put the odd numbered sheets I just printed so when I print the even sided sheets of paper in 2 sided printing they align correctly.
|
|
#18
06-09-2012, 04:30 PM
|
||||
|
||||
|
You can always tell the Blonde in the Office.
Just look for the Monitor with WhiteOut all over the screen. (or in this case, on the Scanner bed? lol)
__________________
SUPPORT ME PLEASE: PaperModelShop Or, my models at ecardmodels: Dave'sCardCreations
|
|
#19
06-13-2012, 11:20 AM
|
|||
|
|||
|
@Isaac
if you print through the Photoshop, go to File -> Print with Preview, then in the dialog window uncheck (!!!) the option Scale to Fit Media to avoid scaling down. If you scanned your model at 300dpi, you should have exactly 2480x3508 pixels (if it's A4 paper size). If the resolution is 300 dpi, but pixels are little more or less than nessesary, create in Photoshop new A4 sheet with 300 dpi (the software automatically will create one 2480x3508), cut the details from scanned sheet (or if you made some improvements, color ajustment etc... doesn't matter) and paste them to the new created sheet. Layers can be merged down with Ctrl+E. Then go to print (after unchecking the Scale to Fit Media!) and printed sheets with details should be the same as in magazine. Of course, if your scanner doesn't "lie" with dimentions. If you print through the CorelDRAW, create a new sheet A4, then go to File -> Import and import your *.jpg sheet. Then File -> Print -> OK (but remember about Color Management, I just turned it off - in Tools -> Color Management) That's all. Very simple. ... Word, Excel are not reccomended for quality printing Cheers!
|
|
#20
06-13-2012, 12:46 PM
|
||||
|
||||
|
Quote:
First, check your scanner input resolution - in this case, 300dpi for photo: 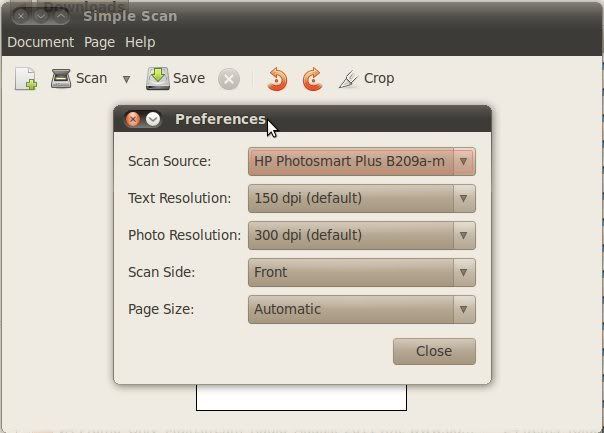 Next, scan your file and save the image as a jpg. I chose to crop to Letter size (8.5x11) 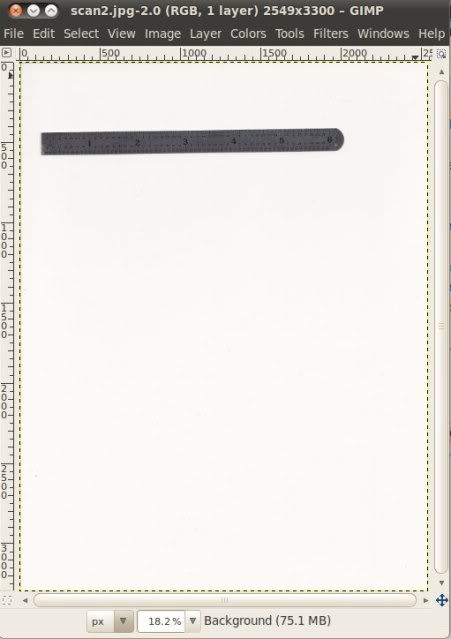 Here we can see the page size properties - note that the scanner software was off from the 8.5" measurement by a few pixels, but the resolution is still 300dpi and that's what's important. If it's not (like for example it sets its default reso'ution to 72dpi, you'll see that the page measures something like 35 x 45"), just change the resolution. 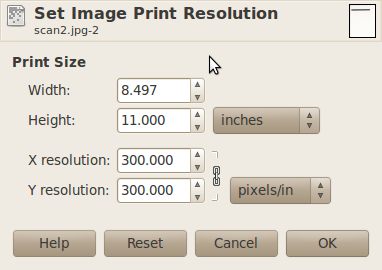 Next you check your print settings to confirm it's set to 100% and that the resolution stays 300dpi: 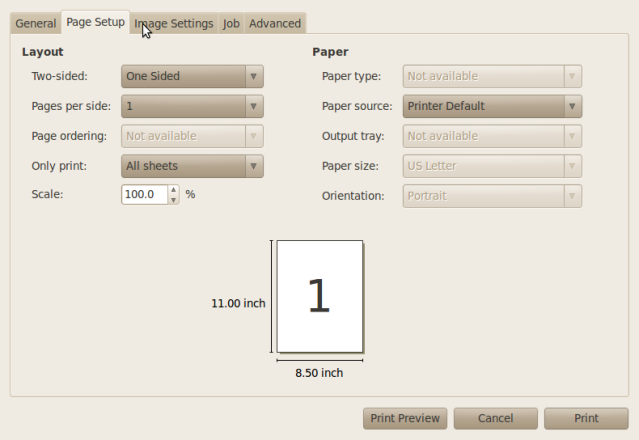 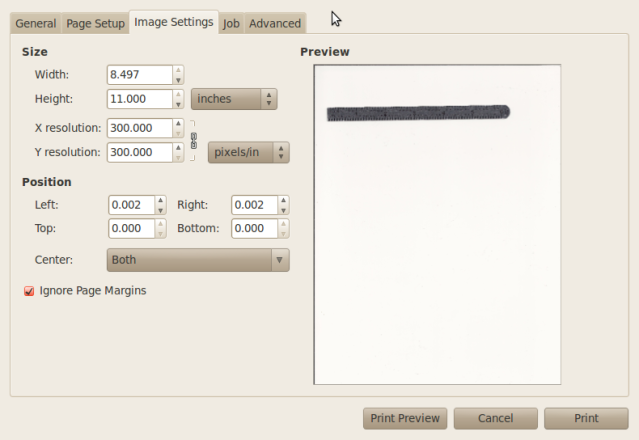 And your result when you print is exactly the same size as the original: 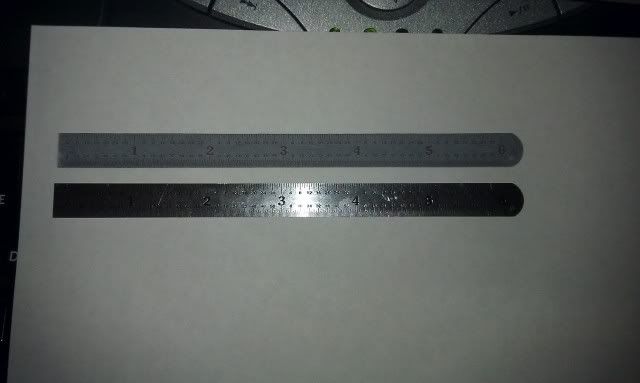 Now, when you don't know the original resolution, you can make some educated guesses. You can usually make an assumption that the original scan was either an A4 or Letter page, of which measurements you know. Plug those into the print size properties dialog and see what resolution results. Often it will come out something like 298 or 302. You can then assume the resolution was actually 300, and that the crop is just missing a few pixels off the edge or that some space around the page was scanned too. Hope that helps! By the way, this was all done on Linux using GIMP - a free image editing program available for Linux and Windows. 
__________________
Put on hold build (someday I'll finish): F-35A Lightning II 1:72 Previous builds: cMags' Card Model Builds
|
| Google Adsense |
 |
| Thread Tools | |
| Display Modes | |
|
|


 Linear Mode

