


|
|
|
#1
 03-11-2014, 10:26 PM
|
|||
|
|||
|
Tutorial/Techniques needed
Hi all...
I am going to be building a model that has components similar to the latticed girders seen in the Eiffel Tower and the Oakland Bay Bridge. The scale is pretty small, and I wanted to find a tutorial here on the exact steps and techniques to apply CA to the paper, to stiffen and harden it, but I couldn't find anything other than people saying "Oh, I used CA to stiffen it" but they didn't say exactly how. My first attempt at doing this permanently glued my tiny latticed component to my worktable. So, if anyone can post some detailed descriptions of the exact names of the CA used, or whatever other materials are used (enough info for me to find it for purchase!) and exactly how the apply it, I would be very grateful. Thanks! 
|
| Google Adsense |
|
#2
03-12-2014, 02:07 AM
|
||||
|
||||
|
As you have found using CA on paper is fraught with danger.
If you're going to use it to stiffen parts - go for the thin stuff. It does like to run and will quickly flood any part. Usually best to suspend the part using tweezers. And do a small section at a time. Tim
|
|
#3
03-12-2014, 02:12 AM
|
||||
|
||||
|
I use insta-cure thin ca to stiffen paper and card stock. whichever brand you choose make sure you use the really thin watery kind. you need to be able to soak the paper. the thicker types, like superglue will not work. be aware that ca will make ink or toner run and ruin your printed parts. the trick I use is to apply the ca from the opposite side of printed surface and carefully handle the stock till the ca has completely dried. not a problem if you plan to paint you model later. ca gives off nasty fumes, especially when it first come in contact with the paper, you can actually see the 'smoke' and feel the paper getting hot! protect you eyes and nose. once the ca has dried the paper takes on a plastic like quality, you can sand, cut, shape just like you would styrene. thicker gauge card becomes really hard and can become hard to cut with #11 or #2 blades. there are other way to harden paper (minwax wood hardner for example) though I am yet to find one that works as well as ca. hope this helps

|
|
#4
03-12-2014, 05:35 AM
|
|||
|
|||
|
Thanks for the replies, fellows. I just wish someone would post enough information to know what to buy.
"Oh, I use CA" doesn't tell me a thing.
|
|
#5
03-12-2014, 05:58 AM
|
|||
|
|||
|
Quote:
The experience I do have has been to apply the CA to the edge of the paper using a straight pin, and sand it carefully afterwards using an emery board.
|
| Google Adsense |
|
#6
03-12-2014, 06:00 AM
|
||||
|
||||
|
OK. People have been trying to help and have posted some good information.
You know what CA glue is. It's been stated to use the "thin" CA (as opposed to the gel) It's been stated to suspend the part being coated with tweezers or some such tool. A380 has given some detailed info on how he uses it. As to specific brands, there are many and vary by location and general availability. I use the thin LocTite brand. As stated it will change the coloration of the pieces it's applied to. It will darken them. Myself, I've not found it to cause the colors to run. If this is the First time you are trying this, it's going to be trial and error until you develop your own system. Everyone has thier own way of working with it, there's no definitive A, B, C step instructions.
__________________
Currently building Heinkel Models/Ron Miller Authentic Nautilus.
|
|
#7
03-12-2014, 06:54 AM
|
||||
|
||||
|
Use any of the following at your own risk. Your abilities and comprehension are known only to you.
Brush-on Instant Krazy Glue works OK. There is a brush-on applicator that is integral to the screw-on cap. The glue is thin enough to flow. There are both clear and a color changing formula. The color changing formula goes on purple and turns clear when dry. Krazy Glue | Products If that is not available in what ever continent you are on then buy some of the liquid CA glue in what ever brand is available in your area and then buy, beg, borrow, or steal a cheap bottle of clear fingernail polish and use the brush from that to apply the glue. Try using a piece of glass to apply if you have to lay the part down. It is less likely that the piece will be glued to the glass. Otherwise use the technique explained before about suspending the part with tweezers or some other tool. Try breathing through your mouth onto the part to help the glue cure quicker. The warmth and moisture from your breath helps. Sounds like an urban legend but it does seem to help. The brain rush from the heavy breathing is an added benefit.  ") Have some Bondini standing by in case you glue your fingers together. If Bondini is not available in your area do some research to find a replacement product that will do the job. Proper ventillation is a good thing to consider. The fumes from the glue can cause harm to your lungs and eyes.
__________________
~Doug~ AC010505 EAMUS CATULI! Audere est Facere THFC 19**-20** R.I.P. it up, Tear it up, Have a Ball
|
|
#8
03-12-2014, 07:16 AM
|
||||
|
||||
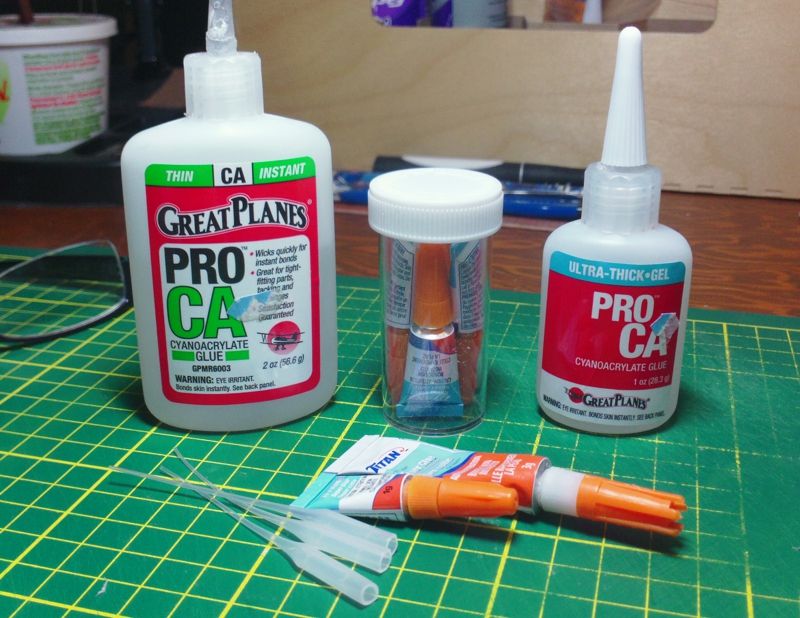 These are the CA Glues I use. I use these as a result of the advice of others who use these glues. There appear to be many modellers who swear by CA Glue and use it successfully. I am not one of those modellers. The problems that I encounter are: - CA glue on the fingers is very annoying and it sticks skin to things! - CA Glue has annoying and dangerous fumes, and can burn skin and eyes (literally). - CA Glues are mostly thin and runny and hard to control (bleeding, running). - CA Glue acts like a dull clear coat...it leaves an uneven sheen and vivifies the underlying colour. Through the suggestion of "experts", I have acquired different types of CA Glue that help with some of these problems. In my photo above: (from left to right, back to front) 1. CA Glue Thin instant in a larger squeeze bottle. Purchased through an Ebay hobby shop. Much better deal. Easier to dispense. Very thin, wicks (travels) easily, Dries quick. 2. Dollar Store CA Glues. Cheap, easy to use little tubes. Open tubes don't last very long. Larger nozzle makes it hard to control the flow. Dries super quick. 3. Gel - Thick CA Glue. Solves the problem of control, bleeding, travel, etc. A little tricky to dispense, its better to squeeze onto a card and then use a toothpick to apply. But, as an instant CA Glue, takes much longer to setup and dry. 4. Extra long Dispensing Nozzle Tips for the CA Glue (Thin) Bottles. Makes application even more controlled, however the tubes get clogged a lot and you have to keep cutting them shorter. Available through the same hobby stores. 5. Cheap (Dollar) Store CA Glues now come in a variety of tubes and small bottles...but I think its all the same type of Glue? ... Second photo (below) shows some of the Thin instant CA Glue applied to a printed and assembled 65lb cardstock part. I ran the the thin dispenser tube up one side of the part, and the glue wicked out to a wide stream very quickly. As you can see it has an uneven sheen and makes the colour stronger. I have never seen inkjet bleeding (colour run) from CA Glue. But I don't like the visible finish, and its hard to coat an entire surface evenly. Its possible to use a paint brush to apply a more even layer of CA Glue, but its not perfect. Soaking a part with CA Glue...try not to flood the part, just squeeze glue onto the surface or the edges and allow it to "wick" its way through the part...this creates a plastic-like strength when it dries. Gives paper the rigidity and strength of plastic. Use CA Glues in a well vented area. Wear glasses for protection from splashes. CA Glue will glue Cats together...but there are cheaper alternatives for this. 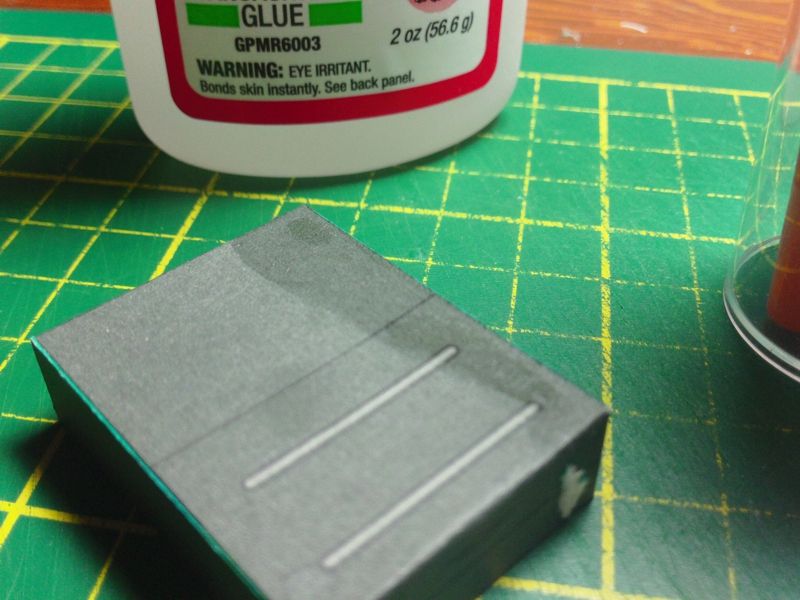
__________________
SUPPORT ME PLEASE: PaperModelShop Or, my models at ecardmodels: Dave'sCardCreations
|
|
#9
03-12-2014, 07:47 AM
|
|||
|
|||
|
Quote:
But seriously, if I understand the chemistry correctly (or at least read the wikipedia page correctly), water causes the CA to polymerize, so there might be some truth to this.
|
|
#10
03-12-2014, 08:33 AM
|
||||
|
||||
|
what? ...that you get a brain rush from heavy breathing?
__________________
SUPPORT ME PLEASE: PaperModelShop Or, my models at ecardmodels: Dave'sCardCreations
|
| Google Adsense |
 |
|
|


 Linear Mode

