


|
|
|
#111
 08-26-2016, 05:50 AM
|
||||
|
||||
|
I'm joining in. Took a few tries to get the model printed out. MY printer margins are weird, so it kept cutting off the front wheels. I finally had to select "shrink to fit" in the print options to get everything to print.
Here's my kit:  -6 inch metal ruler (I also have a couple 12 inch metal rulers for longer creases, cuts and clamping -dead fine point pen for scoring -Scissors -Exacto knife  That lights up for seeing the cut lines. -Pringles can lid and round toothpicks for dispensing the -Aleene's tacky glue -Various sized round wooden dowels, some sharpened to a point with a pencil sharpener -Can't remember off hand what the yellow handle thingie is called, but it's used for clamping. Like forceps, but not forceps.  -Something new I just got to see if it'll help, a lighted magnifier. I'm behind though. I spent all day working on the D4Y, so only got the scoring on the Mystery Machine done today. 
|
|
#112
08-26-2016, 06:23 AM
|
||||
|
||||
|
Step 4 Panel Van Sides complete.
Dave, did you edge colour anything on the panel sides? Thanks, Gary
__________________
"Fast is fine, but accuracy is everything" - Wyatt Earp Design Group Alpha https://ecardmodels.com/vendors/design-group-alpha
|
|
#113
08-26-2016, 07:05 AM
|
||||
|
||||
|
I edge colour everything.
The bottom of the sides aren't very visible, but you should at least hit the wheel well openings. I often run my marker along the folded tabs too. Just to the outside of the visible artwork (on the tabs). That way, if a connection isn't tight, and some of the tab shows, at least its not bright white. (although, on this model, I precoloured the tabs for you)
__________________
SUPPORT ME PLEASE: PaperModelShop Or, my models at ecardmodels: Dave'sCardCreations
|
|
#114
08-26-2016, 07:27 AM
|
|||
|
|||
|
Quote:
__________________
This is a great hobby for the retiree - interesting, time-consuming, rewarding - and about as inexpensive a hobby as you can find. Shamelessly stolen from a post by rockpaperscissor 
|
|
#115
08-26-2016, 07:42 AM
|
||||
|
||||
|
Body sides cut and folded, gently in some areas.
  What is the purpose of not having that gentle bend in the middle of the sides not follow that natural line between the blue and yellow, other than not interfering with that one glue tab?
__________________
~Doug~ AC010505 EAMUS CATULI! Audere est Facere THFC 19**-20** R.I.P. it up, Tear it up, Have a Ball
|
| Google Adsense |
|
#116
08-26-2016, 08:25 AM
|
||||
|
||||
|
"Heads up comming through"
First pick shows part 1 with flash. Seems too bright.
Clear candy box to hold stuff, kitchen cutting board (withdrawn), metal ruler, tweezers, close-pin clamp and other goodies that may or may not be needed, including my last project...the Dodge WC54. Not shown is my large tuna can for all the excess bits when cutting. Photos 2 & 3 without...too orange. Anyways, here are the sides too, I will crease/fold after posting. Dave, on the front windows was I supposed to score with the empty pen on the tab side or the body side? I think the black line is gonna show on mine.
|
|
#118
08-26-2016, 01:30 PM
|
||||
|
||||
|
Doug....the line between the yellow and blue is a paint line.
It does however coincide with a "waist" line on a van of this type. This van does not seem to reflect the common Hippie Van of that time ...the mid 1960s Volkswagen Microbus. It does look a lot more like a cartooned version of a very common American Van at that time ...the mid 60s Chevy. The Chevy has the same waist line...which is not inline with the nose crease. Although, the rear of the cartoon van seems to be a more distorted view and the waist line has been lowered to meet the horizontal crease line of the rear doors. 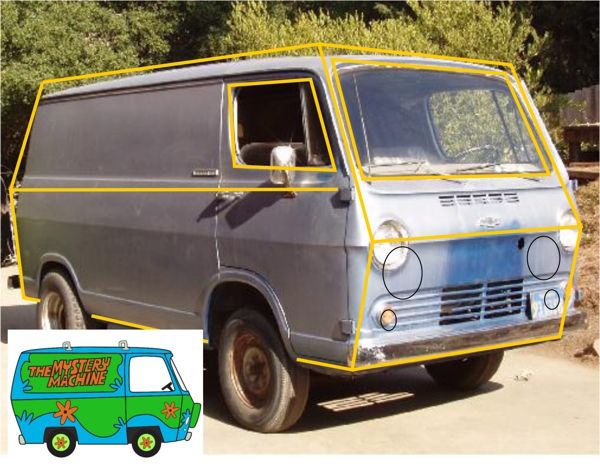 But, none of this matters, since I just copied the cartoon artwork. The paint work doesn't match the actual shape and angles of the van. You have to fold the body in accordance with its angular shape and ignore the paint scheme. ... Thomas...? You score all the folding lines that are marked. You score on the line...just like cutting on the line. Not to one side or the other of the line. is that what you are asking?
__________________
SUPPORT ME PLEASE: PaperModelShop Or, my models at ecardmodels: Dave'sCardCreations
|
|
#119
08-26-2016, 01:48 PM
|
||||
|
||||
|
Thanks for the info, Dave. I would have just glued the tabs on the two body parts to the roof assembly without doing any gentle bending.
The shape of the front and rear of the van would have given the sides the needed  d but the heads up helps. d but the heads up helps.Dry fitting is a good thing.
__________________
~Doug~ AC010505 EAMUS CATULI! Audere est Facere THFC 19**-20** R.I.P. it up, Tear it up, Have a Ball
|
|
#120
08-26-2016, 02:35 PM
|
||||
|
||||
|
Quote:
So, as usual I've started another alongside it. A Chico Van. Progressing well, but the fingers won't let me play for more than ten minutes at a time. Started on a double dose of the new pills today (Duloxetine) and they do seem to be more effective.
__________________
Keep on snippin' ... Johnny
|
| Google Adsense |
 |
|
|


 Linear Mode

