


|
|
|
#1
 11-09-2011, 10:33 PM
|
|||
|
|||
|
Renderbaking in 3dsMax
RenderBaking
Tools needed:- Metasequoia 3dsMax mqo import plugin for max. Render Baking, put simply, is a tool that allows you to place all lighting and shadows, materials and material effects, including glossiness and bumpmapping, onto a single texture. Render baking is performed for a variety of reasons, to combine more than one texture, to overlay a material onto a texture, to add lighting effects or to simply optimise the UV layout. In this tutorial we are going to combine 3 textures, optimise the UV layout and add lighting effects for a metasequoia model, the model will then be export back into metasequoia. MODEL SETUP First we finalise our model and place it into a single object, by finalise I mean make sure all faces have a material and have the model 'finished'. It doesn't have to be in a papermodel-able state just so long as you don't need to move parts you can cut the model up later. The image below shos the model as a single object with 3 textures. 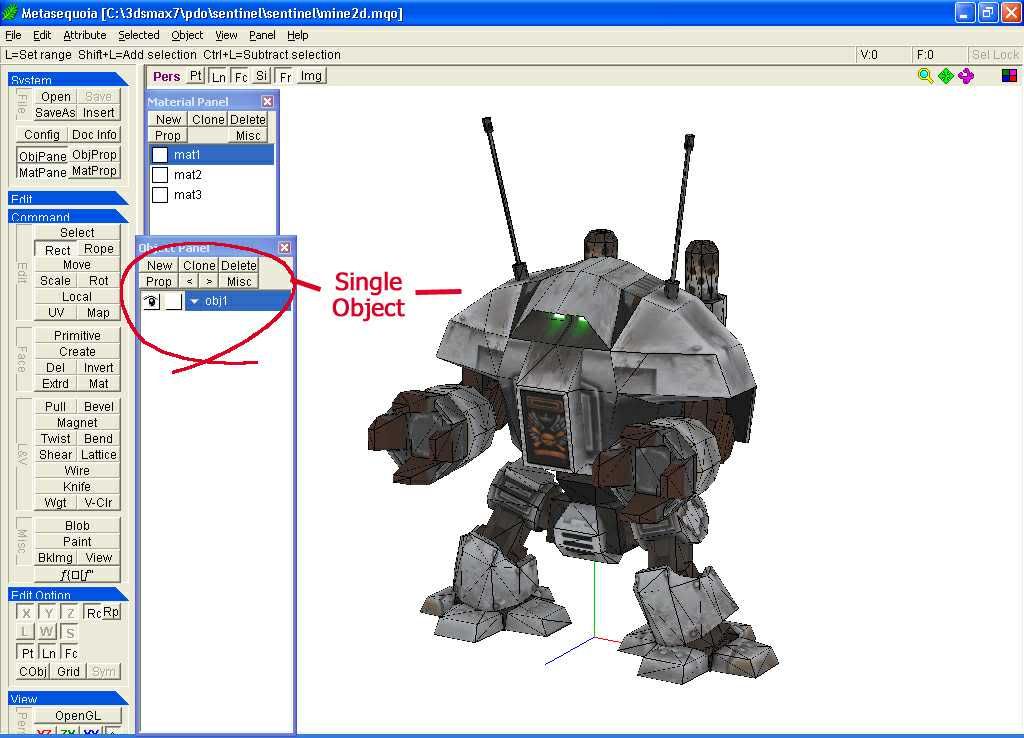 Our next task is to import the model into 3dsMax. Start max, setup your user interface how you like it, file -> import -> find the file you need. Once in max you can rotate, pan and zoom the model with the tools at the bottom right. A quick render, without any render setup, will show you what the output will look like. 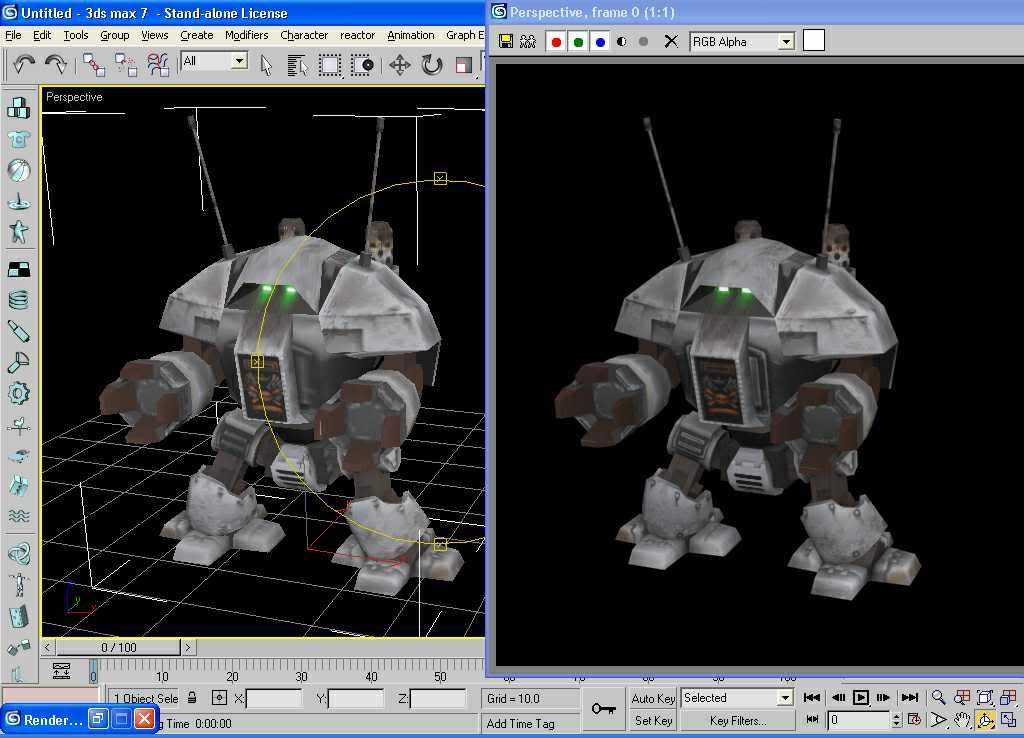 LIGHTING SETUP Now we need to set up a skylight and a plane to bounce light off. The skylight is in the create -> lights -> standard lights -> skylight Place the skylight wherever you want, it's just there to tell the renderer a skylight is to be used, it's position is unimportant. Next create a plane create -> standard primitives -> plane. Drag to make a plane and then change the size to 2000x2000 and move it to 0,0,0 In the material editor, select a blank material and apply it to the plane, this allows you to control the bounce light more effectively than leaving the plane in the standard colour. The image below shows the scene with a plane, a skylight and the model we are using 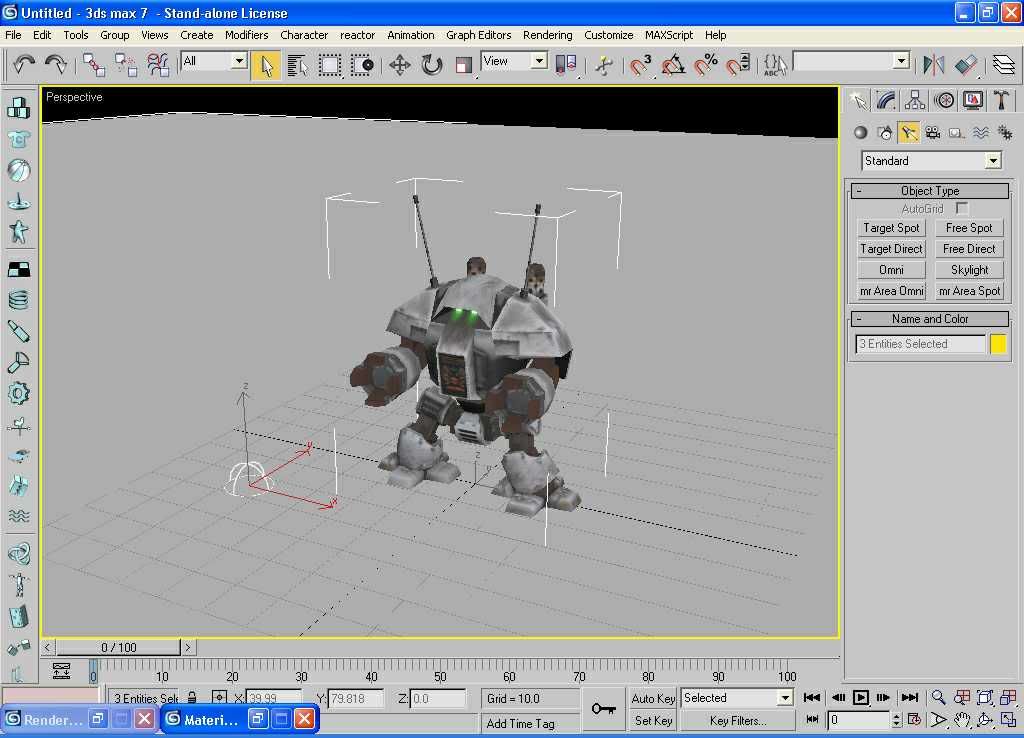 Now do a quick render to see the difference from the last render. This will also let us set up the renderer for the render baking. Click render under the rendering menu, select the advanced lighting tab and select light tracer in the dropdown. The render dialog for max 7 is shown below 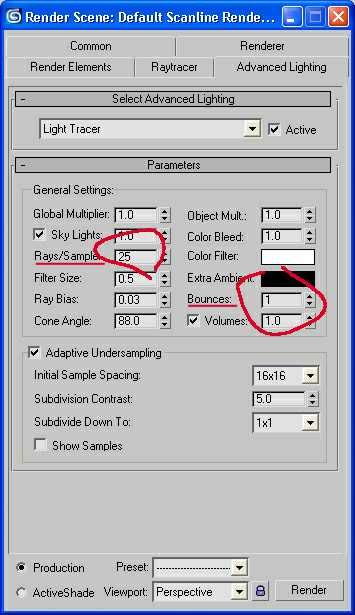 We can set the quality of the render with rays/sample, 25 is low quality 250 is high quality. I set it to 25 because I like the low quality look and because it renders faster. I also set the bounce to 1, this is the ammount of times the light ray will bounce off objects, play with this setting when you get more experience, 1 is good for now. A note to mention is that a higher number of bounces increases the render time. Now click render to see the result. 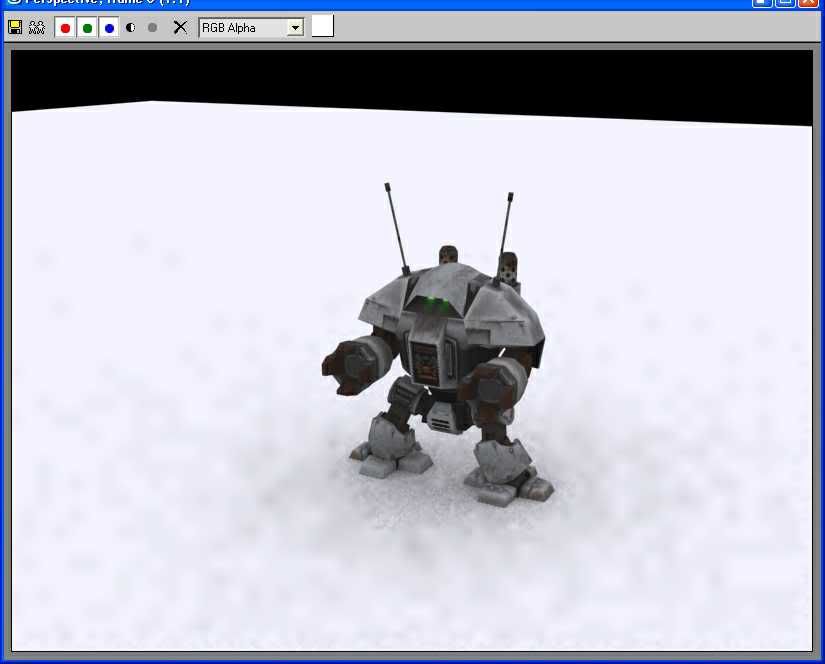 As you can see the skylight and bounce lightens up the model and provides some shadow detail. Setting up the lighting is important as this affects the final output considerably. As it is the model lacks directional lighting so lets set up a spotlight. create -> standard lights -> target spotlight. You create this by clicking where the spotlight will go and dragging the mouse to where it should point. You can move both the spotlight and target at any time 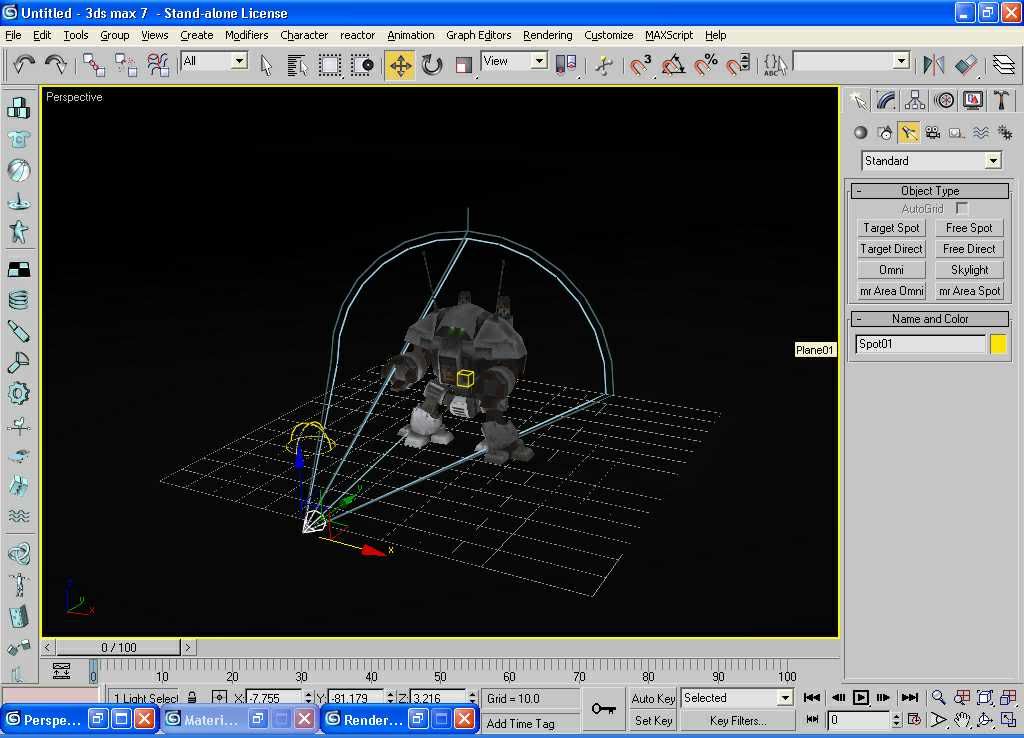 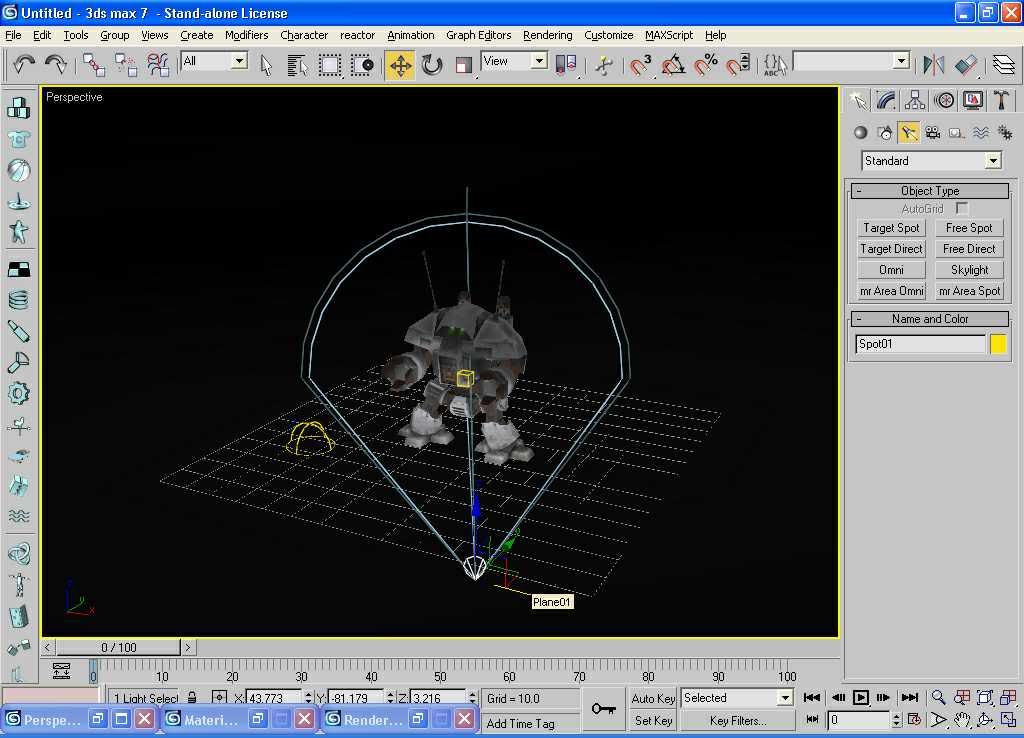 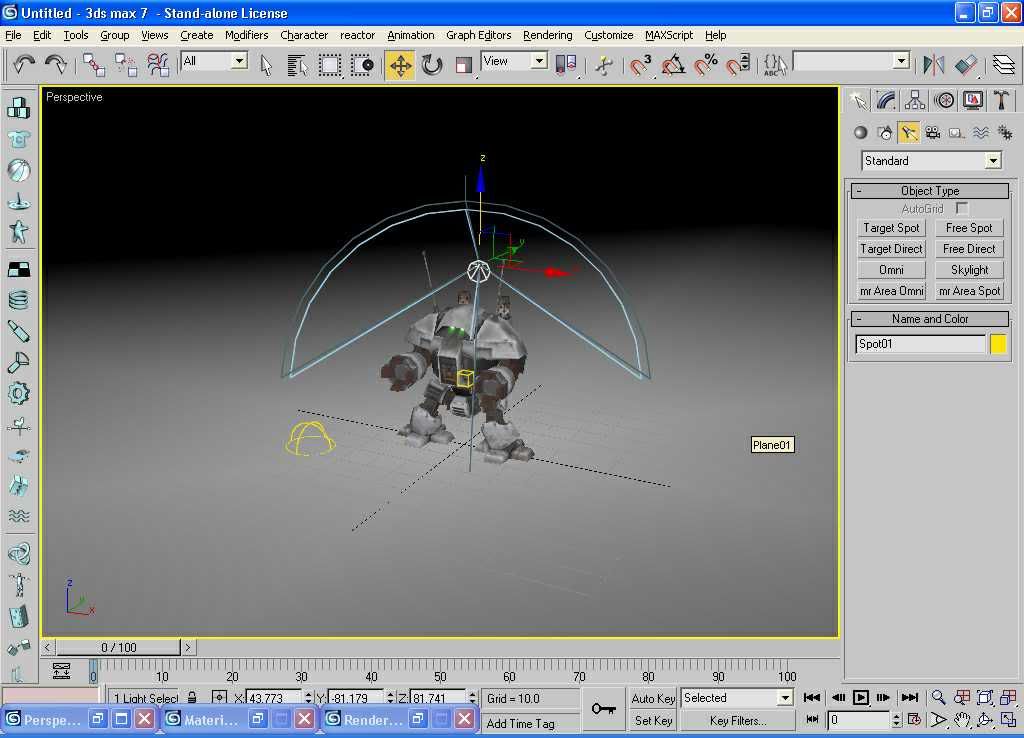 A quick render will show you the results. 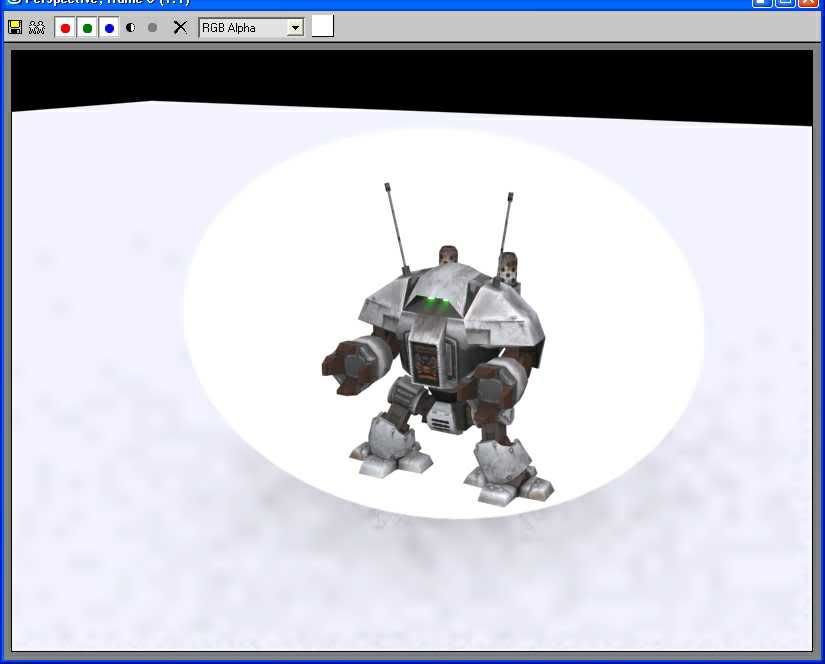 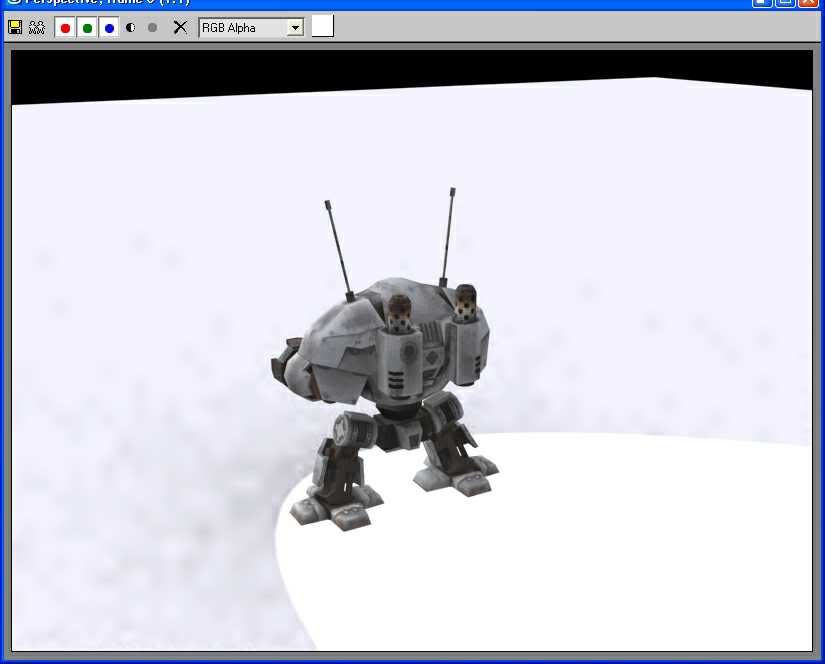 AS you can see the result is alot better, the front is lit and the rear is in shadow, exactly what we want for this particular model. You can add and move lights to wherever you want for the result your looking for. Spotlights can even be used to add specular effects without affecting the ammount of light used to light the textures. Lights can be adjusted in brightness and colour. UV SETUP So once your happy with the light setup and how the model rendered you need to set up the model to produce the render baked texture. We need to 'unwrap' the UV coordinates. First select the just the model. Then goto menu -> modifers -> UV Coordinates -> Unwrap UVW. 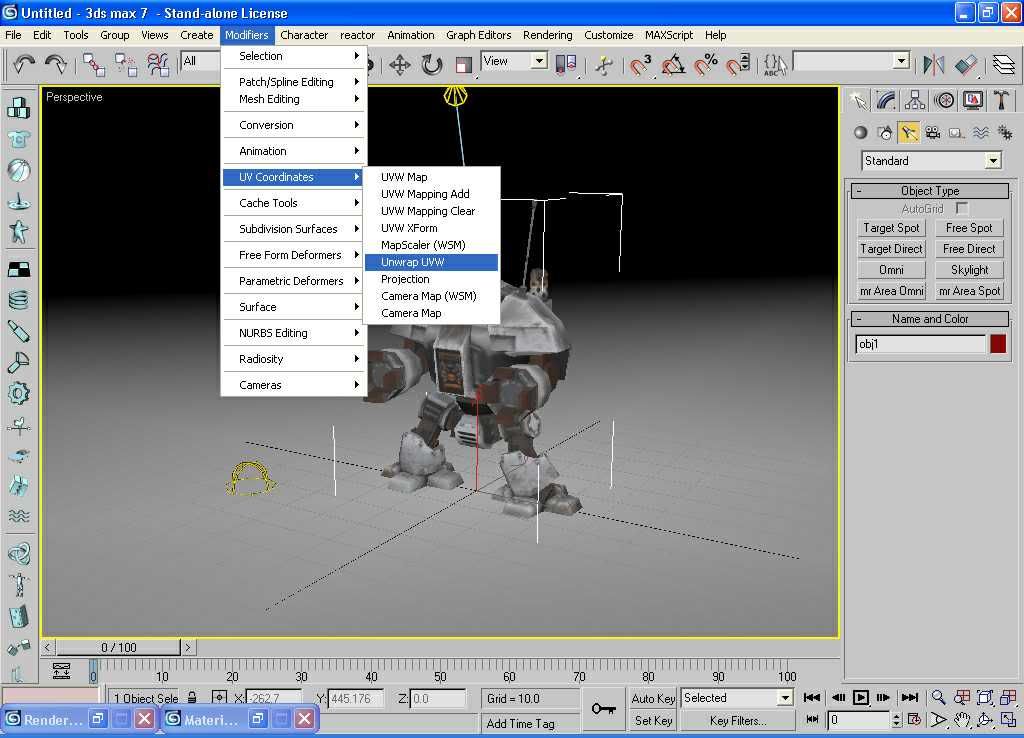 This will automatically bring up the modify section in the right hand panel. The FIRST thing you do is click the save button on the right. Save the current UV's with a name like modelORIG.uvw ********************************* NOW SAVE THE ENTIRE SCENE TO FILE ********************************* Now we need to set the map channel to 2, this is so the original textures are kept in channel 1 and the renderbaked image is in channel 2. 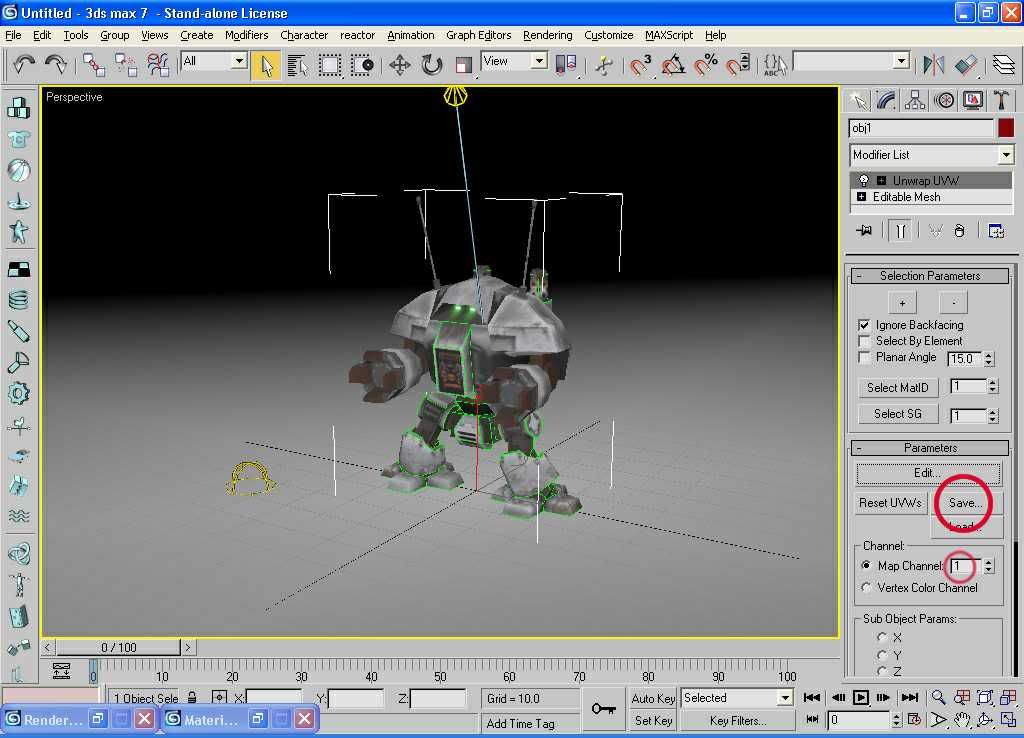 You will get a prompt to make sure you want to do this, click 'yes' After clicking yes to the prompt the UV coordinates will be automatically unwrapped, you will see the green lines change as in the image below. compare this to the previous images. 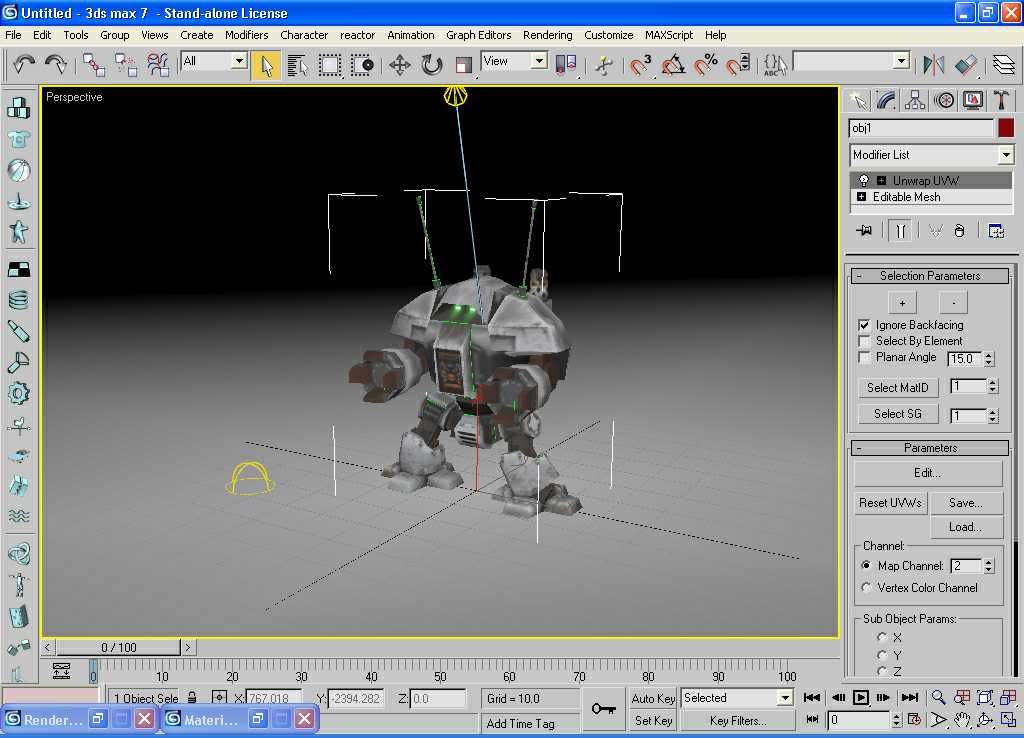 Now we didn't want it to automatically unwrap so click load to reload the UV's you saved a moment ago. 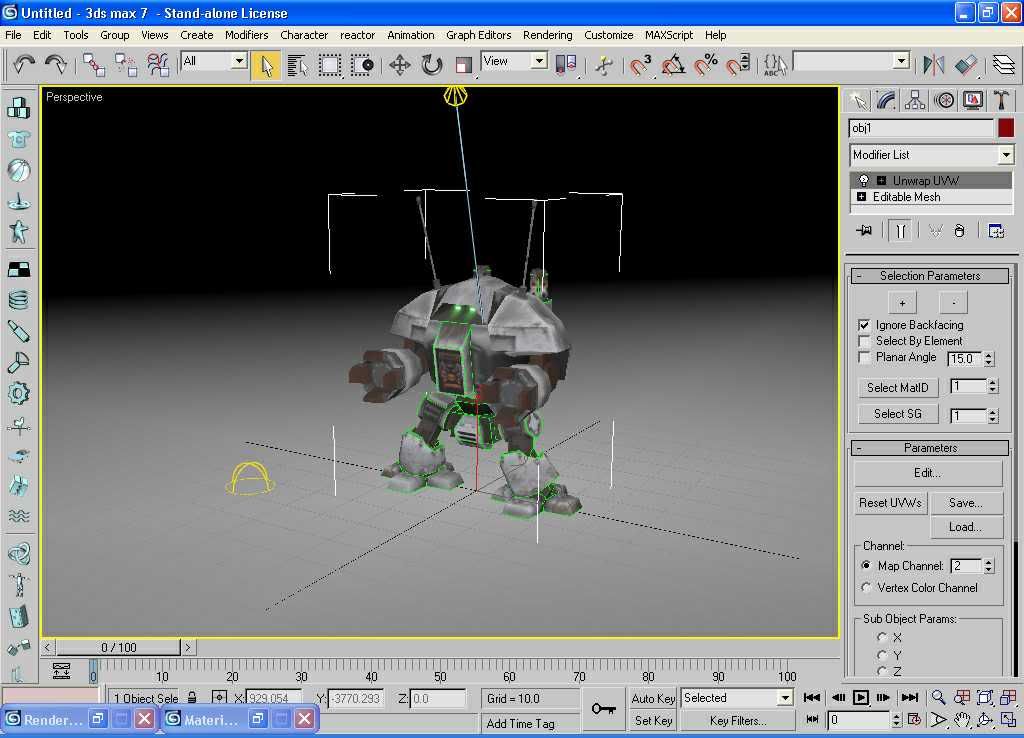 Notice how the green lines change back to how they were before. Now we can edit the UV's so click the edit button 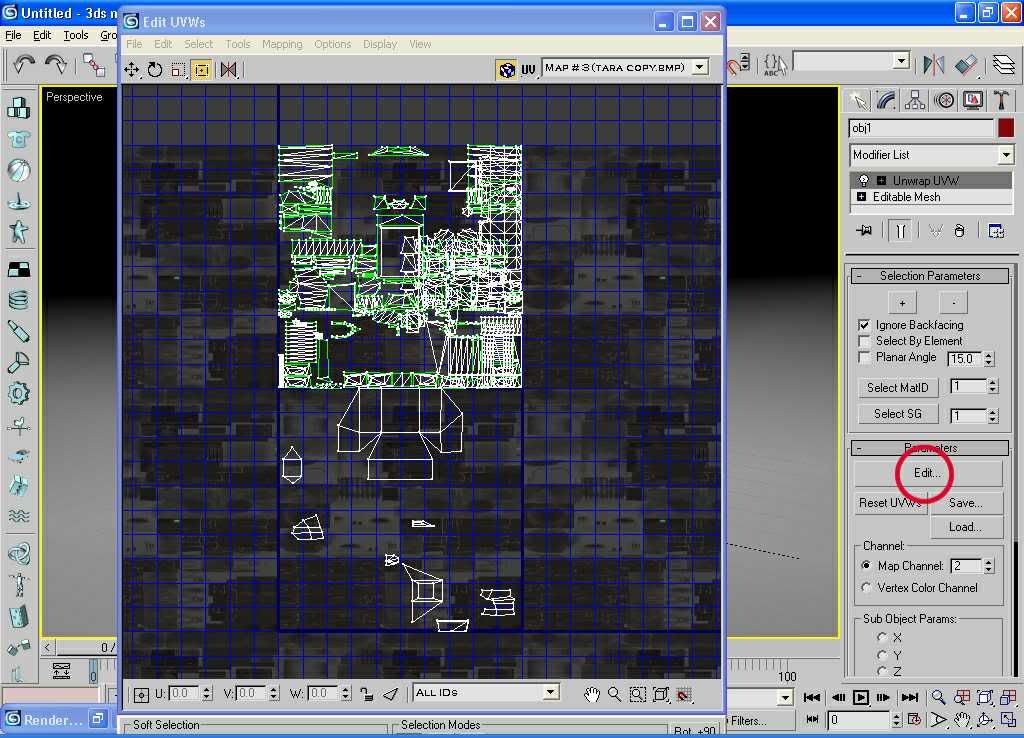 What you see is the edit UVW's dialog with the original UV's displayed. You should notice in the image that some of the UV mappings overlap others, this is because the model had 3 textures so there will be some overlap, this is normal. We can't leave the UV's like this because some parts of the model would get textured with images belonging to other parts. So in the dialog select tools -> pack UV's 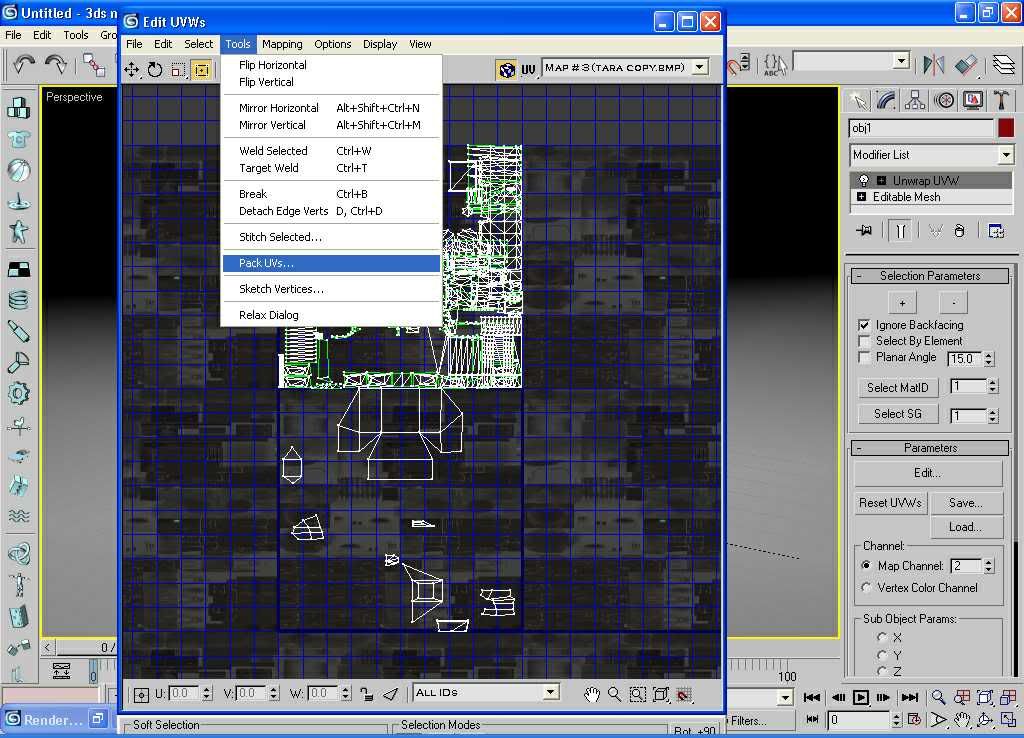 Set the pack dialog with the options as shown in the image below Then click ok 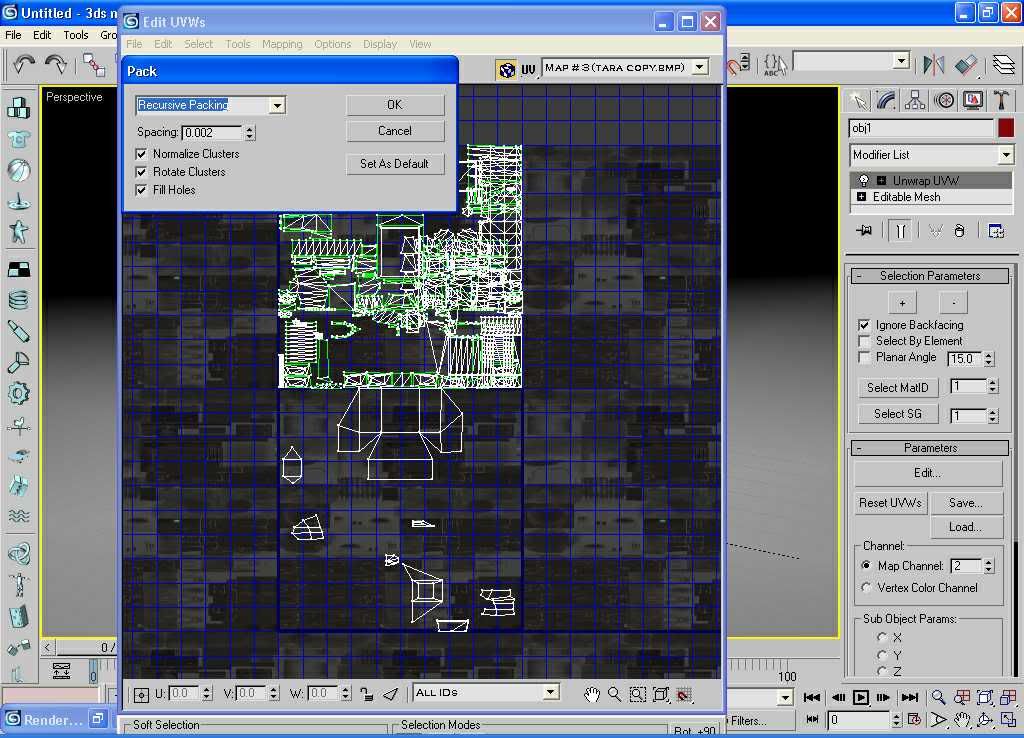 The UV's will now be re-arranged as shown below. You can adjust the UV's to your own requirements, we won't do it here, but on this model the shoulder UV's are quite large, we can reduce the size of these and repack the UV's Now SAVE these UV's with a name like modelPACKED.uvw 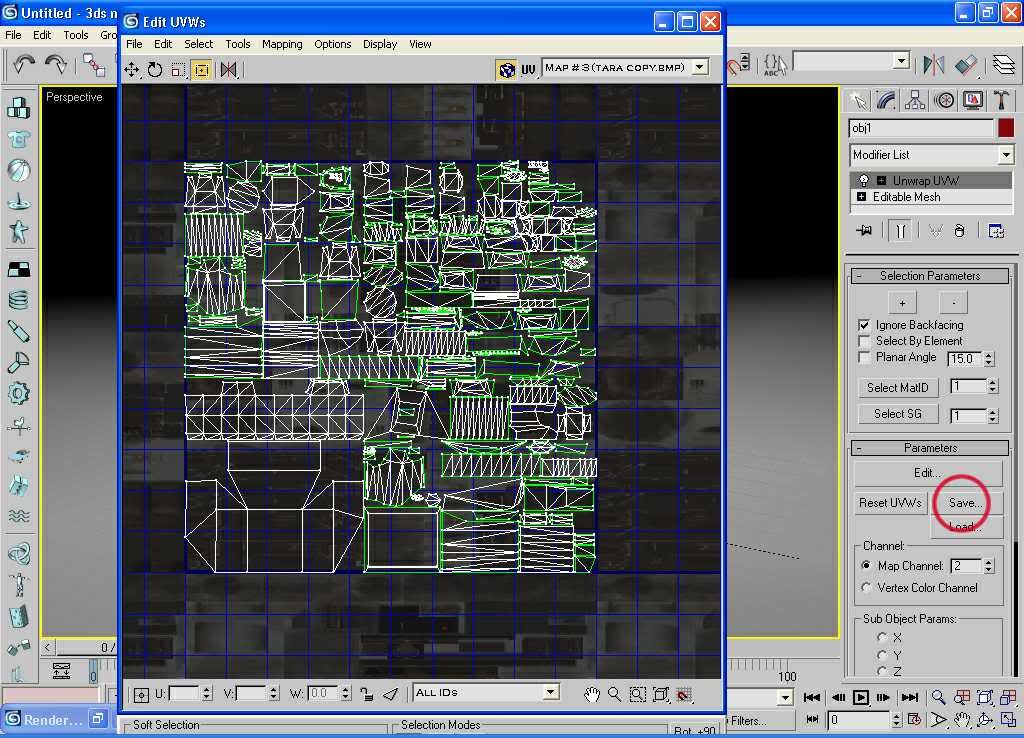 ************************************************** * NOW SAVE THE ENTIRE SCENE FILE TO A DIFFERENT NAME. ************************************************** * 
|
| Google Adsense |
|
#2
11-09-2011, 10:35 PM
|
|||
|
|||
|
RENDER BAKING
Now we are ready to create the merged texture with lighting effects. So under menu select rendering -> render to texture. 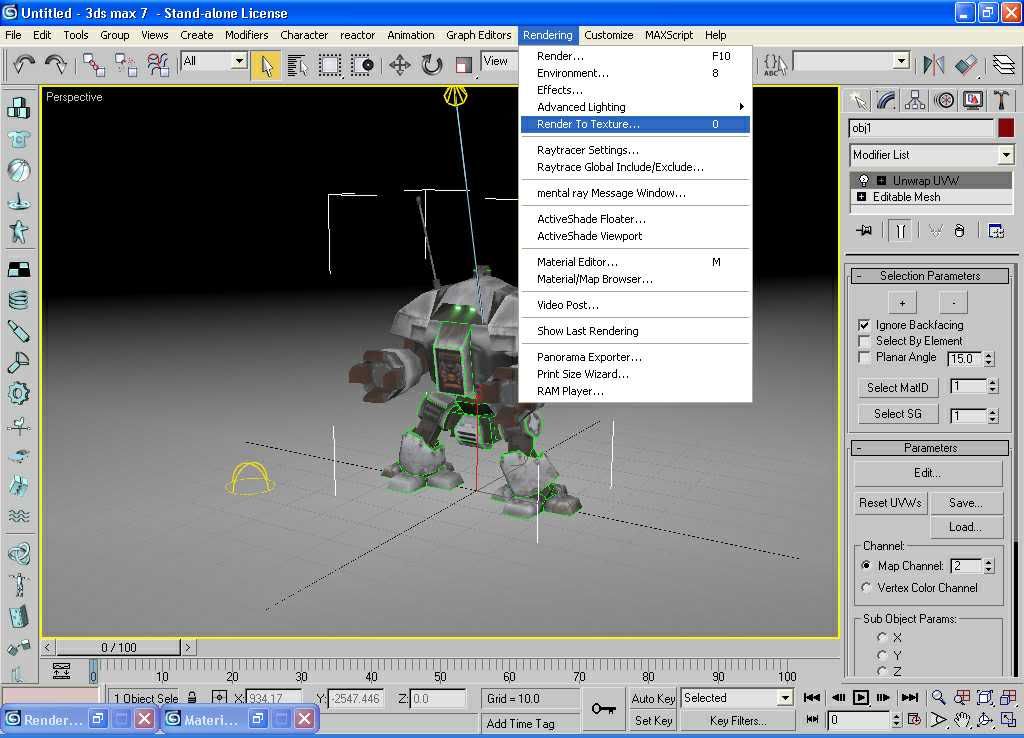 The render to texture dialog box is show below. Important: set your directory path if needed, it's where the texture will be output to. You will notice the the objects to bake are obj1 - which is our model. 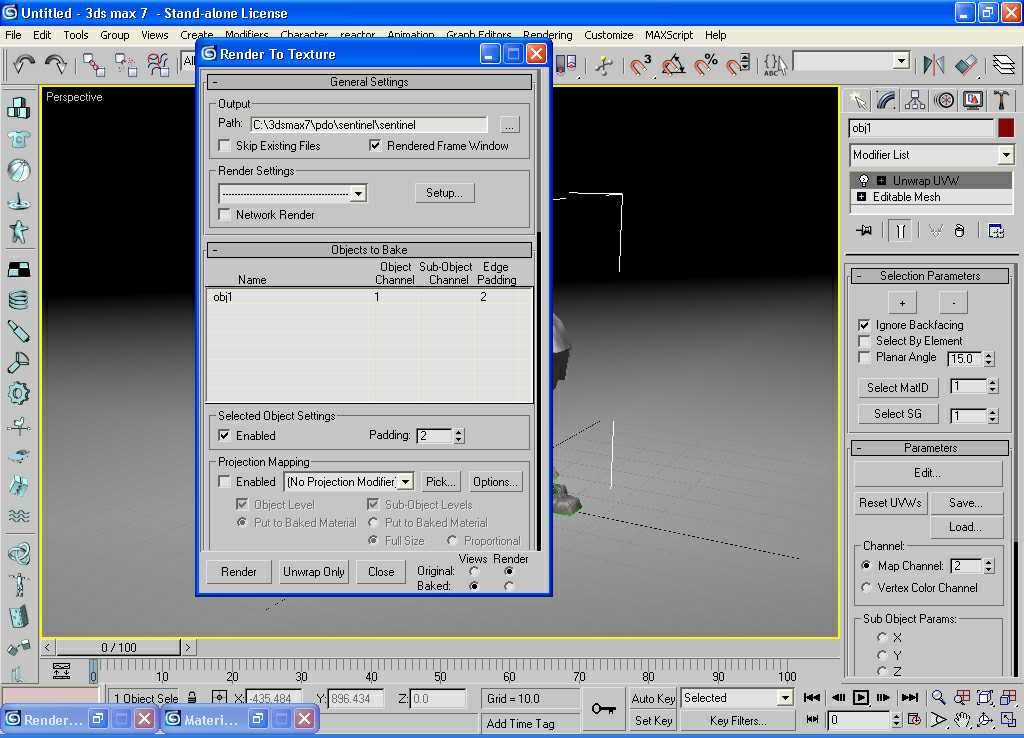 Further down the dialog box, drag the slider down, we have to select the mapping channel. The image below shows where you set it, set it to 2 because that's the channel we want the texture baked to.  Slightly further down the dialog box is an 'add' buton, press it. This button lets you tell the program what type of image you want to render. 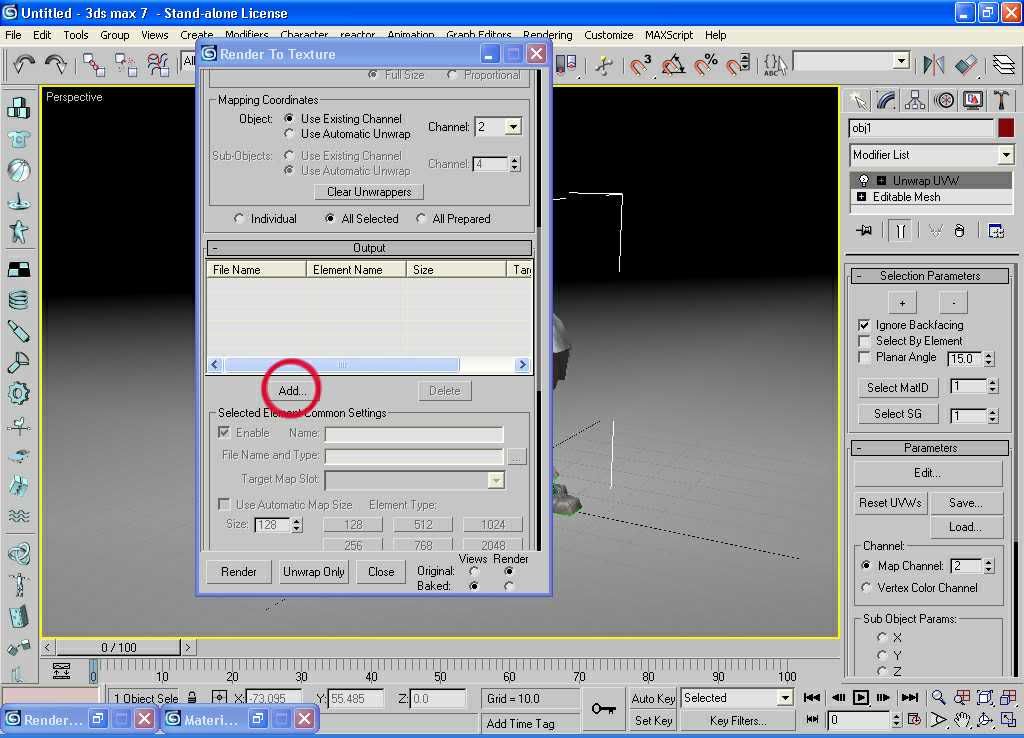 From the small menu select complete map and press 'add elements' 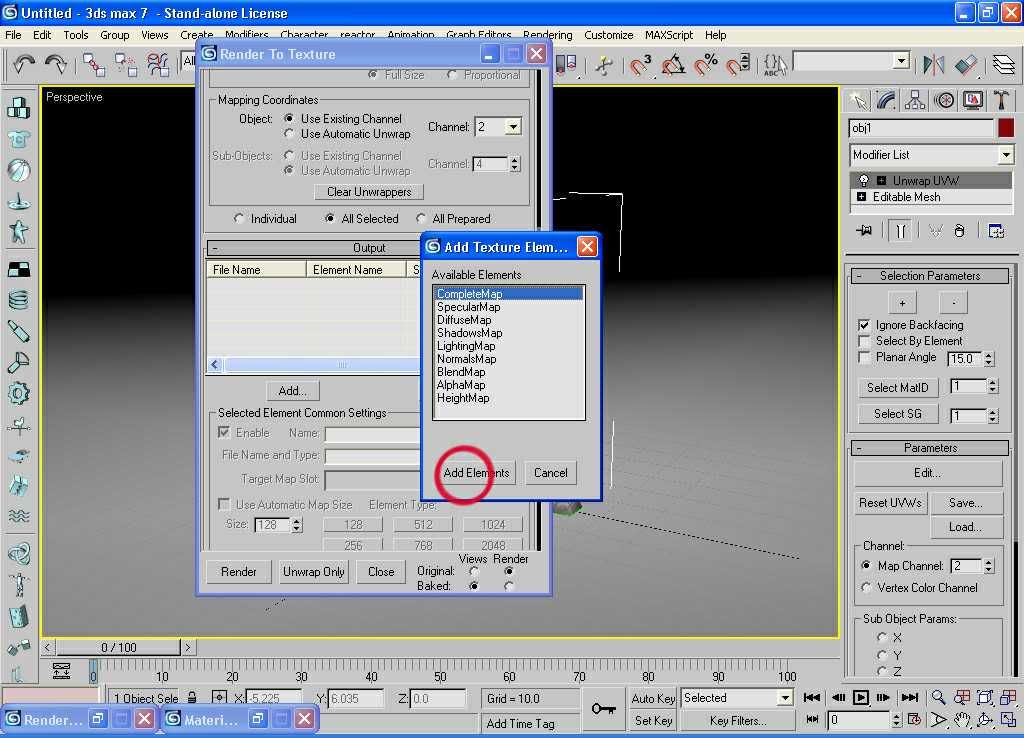 The entires will change to something like this 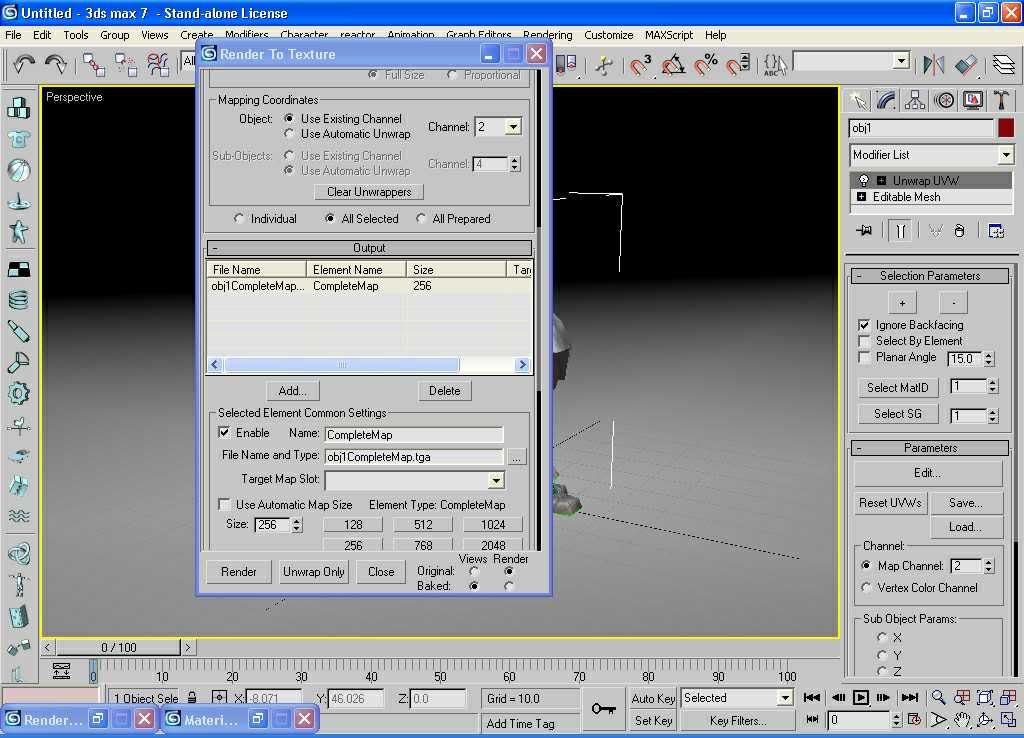 Now select the image size you want to output to. And change the filename. 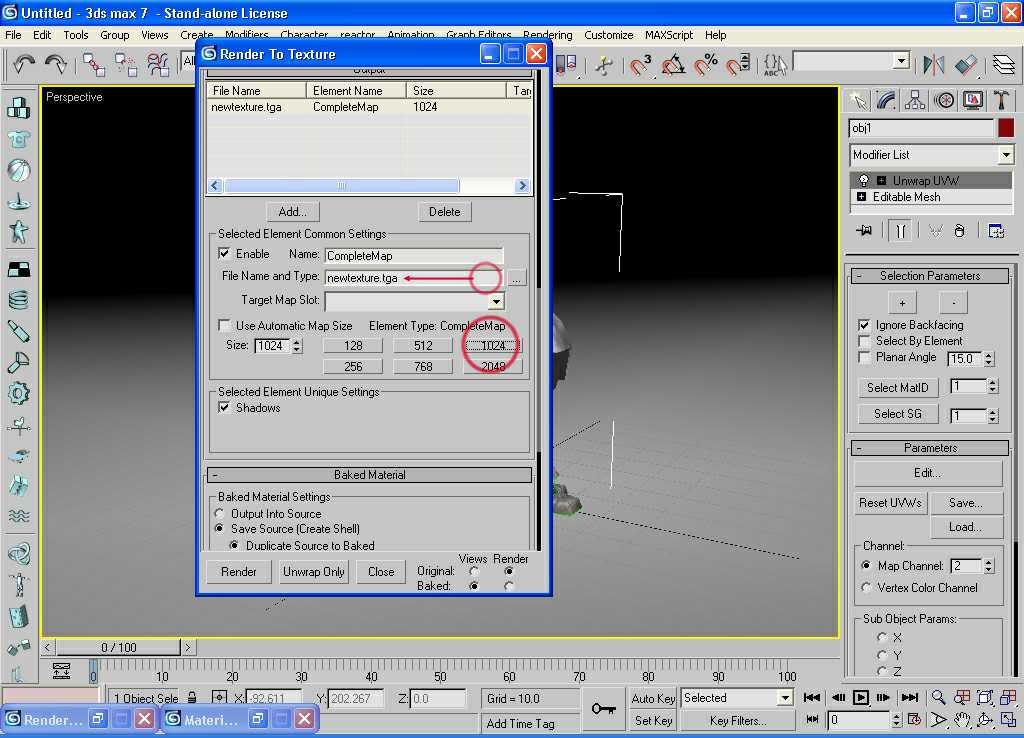 You can now press the render button. When you do it may complain that you haven't set a target material. Just press okay to continue. A render window will pop up to show you the progress of the render. 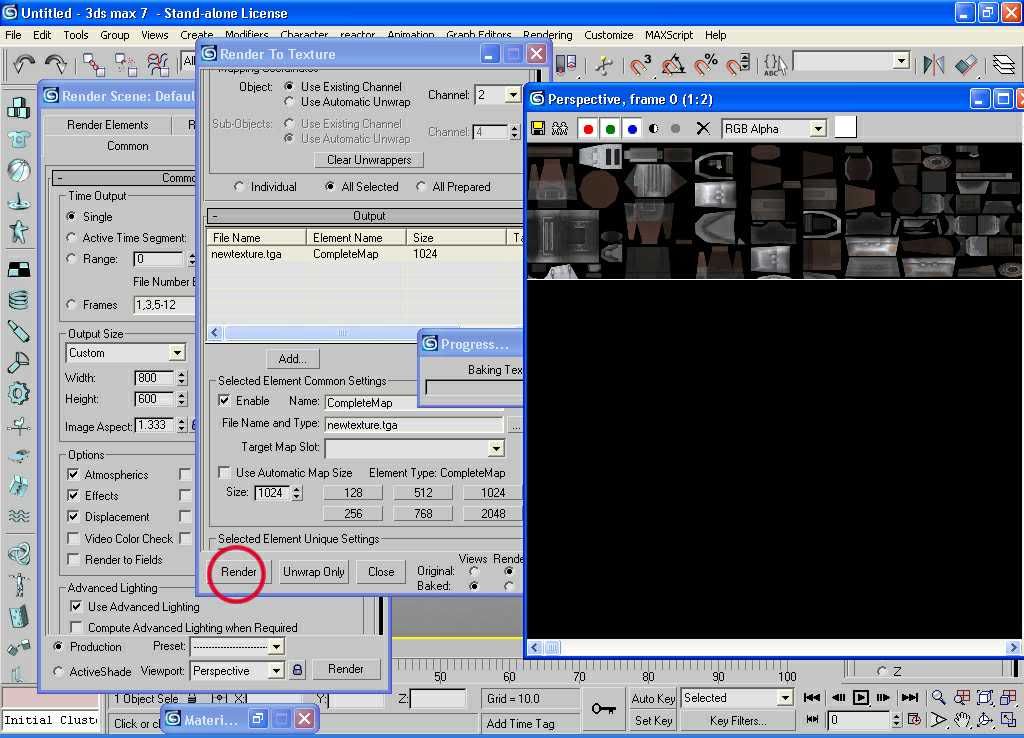 Once complete you can click these dialog boxes off with the small x at top right. DO NOT save the completed texture image in the window, the texture is automatically saved to where you told it to save it, if you save this image over the top of it you will mess up the texture as this image contains anti-aliasing and is only used as a representatin of the final image. RETEXTURING The first thing you will notice is that the model is now untextured. We have to re-apply the material and set the mapping channel to 2. 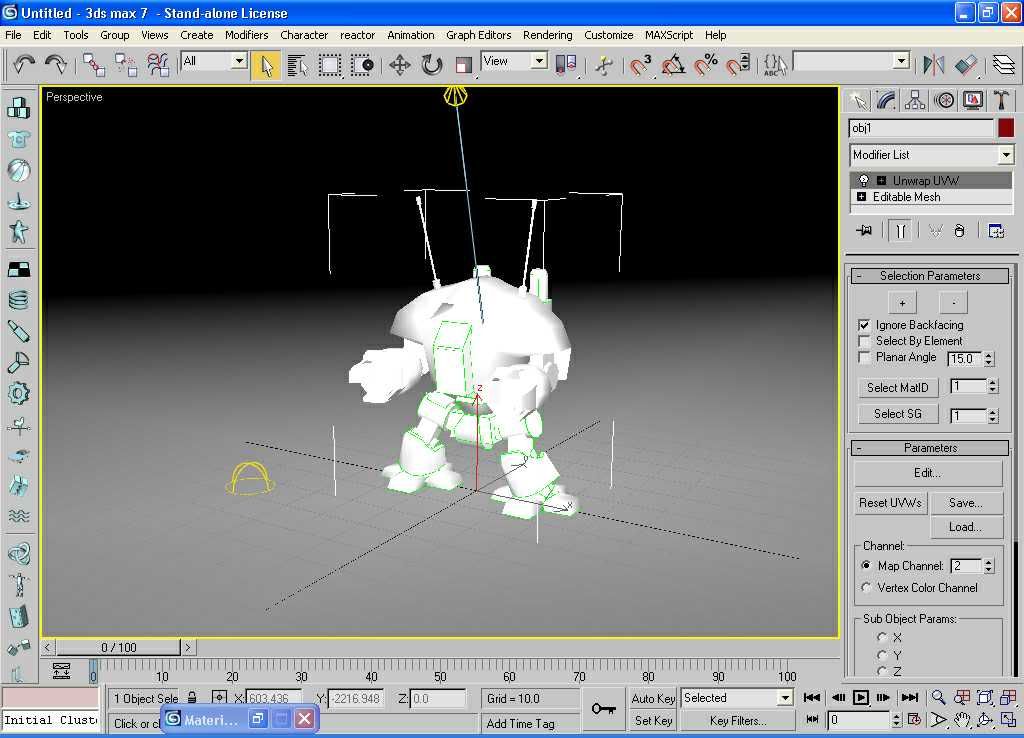 Go to the material editor and select a blank material. Open the maps tab and click on the button 'none' in the diffuse slot. 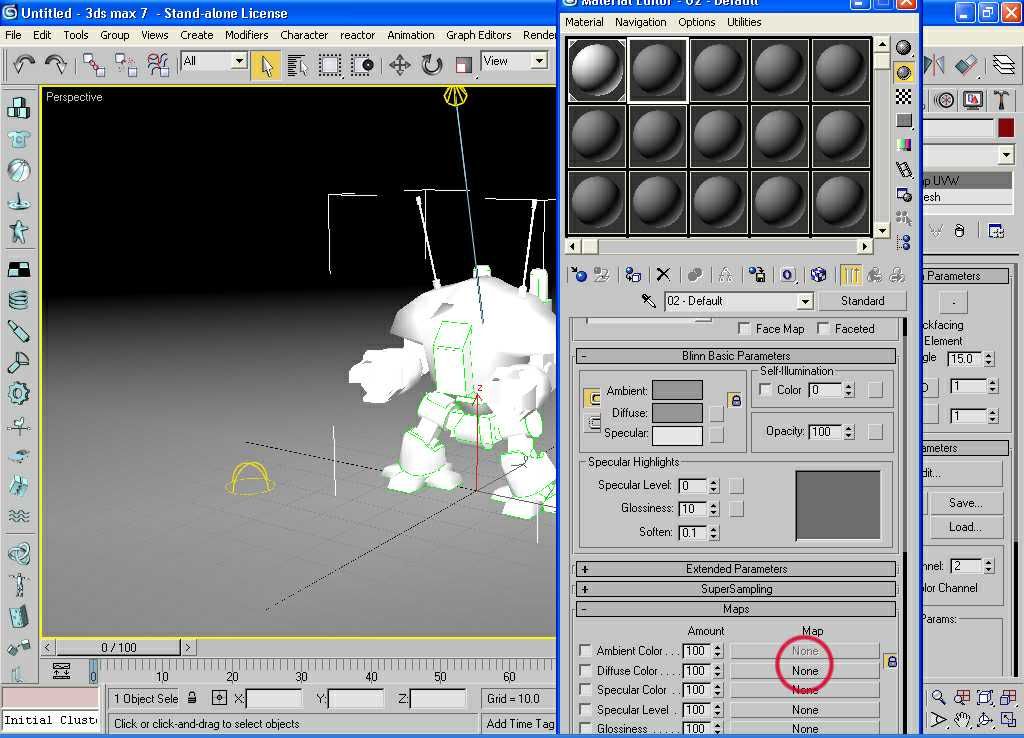 First select the type of material, you need a bitmap. Then load the baked texture you created earlier, if you remember where it is and what it's called. Set the map channel to 2, and then click the 'assign material to selection' button. 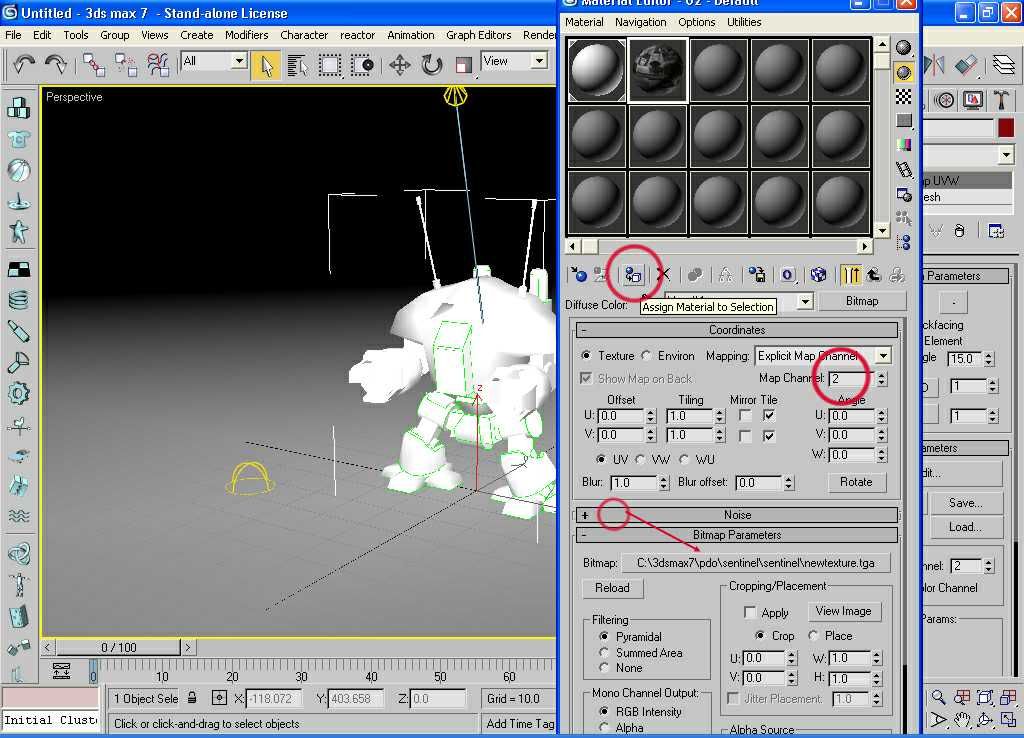 At this point you probably still won't see the texture in the viewport. To see it click the 'show map in viewport' button. 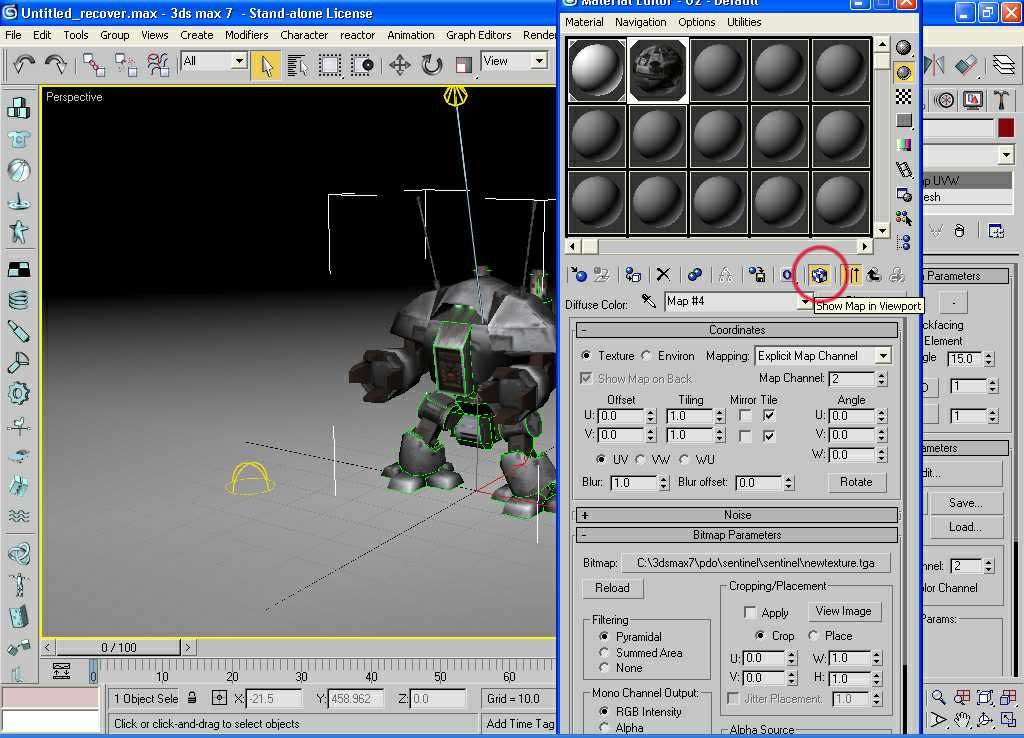 EXPORTING THE MODEL Now that we have retextured the model with the new texture we have to export the model with the new UV coordinates for this texture. Close the material dialog. In the right hand panel change the map chanel back to 1. You will be propmted to continue - click yes. 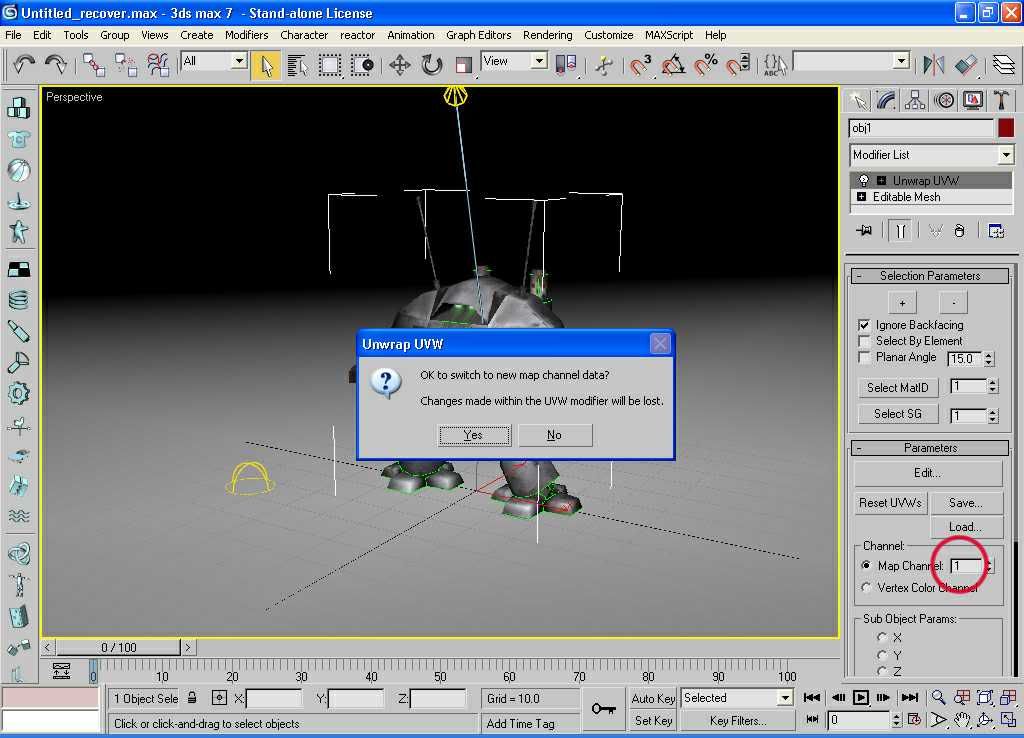 When you do this you will lose the texture on the model, this is because you set the map channel in the material to 2.  Now before we go into the material editor and change the map channel back to 1 we need to make sure we are using the correct UV's in map channel 1. So click load and load the last .uvw file you saved, the packed one. 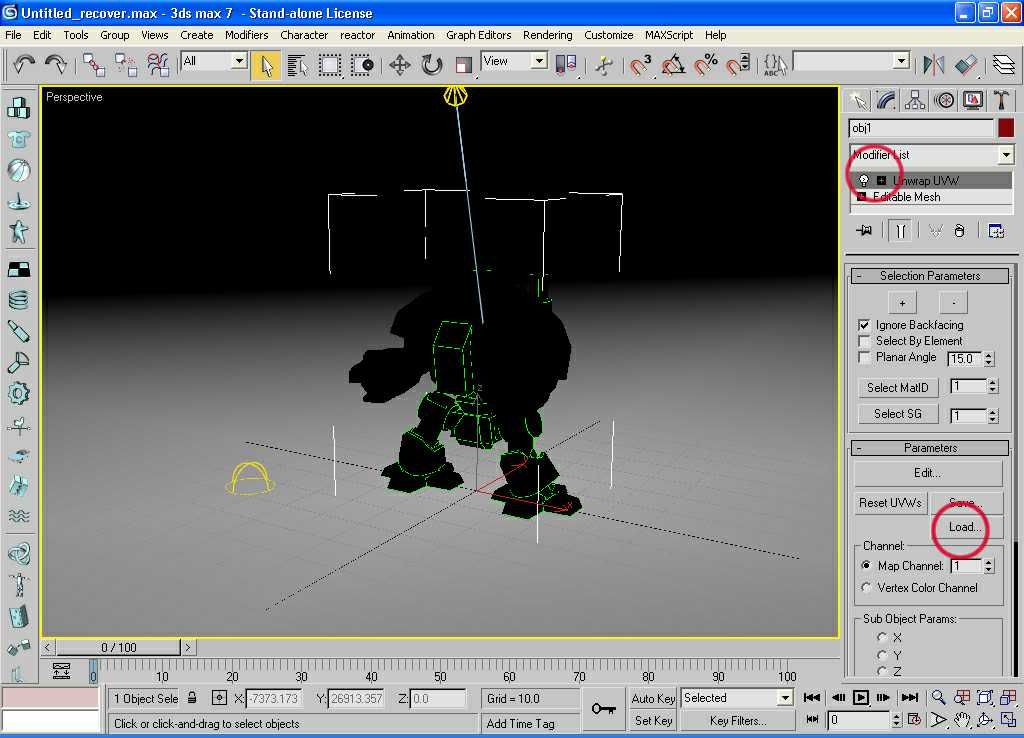 In the right hand column you will find a modifer list at the top, right click on the line 'unwrap UVW', it should be greyed out like shown. From the popup menu select 'collapse all'. 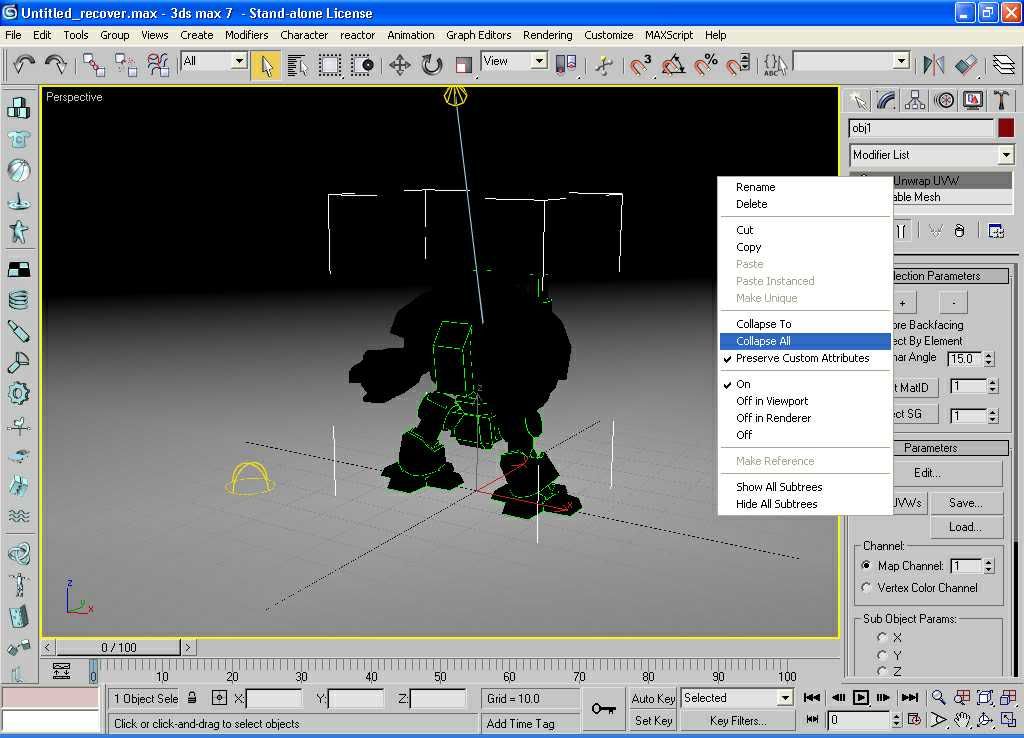 Now we know for sure that we are using the correct UVs we can go into the material editor and change the map channel from 2 to 1. 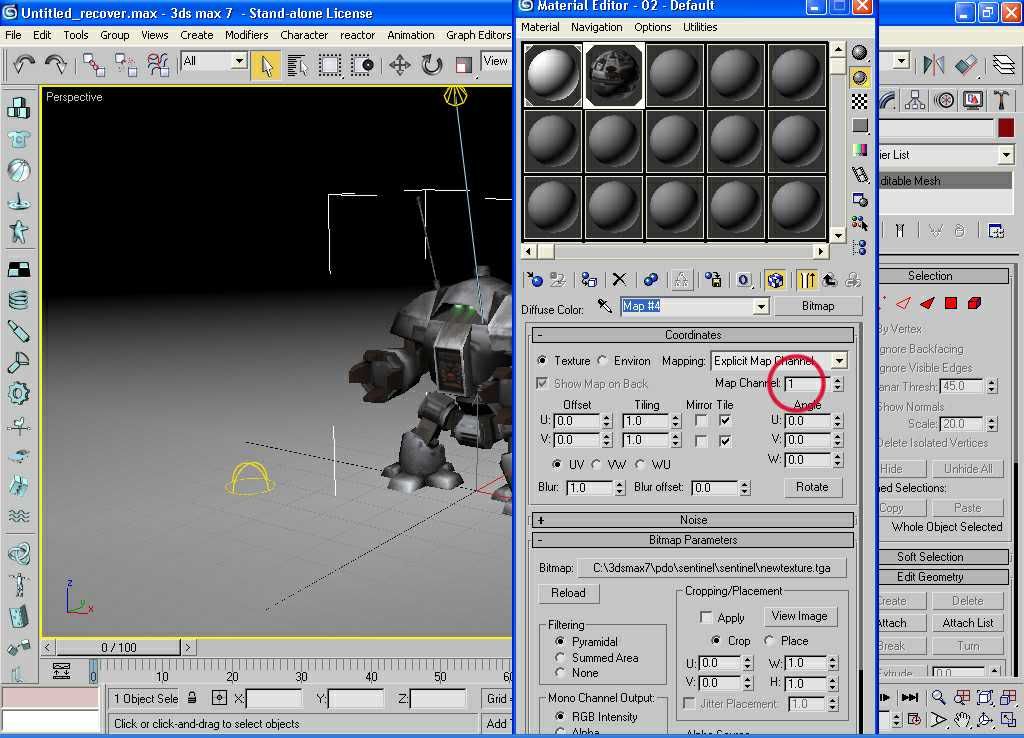 All we have to do now is to export the model. I find that the wavefront .obj format is the best to use for metasequoia. 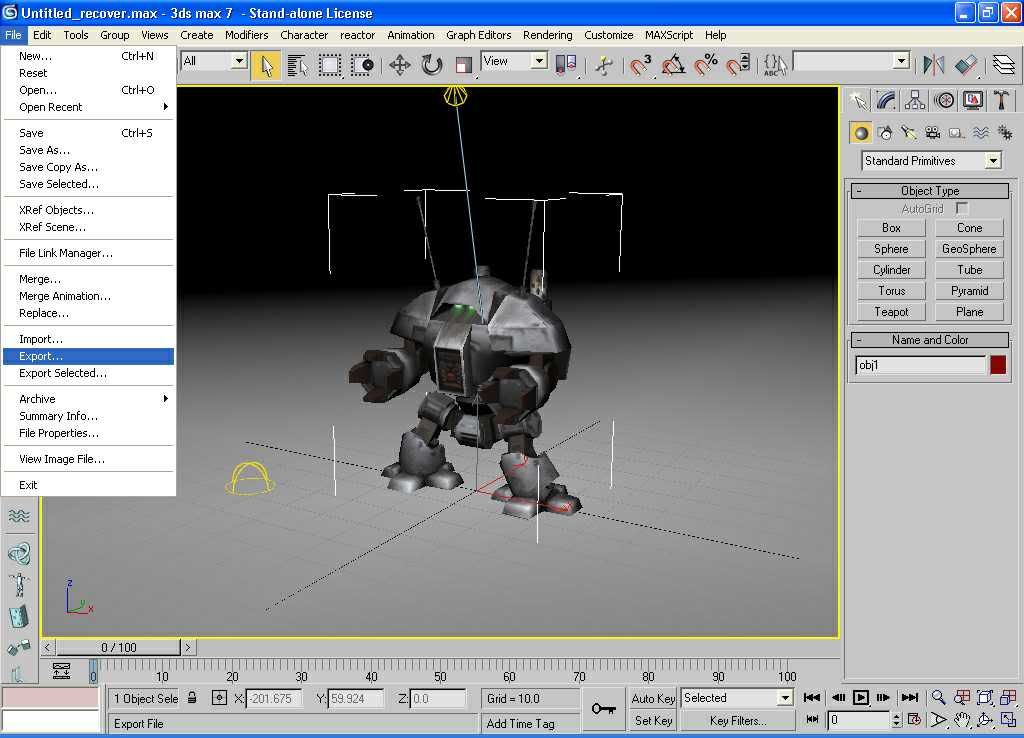 Open the wavefront .obj with metasequoia, find the correct textures and set the colour and emmisive setting to your liking. Save it as an .mqo You should now have a renderbaked model ready for making your paper model. In the image above you will see the rear is darker than the front and there is more shadow in the parts where shadow would normally fall. Compare the image above with the very first image, the difference is subtle but more natual than the plainly lit model. Pre baked:- mecha1.flv - YouTube Renderbaked:- mech2.flv - YouTube Also you don't have to stop there, you have your files saved, you can mix materials and renderbake more textures that fit straight into the UVs for the new texture. 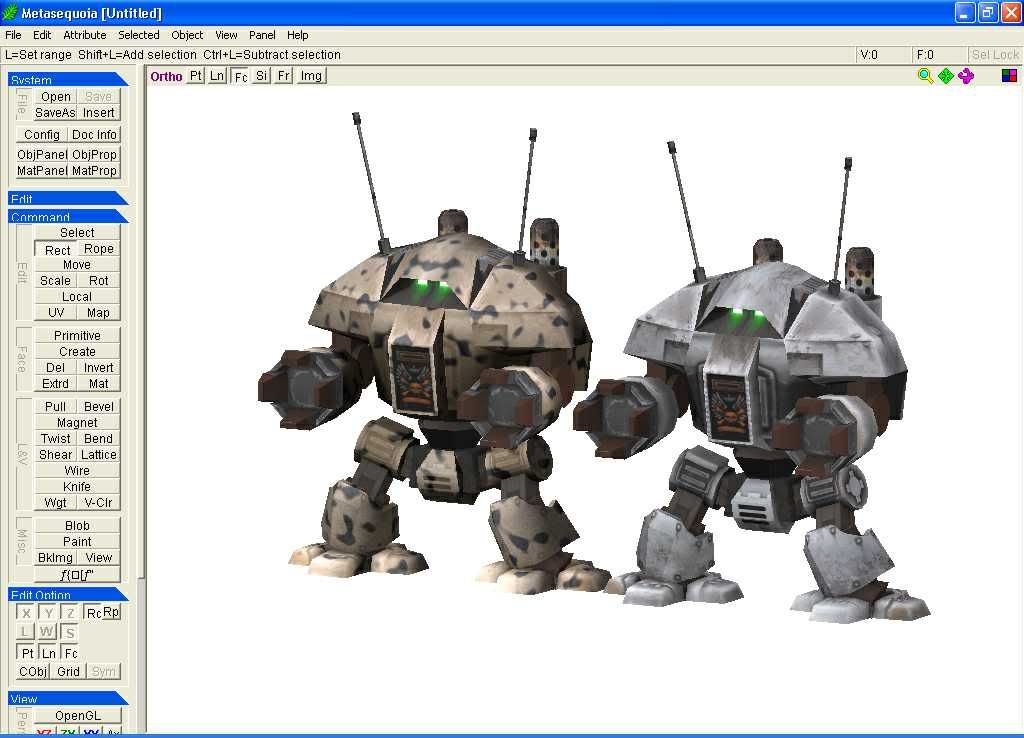 ADDITIONAL. Want to remap the original textures on the model with new UVs? Simply do a render bake with no lights and the original materials self-illumination set to 100. Word of caution, you need to save the max scene at a point where you can go straight to render baking, render baking a render baked model will render bake it twice, the shadows will be ALOT darker, like you burnt it by baking it too much.
|
|
#3
11-09-2011, 10:46 PM
|
|||
|
|||
|
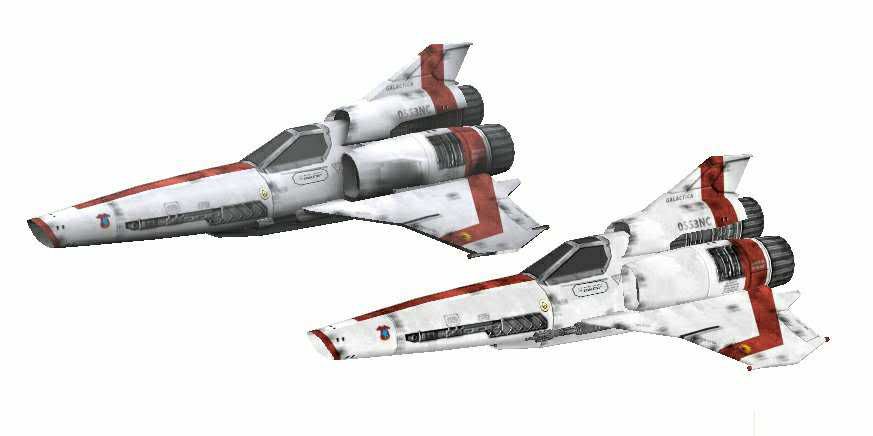
One more pic, different subject.
 In the games industry it is used to speed up the game, you will find some game models pre baked and some that require a game engine to do the shading, this is why some paper models from games look great and some look ok. Finally, render baking is subjective, not everyone will like it.
|
|
#4
11-09-2011, 11:19 PM
|
|||
|
|||
|
All I can say is , WOW, and THANK YOU !!!!
What a great tut. I for one am very glad you made it. It must have taken you a lot of time to write this up for us. I have printed it to PDF for future use. Oh yes. That mecha seems familiar 
__________________
DOWNLOAD all my paper models from my MediaFire page available here : BLaaR's Paper Models
|
|
#5
04-20-2014, 10:07 AM
|
||||
|
||||
|
I know this tutorial isnt very fresh and maybe the OP has the images available to reload.......cause how usefull is a tutorial without images?? Or am i the only one seeing big RED x's?
Mike
|
| Google Adsense |
 |
| Thread Tools | |
| Display Modes | |
|
|


 Linear Mode

