| | Browse Files | |
| daVinci robotic surgeon | ||
 Rating: 0 Favourites: 1 Report File |
daVinci robotic surgeonFile Information
Files
|
More From This User |
|
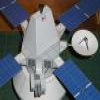
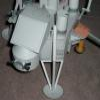
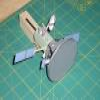
1:12 scale model of the Intuitive Surgical daVinci Si-HD medical robot. You'll need to reference the thread in other builds for construction information - I haven't written detailed instructions yet.
http://www.papermodelers.com/forum/o...e-diorama.html The arms are not movable. The joints are cylinders glued to the ends of the arm sections in this version. You can modify the design to articulate the joints by rolling the joint cylinders, then cutting them in half at the centerline to make two shorter cylinders. Glue those to the ends of the arms sections. Then: 1. cap the bottom of the lower cylinder section with a disk of card, 2. roll another smaller cylinder (axle) to fit inside the arm joints - make sure it's tall enough to extend about 1mm past the top edge of the upper joint, then glue inside the lower section, 3. slip the upper joint over the inner cylinder and glue another disk to the top of the axle (take care not to get glue on the outer joint) to retain the assembly. **revised joint glue technique: cap the bottom of the lower cylinder section with a disk of card; roll the inner axle to fit inside the arm joints and cap it with a disk of card; apply glue to the inside of the lower cylinder well below the top (so it won't get on the upper joint); then insert the axle through the top cylinder and into the lower cylinder - the previously applied glue will secure the axle with little chance of excess glue freezing the joint. The wrist joint would be a little more complex, glue a cylinder to the bent arm section to make an axle/pin, insert pin into a hole in the end of the angled arm piece, then cap with a disk of card to lock the joint in place. The articulation of the tool assembly would just require a series of axles for the two major joints and a cylinder slipped over the existing mounting part for the final joint. The flat part holding the tools could also be made to slide in and out, add a saddle of card to slip under the main part. I didn't make the joints movable - just too many of them for a desk model, it would be like spaghetti. |
||
 40927-daVinci_medical_robot.pdf