


|
|
|
#1
 05-19-2019, 04:22 AM
|
||||
|
||||
|
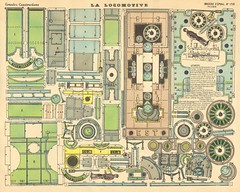
Imagerie DEpinal La Locomotive and Tender
Here is another train from Imagerie D'Epinal. This one is much more detailed than the one I made previously. I think it is a model of a French Buddicom locomotive. It is pretty close to the photo I found on the net.
The detail is pretty good. I was very impressed with the artwork and the fit of the parts. The tolerances were very tight. The only part that didnt fit well was the wheel arch that had to meet the curve of the boiler. It required a good deal of trimming to fit properly. It wasnt hard to build but it was hard figuring out where everything went. The parts are put wherever they fit on the page and dont necessarily relate to the parts nearby. They are all marked with letters, so in theory you must have to match letter to letter. However many of the letters are illegible. Perhaps on the original they could be read. I printed on A4 card. I dont know what size the original was. Even when you figure out where the parts go, without a knowledge of the mechanics of steam engines it would be puzzling as to how they should go together. I dont know what references were like back when these were published but I dont imagine they would have been adequate to show how things go. The only departure I made to the original design was in the wheels. I build them up to look solid. The original had a loop of paper glued to a the outside of a flat disc to represent the surface of the wheel that touches the tracks. It just looked weird and was hard to get round. The driver supplied with the locomotive looked to small. The tender had bigger figures that looked about right. You can see both of them in the pictures. Over all a fun build and I am pleased with the result. 
|
| Google Adsense |
|
#2
05-19-2019, 05:04 AM
|
||||
|
||||
|
Looks very good. You did a good job in figuring out where the parts go.
I have built a few of those Imagrie D'Epinal models. It is an all out process to first clean up the scans since most have a severe color cast and decide just how the colors should look. Then you need to decide how big to print them since most do not have any indication of the scale. Then as you noted you need to figure out exactly where the various parts that are scattered throughout the sheet go during the construction. I have tried to transcribe some of the text in order to get a translation to see if there are any good hints as to the steps needed to make the models. I have also tried capturing the areas with the text and saving as a picture to try some OCR. The results have been interesting to say the least. 
__________________
~Doug~ AC010505 EAMUS CATULI! Audere est Facere THFC 19**-20** R.I.P. it up, Tear it up, Have a Ball
|
|
#3
05-19-2019, 05:18 AM
|
||||
|
||||
|
Thanks Doug. On this one I used gimp to remove the discolouration around the parts. The model in the pictures was made using a print I made later. Again I used gimp, this time to erase all of the big identification letters that were printed in visible areas of the parts.
This model was actually my second attempt. At first I tried using the tabs drawn on the parts, but as the tolerances were so tight I managed to slightly twist the model down its length. On the second attempt I didnt use the tabs. Instead I glued parts that formed shapes to thicker card and built around them. This was much quicker and easier than cutting hundreds of little tabs.
|
|
#5
05-19-2019, 06:19 AM
|
||||
|
||||
|
Looks like a satisfying end to a modeling adventure.
__________________
Screw the rivets, I'm building for atmosphere, not detail. later, F Scott W
|
| Google Adsense |
|
#6
05-19-2019, 07:22 AM
|
|||
|
|||
|
|
|
#7
05-19-2019, 07:23 AM
|
|||
|
|||
|
|
|
#8
05-19-2019, 12:26 PM
|
|||
|
|||
|
The originals are Petites- 23 x 30 cm, Moyennes- 29.5 x 40.5 cm and Grandes- 49 x 39 cm. (small, medium and large)
|
|
#9
05-19-2019, 02:02 PM
|
||||
|
||||
|
A lovely model, and well-executed.
__________________
Give me a pigfoot and a bottle of beer. On Flickr: https://www.flickr.com/photos/153077...57692694097642
|
|
#10
05-23-2019, 09:31 AM
|
|||
|
|||
|
|
| Google Adsense |
 |
|
|


 Linear Mode

