|

04-13-2011, 04:02 PM
|
 |
Member
|
|
Join Date: Apr 2009
Location: Nikiski, Alaska -9UTC/-8UTC DSTime
Posts: 4,028
Total Downloaded: 27.71 MB
|
|
|
Tail Feathers
Whoops, I made a big mistake! I should have posted this build step before showing the Fuselage Prep one.
The reason why this is an important mistake?
The Rudder needs to be dry fit before inserting the PSI Tube assembly. This protects the PSI tube from accidentally getting cut!
Ok, now back to building...
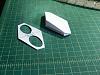
1st photo shows the rudder parts already glued together. Make sure the front glue tabs are inside, not on the outside. Now I'm applying PVA glue, but it is best to use spray glue for these steps!
If you use PVA like I am, be sure to place under a heavy flat object while the glue dries. If the Elevator or Rudder warps from using this glue, the wavy shape will cause excess drag/flight control issues when flying.
The model will still fly, you just have to bend some of the control surfaces to compensate, which causes the drag, in other words the model won't go as high or as far if these don't warp!

2nd photo shows glue applied to the top, the bottom needs glued as well. BTW-Way too much glue-perfect for a warped Rudder, which is exactly what happened!

3rd photo shows a close-up of the glue tabs. This is where it is important to verify alignment of parts. If these are properly aligned, the rudder sits on the fuselage straighter and is easier to glue.
The bottom edge of the Rudder needs to be aligned, not the tabs, the tabs in the next photo will be trimmed for the dry fit to the fuselage.

4th photo shows trimming the glue tabs to fit the fuselage slits. It is easier to trim these for length, than it is trimming the fuselage!

5th photo shows cutting the opening for the Elevator. Use a straight edge to do these cuts! Notice I don't cut all the way through the rudder to the front-bamboo skewer is pointing to show not to cut all the way!
The thick dotted lines look like they go all of the way, but it is easier gluing the Elevator on if you don't cut the whole distance.

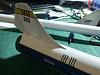
6th photo shows the dry fit to the fuselage. Notice how the rudder sits without any gaps underneath it, where it sits on the fuselage?
 7th Photo shows initial step in gluing Elevator. Do it just like the Rudder to complete it.
|