|

04-13-2011, 04:24 PM
|
 |
Member
|
|
Join Date: Apr 2009
Location: Nikiski, Alaska -9UTC/-8UTC DSTime
Posts: 4,028
Total Downloaded: 27.71 MB
|
|
|
Forming the Nacelles
Time to form the Nacelles.
These give the model strength. They form a "cantilever" type mount for the wings. This allows the wings to be made without the use of internal wing spars!
They also support the Fuselage, adding strength to the front when the model performs a vertical landing pattern.
Roll them just like doing the Fuselage & PSI tubes using a wood dowel or any method you prefer.
To get them ready to attach to the model, a few things must be done as follows:
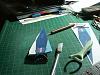
1st photo shows the bending back and forth of the glue tabs. Notice I try to show this by one side up, the other down.
These tabs need to fold easy, if they don't, they act like a spring, forcing the Nacelle away from the fuselage while trying to glue in the next step/post!
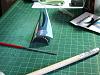
2nd photo shows the nacelle ready to roll. Notice that the wing opening is Not cut out!

3rd Photo shows how the nacelles should look after rolling.

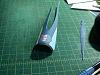
4th photo shows the wing opening cut and the forward tabs bent inward.
These tabs create a very strong connection to the forward part of the wing, forming the cantilever mount where it is needed most!
Now would be a good time to edge color the front of the nacelle, if you want to. This is the only edge coloring I do.

5th photo shows gluing the nacelle to the front air inlet.
6th photo shows a completed Nacelle, ready to be attached to the fuselage/wings.
Attaching the Nacelles is next!
|