A day of frustrations...the 40 inch LCD TV arrived in time for the birthday, but when the box was opened, I found the remote had been smashed during transit. Walmart says to bring it back and they will have a replacement shipped...another two weeks before being able to enjoy it. The frustration is that they can't work just with the broken remote....the entire SOB has to be shipped back. I tried working with the 'manufacturer' of the TV, but since the damage occurred during shipment, they won't stand by the warrantee, and can't just sell me a replacement remote. INSANE....no wonder America's economy is in the toilet with such stupid, stupid policies. Rant, rant.
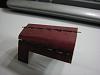
On the building front, the hood is finished. For those thinking of attempting a build themselves...my technique was: first, shape the hood pieces to fit around the curves in the radiator assy and firewall. Then valley fold the tabs that will make up the hinges. Take a straight pin, hold it behind the first hinge tab, and bend the tab around the pin. Use thumb nail to conform the tab snugly around the pin. Holding the end of the tab closed against the hood piece, remove the pin and place a small bit of superglue to the outside of the hinge cylinder in order to harden it. When dry, use the thumb nail to press the end of the tab against the hood piece and place a small bit of superglue against the edge of the tab, letting capillary action suck the glue into the joint. Only about the last 1/64th inch of the tab end serves for the joining tab...the rest of the hinge tab makes up the cylinder. Carefully pry the thumbnail from where you cemented it to the part, and when glue is dry, reinsert the pin into the hinge cylinder. Repeat, repeat, repeat.....
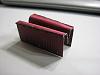
Once the first hinge tab is completed, it can be used to help steady and position the pin for doing each successive tab. When all hinge tabs are formed, check for alignment of the hinge cylinders by running a length of wire into it. I used piano wire with a slightly smaller diameter than the pin for the hinge. When you can easily run the piano wire into the hinge half, remove the wire and glue in place the interior hood pieces. When dry, use lengths of piano wire to join the hinges together. The two outer hinges of the hood should have the wire cut off flush with the ends of the hinges. For the center hinge, leave the wire long enough so about 1/8 inch extends beyond each end of the hinge...this will be used for attaching the hood assembly to the radiator assy and car body. Slow work, but the finished product is worth it.