Part 13 - Machine guns
More than once I considered dropping the machine gun pod altogether, it's literally an ugly wart on the nose:
Moreover, it's modelled as a partial orb with a slot at the front, much like a motorcyclist's helmet, trespassed by a trapezoidal box. Therefore it's weakened and awkward to hold while building, and the incomplete central ring is a bit difficult to align, without folding lines at least; the strange texture mapping at the rear and side does not help at all. IMHO it'd be much easier and more precise building a complete orb (except where it intersects the hull) and a partial box with curved edges glued on, not through it.

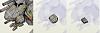
As usual, I used Inkscape to remove folding lines and detach the central face. The ring edges, shown here before coloring, were curved as smoothly as possible:


I modified the box with parallel sides and a recessed front. Later, a dash of paint will help concealing the edges glued flush:

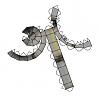
Hollow machine gun barrels were scratchbuilt with rolled tissue-like paper, painted silver-gray and coated with CA.
Now all the original parts are in place, and it's time to add detail and color touch-ups. Please be patient.


