
With the joy of having a fresh sharp blade in the cutter, I have started out on a 50% reduced version of Leo Cherkashyn's Soyuz launcher. He made a special edition for the 50th anniversary of Gagarin's launch, which was in April last year*. Unbelievable this rocket still is going strong! I have made this rocket three times already, in several scales. 1/200 (Sputnik - Lars Folmann), 1/48 (Voskhod - Leo Cherkashyn), 1/144 (Soyuz - Raimondo Fortezza) but since my "Official Rocket Garden" is scaled in 1/96th, I decided to do one more in this scale. The first rockets I made are from two years ago now and when I look at them, I see all kinds of things I now would do different. But they still look good, I think.


Well, first parts are the central core booster, or stage 2 (stage 1 being the strap-ons). Leo's kits are reliable in this sense: they always fit very well. While working on it I kind of felt there was something missing. Then Merzo very thoughtful mailed me a very big file full of detailed Soyuz assembly pictures. While I first wanted an easy build, I now was on a different track. I knew what my build lacked. Thanks Merzo!
Detail! Shiny detail! The business ends of the Soyuz have parts that are made of very smooth polished pieces of bare metal. I thought a while and remembered I had this roll of silver tape I used for taping the insulation floor together beneath the laminate floorboards in my GF's house. This did the trick.


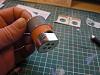
The core stage was done with a small strip around the body and housings for the Vernier steering engines as well as the bottom part. Then I went on with the first of the four stap-ons. I decided to do them one by one and not in serial construction to prevent it getting tedious.
I used the tape again and added some carved lines into the part for panel lines. I added some weight to the bottom of the booster, planning to do this with all four of them. It might keep the stack from getting too top heavy and falling over. It all went together smoothly and now it's awaiting its top part.
I decided to take it easy on this build, there's a lot of work ahead job-wise, so I think I have to take it slow.
Anyway, this was the first part.

 *To make things clear: the Russians have launched this rocket with special insignia - and Leo made this into this model. It's not Leo's own invention.