A few people have asked me to write up a tutorial on how I design, so I thought I'd give it a try. I started one many years ago on the FG forum, but kinda lost interest. Hopefully that won't happen this time...
Today's installment is how to prepare the 3-view of the model, using Photoshop.
First step is to pick the 3-view. You want a top, right side, and front view. Any other views are gravy that'll be used later for panel lines.

The Top view needs to be pointing nose down in order to work in Rhino 3d, so select the top view using the Lasso command...
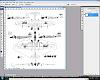
...Cut, paste, rotate 180 degrees, then flatten the image.
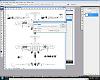
Next up is to turn the background into a layer. Double click on the word Background in the layers window, and press enter.
Then create a new layer,

and make it the background

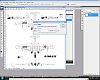
Then go to Image> Adjustments> Invert
Then on the Layers window, set the opacity to 50% (The grey background fades into the background of Rhino) and flatten the image again.
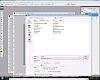
Make sure to save the file with a new name as a .jpeg
Next installment, importing the 3-view into Rhino.