Now for the fingers.
I modified the build a bit. It can be done as shown in the instruction graphic. I made a help aid using the section of the instruction graphic to show how I interpreted it to make the fingers as designed.

Later another way to make the fingers will be shown.
The folds for the knuckles:

Follow the natural lines for the "T" shaped base part. The rectangular part needs a fold 17 mm from each side. You can not use the base as a guide in placing the folds for the rectangular part. It seems to be shifted a little to one side.
You print the page with the three finger sections 4 times.
The folds for the finger sections:

The small triangular tabs are glued to the beveled areas of the finger sections. The narrow section between the two close poximity red lines form the bevels. The circles on the part are important for placement of the pivoting assembly. In order to not have the heavy black lines show I transfered the circles to the back side of the prinout and valley folded on all of the black lines and the red fold lines where indicated. You don't have to do that, but the heavy black lines will show on the finished model.
Here is the finger joint base:
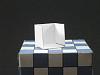
The thumb and four other fingers each have one base. The thumb has two finger sections, the other four fingers each have three finger sections.
Here are the pieces used to make the finger joint pivots:

The numbers correspond with the numbers on the instruction graphic. There is an extra piece labeled 5b which will be explained later. Also, rectangle 2 is solid. You will use disk 3 which is cut out of rectangle 2, but rectangle 2 with the hole is not used. Cut other rectangles with the same dimensions as rectangle 2. Disk 5 and rectangle 4 are cut and used as printed.
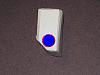
After constructing the finger section, glue disk 5 to the circle area:

The pieces have been colored to make them easier to see. They are all actually white.
I used a 1/4" hole punch to make disk 5b. Glue disk 5b centered on disk 5:
Place rectangle 4 over disk 5, do not glue:

Glue the center of disk 3 to disk 5b, sandwiching rectangle 4 between them:

Make sure the disks and the rectangle are not glued to each other. Wait for at least a count of 20 before moving the pieces around. Make sure rectangle 4 rotates freely.
Glue rectangle 2 to rectangle 4 by applying glue along the short sides:

Disk 3 is sandwiched between rectangle 2 and rectangle 4. Make sure not to glue the disks to the rectangles. Make sure the rectangles rotate freely.
Follow all of the steps for the other side of the finger section.