Not a lot of progress on the actual model to report but I've been working on building a large collection of parts that I'll attach all at once, to simplify the process. I just thought I'd make an update to save having to catch up later.
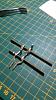
Next up was the suspension. Not a lot of problems here with parts fitting, just a lot of sometimes tiny tubes to roll and a lot of cutting. Thankfully the cutting time was kept to a minimum thanks to some handy lasercut parts, although I have to say, I'd love to know the thought process that went in to deciding which parts to add to the lasercut set... there's a lot of simple square shapes included on the sheets and some tiny curved parts that for some reason are not... a perfect example of which are the tiny little steering arms that attach to the wheels, as shown below.

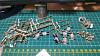
Thankfully though, the suspension arms were included, they would have been really annoying to cut from 1mm card. They weren't very sturdy though, so considering most of this section will be holding the weight of the model, I've given everything a good soaking in CA glue for some added strength.


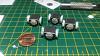
I mentioned earlier I wasn't going to bother with working steering or suspension and have glued some of the parts from the steering mechanism... I appears that I might be able to save it and at least have poseable wheels, by customising the parts that make up the connection from the steering system to the wheels. I also, for now, have working suspension, complete with springs inside the shock absorbers, so fingers crossed, that will continue to work after I attach it.


I've added some extra details here and there, mainly just some rivets, I can't help myself, even though most of it probably won't be visible once the model is complete. Next up everything had to be prepared for painting once I'd accumulated a pile of parts...

So now it's all been painted and is ready to attach, however before doing so I decided to move ahead a bit in the build to work on the diffs and the driveshaft thingies that go to the wheels as this made more sense than to try and attach them all later with other stuff getting in the way...

This is where things got a bit nasty, and confusing. Missing parts, mislabeled parts, confusing diagrams on the instructions, you name it, it's all here. It really takes some time to understand the instructions to this kit, and that's not helped by the fact that the instructions for some sections are randomly spread over multiple pages. Add to that the mislabeled parts, both on the instructions and the parts sheet... parts are also spread randomly through the parts pages and some don't even exist. Yes this model requires some skill, but above all else, the two things you require the most are patience and time.
Having said all that, I'm actually quite enjoying this build, for now, I love a good challenge. We'll see how long that lasts...
")