After plenty of discussion, digression and distraction, it's time to get back on track with some actual building. Don't get me wrong, I love the discussion, I could talk about this stuff forever.
It's been a busy week or so, trying to see how this idea of squeezing Uhu's cockpit into this model would work out. As mentioned previously, John (skyman00) has been incredibly helpful with his graphics skills, helping me re-scale and simplify Uhu's cockpit to suit this smaller scale while at the same time, enhancing the graphics and colours.
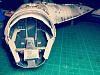
I've done another "quick and dirty" build of a basic Uhu cockpit to see how well it sits inside the Makino cockpit tube/nose. The Makino nose cone section is longer, leaving a gap in front of the control console but I should be able to fix this without making it noticeable.


I intend to print the actual cockpit on glossy photo paper and transparencies, to allow for a crisper, cleaner look, while also allowing for some back-lighting provided by side-glow fibre optics (think flourescent tube type lighting), along with some standard end glow fibre for small lights and some flashing lights/buttons.
I'll also be doing my usual layering and added detail to the cockpit, instead of trying to build some of Uhu's extra details at this scale.
While I wait for my new paper and a few more bits and pieces for the lighting, I decided to start detailing the exterior of the cockpit tube. I've been keen to start external paneling as soon as possible, so I can decide on a thickness for my panels, I've decided on 0.75mm as 1mm was too thick and the 0.5mm and 0.6mm card I have on hand seemed a bit too thin.
I've added all the panels, leaving a bit extra along the bottom edge in case I need to compensate for the curved hull later, Makino's hull is almost straight at the section where this tube is attached.
I've also added all the greeblies that run along the top of the tube and the cockpit, based on makino's textures and reference pics. I think some of these have ended up a bit more pronounced or raised than they should be, but I'm OK with that.


The most annoying aspect here was the "ribbed" ring that goes almost all the way around the cockpit, it took me a full day to make it, gluing the brass rods to the card with CA glue, then finding out it had misaligned itself so I had to start the whole thing over again.