I have been working on this thing off and on for a while. Lots of stuff to get me scratching my head trying to figure out if the desinger actually built this thing as offered.
I printed two pages on one A4 size sheet.
The fuselage so far is around 9 in / 23 cm.
Parts B2 and B3 go together to form part of the forward fuselage. Unfortunately the resulting diameter is too big to fit the B4/B5 assembly as noted in another thread about this thing.
What I did is to cut down the middle of one of the segments on B2 and B3 then use one of the half segments as a glue tab. You will also need to modify the nose a little to fit the smaller diameter of the B2/B3 assembly.
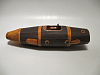
The cockpit was supposed to be edge glued to the underside of the top of the fuselage I guess, but I added some glue strips for a more secure installation.

Here is what it looks like intalled. Seems a bit twisted to me.

Don't know when I will do some more work on this thing. Maybe when I have been feeling to good and need to get pissed off about something.
")
