First thing that will not be to scale shape is the propeller. It will be the average of 5-different 3-view drawings. Some were 15" some were 18.5", working up an ave. of 17.25inch.
But first a little history from last century till now: Can pass by if you want>
When I was 8 or 9 years old, both my Grandpas gave me control line models for Christmas that year. Grandpa Ed gave me a Cox .020 Green Pitts Special, it cranked and flew fantastic.
Grandpa Joe Gave me a Boeing P26 Peashooter made by Cox with an .049 engine. It only started once! No matter how much I tried, it would not start. I knew nothing about Glow Plugs and how they worked.
All I knew was hook the battery and spin the prop, it should start just like the little green one.
Well one day had some friends over to launch rockets and fly the control line Pitts.
Decided to try and crank the .049 again.
Guess what? it fired right up first spin of the prop!
Well the spinning prop totally caught me by surprise and left me with a scar to this day! Got my left thumb just below the main big knuckle! Please note scars around middle knuckle are from cop car/motorcycle accident, not to be confused with the propeller history:

Grandpa Joe was special: He owned a Cessna 182 that had Robertson Stall to fly into the Idaho back country. Anything, anytime he talked about flying, no problem with me falling asleep!
Or invited to fly the next day into the Flying B Ranch on the Middle Fork of the Salmon River?
No sleep for me.
He learned not ask about the trip until the day before, mother's request...4am alarm clock, 5am take-off. Usually meant work on the end of a shovel, but horses to ride and fish to catch and most important payment-over an hour each way to fly in.
When he gave me the model he told me about his favorite fighter he admired as a young adult in the 30's. That is why he bought me the Boeing Peashooter. Now you know why it gets high end printing! Looking around found a couple of
gold colored fuselages. Perfect to show off the Metallic Photo Paper. The one he gave me was a Red, White, Blue colored one, which there are several.
Back to work:
Looking around it was possible to buy a two bladed 17" diameter propeller that was rough cut from balsa wood. Only final sanding needed done.
It will shatter instantly on contact with almost any hard object. Cost is over $20 per blank.
After several on-line searches and finding some interesting photos and reading material, decided to make my own propeller.
It will be made using photo paper! Why paper?
It won't shatter if it hits a hard object. Easy to cut to proper shape. Only issue is getting the correct under camber or curve.
Thinking that it will work to get the under camber by:
After cutting both sides of each blade out, verifying good dry fit for accuracy, super glue will be used to fuse the blades back to back.
Before the super glue has a chance to set-
A plastic wrap will be wrapped around a 2" paper roll tube (done well before super gluing).
The blade parts will be wrapped at an angle on top of the first layer of plastic wrap. The blade part will be tightly wrapped to the tube using more plastic wrap to hold it "tight" to the tube while the 60-second super glue cures for the next 4-hours minimum.
Hoping this treatment will give it the correct curve, by pre-stressing the blade this way, should make it incredibly Strong and hopefully will maintain its shape at the 2000 RPM it rotates at.
Rubber bands rotate at 2000 RPM? What??
Well, not sure, Have read several different places where 1000 windings are done in 30-seconds. That count is by an actual counter they use at the competitions.
You can get more windings by lengthening the rubber bands (what I do), by adding strands (what I do), and more time or less time by using a different pitch propeller, gearing, a bigger blade also slows down the RPMs.
To make a propeller and get it accurate you need a prop "Pitch Gauge" to verify both sides are the same.
Here is my home made tool after finding something similar on-line at
endlessLift – the wonder of simple aviation.
My version cost way less than any you can buy, commercial ones start at $15 for electronic versions to $345 for adjustable mechanical ones. Old Scrap wood from the garage, $1.28 protractor. Screws were a major cost of the project. Electricty had to be in the the 2-3cent range for the drill press that was used to drill the holes

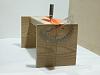
Here are some photos: Easy to see prop pitch at top of wood edge, harder to see prop in this photo-it is a 12" long plastic one:

Top View-Regular mechanic socket used for weight to hold prop down. Holes are 1/8" apart:

Here is a side view, easy to see wood used- ends are pine wood sized 8" wide x 3/4" Thick x 7" long. 2x4 is 14" long with holes drilled down the center. Don't need a ruler to determine length, just that blade falls at mid-length location onto the protractor edge-as shown with 12" blade. Clearly shown is 3/32" spacer under prop for proper clearance for the tool to work:

Last look for now: Soon you will see how it works to make a working propeller!:
Mike