On other forums I placed this tutorial. I understood it was helpful for many people so far, so, why not post it here as well?
Part I
F.H. af Chapman (1721-1808) was a brilliant 18th-century shipbuilder working as a manager for the Swedish Karlskrona navy shipyard. He ended his study in England under Thomas Simpson with a tour around English, French and Dutch shipyards. There he draughted many ships on the stocks and in 1768 he published his Architectura Navalis Mercatoria, in which he presented his drawings, all accompanied by his calculations of draught, stability, center of gravity and more sort like scientific data.

On plate LIX we find (amongst others) the lines of a 64 ½ feet long fish-hooker, a type that has been in use in Holland for several ages. If you don't have the book, you can find it on the digital museum site of the Sjohistorical Museet, right here:
DigitaltMuseum. You can download the drawing, which is the penultimate one on the page. I will tell more about the ship type later, first I will say some things about building in paper and card.

For many years I have professionally build wooden ship models, as a method of research. Nowadays I have thrown off the burden of science and concentrate on models that look like real ships. I know we all have our own philosophy about what a model should look like and what it should stand for, but what I try to achieve is a certain degree of realism. Not by duplicating every nail or piece of rope that was there in the real thing, but by creating an impression of the vessel as it sailed in its days. It is more about atmosphere than accurateness. I won't try to convince you that what I do is the only way to build here, on the contrary, I just tell you what I do for fun and who knows it may inspire you one day to give it a try. The fact that my son Emiel uses my models to create wonderful 'photoshop-paintings' has of course been a factor in the decisions I made.
Not only did I leave strictly realistic constructions on scale behind, I also chose for a rather unusual material that makes building a lot easier and faster for the model maker than wood does: Paper and card.
You might call what I do 'model-building-light version'.
Don't think I consider my builds examples of how things should look or be done. I have spotted many members on this forum who are a lot better builders than I am, but hey, this is all about fun and not much else.
Easy building with easy results.
About paper
One of the many advantages of building in paper is that it is incredibly cheap. I am Dutch, so I will not dwell on that too much. If you have purchased paper kits you know they are usually not the most expensive way to spend your money compared to wooden kits, but scratch-built paper models don't cost you anything, except for some paper, glue and paint. Even my largest models never cost me more than a few Euros. So if half underway you think you failed your mission and you decide to abandon ship, make a run for the dustbin and start anew. All you wasted is time and as a model builder you have plenty of that, don't you? Otherwise you would have spent your precious time on more useful things'.
Another advantage of paper is the speed you can work with. Some of my models were made within three weeks, although I must admit that the Lenox model took me 5 months. Still an incredible short time for such a complicated ship and in no relation to what it would have taken if executed in wood.
A last positive point I would like to emphasize is the mess you make, or actually you don't make. After working on the model you can simply clear the table and your wife is as happy as before. No wood-dust, no shavings, just some paper snippets to be moved into the dustbin. Everybody happy:-).
Plans
Especially for people who are used to buying kits, it might be useful to explain how an original plan can be used. Looking at the Chapman drawing we see there are several ships on the sheet. We just need the upper part, where we see an elevation (or side view) of the hooker with a body plan and a section to the left. There is also a top view underneath which we will use later when some deck-details have to be filled in.
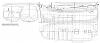
1. The first thing we have to establish is the scale. I work with a 1/77 scale because it fits me, but you can pick any scale you want. The length of the vessel is 65 ½ feet, which is 18.25 meters in Amsterdam feet (28.3 cm). On a 1/77 scale that is 23.7 cm for my model. Print the drawing, measure the length, calculate the percentage you need to get the size for your model and print again.
2. Now we can cut out the shape of the side view and paste it to a 1 mm thick piece of card. Let's call this longitudinal part the spine. Use so-called eskaboard, a solid sort of card, used for making sturdy boxes. You can use old boxes, but your art supplier sells it in different sizes and it is not expensive. (in fact I use 1.3 mm thick card, but it depends on what you can find) Use glue from a spray-can, to make sure the paper sticks to the card at all places. Don't take the top of the bulwarks as the upper side of your spine, choose the line of the deck instead, it is visible on the drawing. Draw your topline one millimeter lower than what the plan says, because your deck will have some thickness and you don't want to end up with a deck that comes too high. Don't forget to make cuts for the masts.
3. Next double your keel, stem and stern on both sides with the same type of card, so that you get a rabbet.
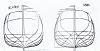
4. Now we need the body plan. What we see on the drawing is the shape of the ship seen from fore on the right side and from aft on the left side. Make three copies and cut one of them in halves over the centerline. Hold one half drawing upside down against a windowpane or lay it on a light box and take over the lines on the backside. Now paste the half body plan precisely next to its counterpart and you have the shape of the full frames. Check the width! Do the same for the other half. If you can manage a computer program to do the trick, even better, but in the end you will end up with this (left the fore part, to the right the aft part, even though the Dutch words seem to suggest the opposite. Nobody is perfect:-))
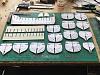
Go back to your printer and print 6 copies of the front part and 8 of the aft part of the ship. Paste them on eskaboard. Now you will have to mark the height of the deck on the frames. The best way is to cut the whole frame as it is on the body plan and draw the height of the deck later.
5. Now you will have to bring the spine of the ship and your frames together by cutting slots. Decide how deep your slots will be. Cut them in the spine from the top downwards and in the frames from the bottom upwards. Most of the time the waterline is your best option. If all goes well your frames will butt against the doubled keel and all will be in line. Mark the height of the spine on each of your frames and remove them from the spine. Now you can draw the exact height of the deck on the frame. You can make a mold with deck-camber and transfer it to the frames. Cut slots in the sides of the frames to half the distance to the centerline and perforate the remaining center part with light pressure of your knife, so that the whole part can easily be removed later on.
6. Take two strips of card of the ship's half breadth and mark the position of the frames on them. Make slots in them halfway from the inside outwards.
Now carefully fit the strips into the frames, so that the two meet just on top of the spine. This will add strength to the construction. Take the shape from the outside of every frame and cut out the shape of the upper deck. Also cut the hole(s) for the mast(s).
The afterdeck is made separately, as the picture shows.

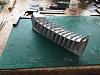
7. The last thing to do is to double the parts of the frames below deck level. This is to ensure that you have a good landing once the skin will be applied. The frames fore will be doubled on the front side, the frames aft on the aft side. At the extremities you will have to slightly correct the shape with a knife.
Finally we glue the whole thing together. PVA glue can be used, as well as any clear plastic glue, or whatever you prefer. Make sure not to apply glue to the part above deck, which will be removed in a later stage.
What you have now is about what kits offers you, but all done by yourself in an afternoon's job and at practically no costs.
Next time we will apply the skin of the ship.