Part II
Planking a paper model can be a choice of several possible methods. You can plank with real planks, following the run of the real planking of the vessel, you can plank in sections and you can use a combination of the two. Most of the time several layers of planks are used, but I will show the simplest method, with only one drawback, about which more later on.
First of all a few words about the material I use. For the skin a sort of card is used, which in Holland is called hout-bord (wood-board) in English probably called -white mechanical pulp board-. It is a yellowish slightly spongy sort of material, much like the coasters used in pubs to place your beer glass on. If you ever bought a Polish kit and purchased the laser-cut parts too, you will know exactly what I mean. It can be bought in different sizes, but I mainly use the 1 mm thick one. The reason to choose this material will become clear in a minute, but I should warn you. This material is inclined to break. Not into two pieces, but it cracks and the crack leaves an ugly angle in the material you surely dont want. So you will have to carefully pre-bend it with a round stick of sufficient diameter, rolling it in your hand until the final shape is more or less reached and the strip can be glued without stress.
Starting in the mid-ship area it is a simple process to cut a strip of the right width and glue it to the frames, using only one half of the doubled frames to glue to. Thus the next strip will have a decent landing too. Working to both ends of the hull things will get a little bit more complicated: due to the difference in shapes of the frames the strips more and more begin to show a twist. So they have to be cut wider to begin with. The procedure is simple.
_
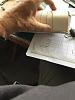
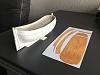
Place the bottom of the strip against the keel and the last planked section, allowing for no gaps. Carefully fold the bended strip over the frames, in a way that they touch them entirely on both sides. With a pencil or pen the overlapping side against the already planked area can be marked. Also the height of the bulwarks can be marked. Take sufficient length and width for the strip, because it can easily be trimmed, but hardly enlarged once it is glued on. Cut the excess and place the strip back on its location.
_

Now there is only side that is left to be shaped. The more often you do this, the better it gets. It is wise for your first efforts to begin cutting a bit wider than necessary. You can always trim later. Make sure that the strip touches the frames everywhere. Any gap will mercilessly show up later.
_
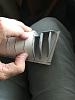
So in the end we reach the extremities. Now the spongy character of the card will prove to be handy. Cut a piece of card and fit it over the area to be planked. Make sure that it is a few millimeters wider than the gap it will have to cover. Place it in the palm of your hand and use something round to press. I use an iron ball, but I guess a firm spoon will do the job as well. The material will take a roundish shape and with some kneading and pushing and pulling the part will fit and close the remaining opening.
_


The result so far is rather crude, but have faith, all will end up ship-shape.
As stated earlier the frames above deck-level will have to be removed. Because we slightly perforated them in an earlier stage, this is an easy process: just push them forwards and backwards. They will break and can be removed, flush on deck-level. Prepare a strip wide enough to cover the inside of the bulwarks and glue it on the inside, lining up all the strips of the planking above deck-level. Save the shape of this strip on a separate paper for later finishing.
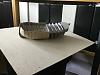
Here we are with our paper hull completed and more or less in shape.
Not really. The drawback of this type of planking is that angles in the shape of the hull are visible and we dont want them. It is called the hungry-horse-effect, looking like the ribs of a neglected horse. So here comes the dirty part of this method. Putty has to be applied all over the hull and sanding is the only way to produce an acceptable shape. Dont do this in-doors where your wife rules over the tidiness of the house. Your marriage will definitely grind to a halt and that might not be your intention. But applying putty can be done outside the house, as can sanding. It looks like a lot of work, but I doubt if it will take more than an hour all together.
_


The trick is to do this in shifts. Apply a first layer of quickly drying putty. Use a flexible piece of card or plastic to cover the flat areas between the seams and as little as possible on the seams themselves. Try to follow the curves of the hull. Wait at least overnight until it is thoroughly dry and sand. Use a flat piece of wood and a curved one to wrap the sandpaper in. A few minutes of sanding will be enough to get your first result. You will not like it as it is. So put on a second layer of putty for finishing, only where necessary. After drying, sand again and mark the spots that are still not satisfying in your opinion. A fourth shift, only applied to places where it is needed will probably finish the job.
Of course this is dirty and on top of that it will take some experience. So there are other, more subtle solutions to the problem of planking. You can for instance work with longitudinal strips and apply several layers of planks on top of each other, combined with some sanding that will finally reduce any unwanted angles to almost nothing. You can also try to shape every section of planking you apply with a variant of the iron ball method: make shallow cuts on the inside of every section where a curve is needed and carefully shape them so that the frames become almost invisible. After that you will still have to plank the ship longitudinally, taking care to narrow the planks towards the bow and use stealers aft. You will end up with a magnificent hull. But that will take experience too. The whole process is about experience, but the method I described is easier if you use the trick I will show you here.
But before I unveil the trick, some more preparations have to be made. First you will have to make the rudder. No problem at all. Glue some layers of card together and take the shape from Chapmans plan. With a few pieces of wire it can be attached to the stern. No hinges? No, why would you take the trouble of making a working rudder if it will never work anyway? We are making a model that looks like ship, but it still is a model and it will only look like a ship.
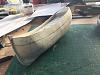
Once you reached this point, it is wise to make a stand. I use strips of a beautiful kind of card, used for framing artwork, called ivory-card. The pictures show what it looks like and your art-supplier can help you out.
With the help of a block of wood of the right height you can run a pencil around the hull to mark the waterline and from there you can draw the run of the wales. This should be done with the utmost of care, taking measurements from the plan. Slightly off-line and the beauty of the hull disappears and leaves you with an inelegant and awful result, so take care. The wales can be made both from card and from plastic styrene. The same goes for the top rail, defining the top of the bulwarks. Now the lines of the hull will become visible and you can judge if a weeks work does pay.
Now the final planking is done. There is a firm in Germany producing self-adhesive foils, called C-D-Fix. They sell all sorts of decorative films like flowers, marble, and a variety of sorts of wood: oak, fir, beech and so on. Some builders use these foils, but I dont like them, looking too plastic to me. I use whitewood, a white foil with a wood imprint. Here is the address:
https://www.amazon.com/stores/page/B...1-d6af39183894
Simply cut strips of the right width and cover the hull with a natural run of the planking. The material sticks remarkably well to the hull, especially if you heat it a little with a hair-dryer. Where the planks should be bended some more heat does the job. The process of planking is so fast that I dont even have pictures of it. Here is the result after little more than a quarter of an hours work.
_


Next time we will give the hull its color and we will work on the details.