Thanks for the reactions Michael, Vermin_king, Seascape and Philip.
As I showed earlier in this tutorial the frames and the longitudinal 'spine' were taken from the plans. There are two elevation plans in this case, one showing the outside with the location of the wales and the other showing the interior. It is wise to decide in this stage what is to be shown in the model. Due to mistakes in the original design I took some wrong decisions in the length of the crew's quarters and the height of the forecastle deck. So I ended up making corrections that would not have been necessary if I had made better plans. Fortunately paper is very forgiving and corrections can be made in almost every stage of the construction without noticeable damage.
Both the side elevation and the body plan can be used to print the longitudinal 'spine' as well as the necessary frames, as can be seen here:

1 Frames and spine prepared. The plan to show an open hatch was abandoned in a later stage of the build and the length of the lowered deck for the crew's compartment was altered after the hull was 'planked'.

2 Dry fit of the hull.
As the construction of this fluit does not differ from the example of the hooker I showed earlier in this tutorial, I made no pictures, but I will use some from the former small fluit I built. Here some shots of that older project:

3 The cardboard bulkheads are still there and parts of the outside are covered with wood board, which has the advantage that it does not delaminate if sanded.

4 Here the hull is planked, not only with cardboard, but also with plastic strips. The decks have been painted with Humbrol 94, mixed with some white and scribed with a fineliner.

5 Planking the hull is of course an important stage in building a ship model, so actions have to planned well here. It is possible to draw the planks on the hull, like I did here. It helps getting a good spread of the planks, which always have a limited width. A few extra planks in the back are necessary to compensate the full shape of the hull there.

6 The remarkable Delftship program also offers the opportunity to print the layout of all planks.
Zandstrook = garboard strake
vlakgang = bottom strake
kimgang = bilge strake
huidigt = side strake
berghout = wale
vulling = filling strake
Mind you: both the wales and the filling strakes are mirrored (sorry for that).

7 Still, there are other solutions, for instance by planking the bottom first with parallel planks and leading the first bilge planks towards the stem. Especially for these bulky ships that solution was used many times. Here five bottom strakes and two bilge strakes.
The construction of the top-sides asks for some explanation. Once the hull is covered with card, corrected with plaster and planked with plastic strips like described before, the bulwarks are constructed in a special way. Therefore it is necessary to show the original construction of the ship.
On big ships, especially men-of-war, both the outsides and the insides of the bulwarks were planked. On smaller ships like this fluit however, the inside was not planked, except for a low ceiling plank, covered with a covering board, which fitted around the top timbers. On the outside the clinker top planks were applied, except for the top one, which was left open, showing from the outside the top-timbers like some sort of parapet. Here a sketch that hopefully illustrates what I mean.
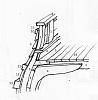
8 Construction of the upper works. The names of the numbered parts are:
1 Top-timber
2 deck clamp
3 deck beam
4 knee
5 waterway
6 spirketing
7 covering board
8 railing
9 top planks
10 strip
11 sheer strake
12 filling strake
13 wale
14 deck planks
15 open strake
This construction can be easily imitated by gluing a narrow 3 mm thick strip in the corner, covered by a thin 'covering board' and gluing short 'top timbers' on top, long enough to protrude above the top planking. Next a railing is mounted on top of the top-timbers and a small strip is glued outside on top of the top planking. It can be colored like the side of the railing. This will show the elegant sheer of the railing in a nice way.

The numbered parts are:
1 bulwark consisting of 1 mm wood board, on the inside reenforced with a
paper lining.
2 deck
3 3 mm thick cardboard strip to imitate spirketing
4 covering board 1/2 mm thick, 4 mm wide.
5 Notched top-timber
7 colored strip
8 klinker top planking
9 sheer strake

This is how it works out in real life.
To be continued.