Before I finish this thread I would like to explain why I wrote it in the first place. Papermodelers.com has over the years become more and more only a meeting place for builders of kits. There is nothing wrong with building kits, I did numerous ones myself and enjoyed all of them thoroughly. But if my observations are correct, the scratch builders are more and more a fading phenomenon. I regret that, because I think the ingenuity and the necessary research prior to building the object of choice is disappearing when only kits are the subject of the threads here. I do not consider myself to be an excellent model builder. Fading eye-sight and growing clumsiness of the hands come as a bonus with the years. So don't think my appearance here originates from a wish to show off with my my results. I know they are mediocre in many aspects and there are numerous members here who do much more brilliant things than the meagre products I show here. But I think that many of us could make wonderful and unique scratch build models if they are inspired to give it a try. Paper is a wonderful material with many possibilities and my only aim is to make more people enthusiastic to build something that was not delivered by the postman. Having said that, let's continue with some hints and tips for the brave who want to give it a try.
Bulkheads
Much of the construction of the hull of this fluit was dealt with when we did the hooker. What we did not cover were the bulkheads. On bigger period ships, like this small fluit, there are various decks, some of them separated by a bulkhead. There were two kinds of bulkheads: the flat one and the curved type. The flat ones were installed if the entrance was as high as the room behind it, like in the case of the upper cabin in the back of the fluit. The curved one was applied if the deck behind it was deeper than the upper deck. This was done to gain some height. By making the bulkhead curved it became possible to step down first underneath the round cover over the doorway and then move forward without hitting the deck beams with the head.


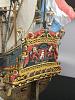
Carvings
Carvings naturally come with bigger ships. Their absence on smaller ships makes those types easier to build for the novice. But if carvings are required, the builder has a few options how to make them. He can use wood if cutting wood is what he is good in. In the past I did that many time, with various results. Nowadays I rather use a two-component kneadable stuff, called Magic Sculpt, or slightly less popular (in my case) Milliput. Both can be used for about an hour after mixing, which gives the sculptor enough time to do his thing. The wonderful thing about the material is that it can be used 'in situ'. I start with sticking a blob of material to the location where I want the statue and start reorganizing the material. A mistake many 'artists' make is to go into detail too early. Try to bring sufficient volume at places where it is necessary and deal with the details later. The stuff can be cut and filed once hardened and in a later stage even some new material can be added if necessary. It certainly helps to use a drawing of the planned statue while sculpting. If the end product has to be painted in natural colors, don't forget to give the whole statue, together with the whole ship a light brown wash (I use Rembrandt paint #414, asphaltum extra) once the paint is thoroughly dry. It helps to blend the colors together and makes them match. Do not make eyes in the faces of your statues, they will look horrible. The best thing to do is to make small imprints in the face. Once the brown wash is applied the color gathers in the dents and suggests the present of eyes. It is not wise to go into too small details, although it all depends of course of the scale of the model. Keep in mind that a model is an impression of the real thing, however technically correct it was built. Seeing a model of say 50 cm close before you, means in fact that the real ship is about 50 meters away. Making too much fuss about tiny details will diminish the 'reality' effect of the model. If I were a painter I would be an impressionist. It all seems to be there, but really, all appears to be an illusion, the closer you get to the object, the less is left. In fact we all are only suggesting that what we have built from paper really looks like a plane, a car, boat, whatever, but it is not. We are all faking :-).


Flags
For flags I use very thin blotting paper. In Holland bottles of liquor are rolled into it by the shopkeeper, like in other countries brown bags are used. This very thin paper is perfect for making flags (and it provides a perfect alibi to buy another bottle of your favorite brand of whisky). I usually glue a piece of it to a wooden frame so I can reach both sides. First I draw the flags on the paper with very thin lines, to be hidden by the paint. The paint I use exists almost entirely of turpentine, with a very small amount of paint added. This keeps the flag transparent and the colors a bit dim. Of course other paints can be applied, watercolor works quite as well, as long as the paint is thoroughly diluted, but the chance of tearing the paper is bigger than with oil paint. Because the flags are painted on both sides, it soon enough becomes clear how little paint is needed to do the job. After sufficient time to dry, the paper is taken from the frame and the flags are cut. Next they are crumpled to a small ball and carefully folded out again. Maybe you have to do it twice. After partially stretching and glueing it to the flagpole the paper can be shaped in any realistic way, depending of the amount of wind required.

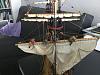
Loose hanging lines
Rigging is a tedious job and especially if some ropes have to hang loose to look realistic, it can be very frustrating. The curls of the lines, coming from the roll they were wound on, thoroughly spoil the looks of loose hanging lines. Bees wax can help out, but usually not enough, although it does take away any fluff on the tread. To get nice straight lines I usually cut some lengths and hang them (from a lamp), stretching them with a weight. Then I take a piece of cotton wool, soak it in shellac and treat the thread with it. After drying the curls will be gone and the line can be 'hung' on the model in the desired manner.

Crew
People on board a model is a matter of personal taste. When I was building models to understand the construction I never considered adding people. But now my models are mainly used to make deceptive 'paintings', crews are necessary. They can be bought in modeling shops. Here is an online one:
Red box figure English Sailors, 16-17th century..... However, sometimes it is necessary to make them yourself, for instance to man a rowing boat or with specific attitudes to work on the sails. A piece of wire is very good to use as a skeleton. Fold the wire and give it a twist to form the head. After a few twists I add the arms and solder the joint before twisting on to the legs. Magic Sculpt works very well to make the bodies. I do it in two phases. First I apply material to the skeleton to roughly form head and body without the limbs. After hardening I add arms and legs, if necessary without hands and feet, which are added once the figure is at his destined location. Adding hands and feet once the figure is 'in situ' helps making them look more natural.


Guns.
This small fluit has no armament. Nevertheless there will be guns to make on many period ships. So here are my suggestions how to tackle the job.
The guncarriages are simply to be made of 1 mm card. This is a repetitive job so it helps to cut strips of the right size for the bottom and cheeks and for the axles. My axles will touch the deck over their entire length to give enough surface to put the glue on. I even make another strip between the axles to even enlarge the glueing surface, as shown at the bottom of the picture. Wheels are cut with a very cheap tool to cut holes in leather belts or with the punch set I showed earlier. Next put the carriage on the table and glue the wheels to the ends of the axles. It will be hardly visible that the axles touch the ground over their entire length. Smaller disks glued to the wheels make it look like protruding axles.
The barrels can be made of 160 grams paper, rolled around a pointed stick. If the paper is cut right the two meeting sides can be glued together. The aft end of the barrel is reenforced with an extra layer of paper (90 grams or more) and finally the rings are applied from very narrow strips. Small disks serving as the protruding part of the axle complete the proces. Once dried the barrels can be painted matt black and finished with some graphite powder to give the an iron look.
The last picture shows the armament of a small man-of-war, most of them with gun-carriages, some without, because they were already placed on the closed-off gun deck.


Masts
I make my masts from wood, but I would not be surprised if very nice masts could be made of paper. But I am not a purist and I try to find my lazy way with the least resistance. My method nowadays is to complete the masts entirely, even with blocks and many times with spars and sails before stepping them. It helps avoiding stiff shoulders....


Finally
So far the ideas and advices I can pass through to anyone who wants to give scratch-building a try. Make sure you choose a good draught. Nobody demands you to to make your own, like I do. The reason to do it myself is that for Dutch ships next to nothing is available. I have tried to do something about that in my books and on various forums.
Although the emphasis on the papermodelers forum is not any more on scratch building, I hope to have shown that it is possible with a minimum of tools and with materials that can be found in any dustbin. Seen from that point of view the result of the build is something that makes me very happy.
I hope you will enjoy your own efforts. Any questions I will be more than happy to answer.
