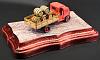
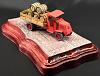
In my latest attempt, I decided to rescue the Mack Bulldog from the shelf of doom. That is, uncompleted projects.
The original kit is the 1/100 Mack Bulldog from Feriot Design Studio (FDS), found at Minimodel.sk.
I took this kit and enlarged it to 1/87. This provided the basis for the build. Wanting to do something off the wall,
I chose to make it a beer delivery truck. With this plan, I already had the Lachezar Dragostinov kit of the Bulldog,
in 1/43.
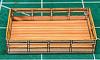
Using the stake bed, barrels, and wheels from Lachezar's kit, I rescaled those to 1/87 as well.
My first task was to get a wood texture I could use. Finding several, I used the b/w outlines provided in
Lachezars kit of the bed and barrels. Test print showed it would work well. Then I found the manufacturers logos,
and using Inkscape, made the barrel ends. The stake bed uses double sided prints to give an interior and
exterior wood grain, as they would be visible. Following that, parts were cut out to give the stake bed look.
Following this construction, these parts were set aside.

The wheels in the FDS kit, were attractive, but simple 2d pieces. I, needing to make them better,
used Lachezars wheels. Using my #2 blade, I cut out the open areas of the wheels. This modification
necessitated the need to redesign the wheel/tire combination. With that, after the wheel was cut out, I made
an inner wheel liner. This was then inserted behind the sidewall. The next step was to add the tread area
and let this dry. The final step was turning the wheel over and attaching the opposite sidewall.


With the wheel/tires assembled, work progressed to the main body of the truck. I am pretty sure I
screwed up the assembly, as something just doesnt look right to me. But its done.
On the cab interior, I cut out the rear window, cut out the areas between the spokes of the steering wheel,
and added parts to give the seat and seat back some depth.
The final piece, a small punched disc was added for the radiator fill cap.
So, now a few pics for those who stayed through that whole thing!