


|
|
|
#41
 02-19-2019, 07:56 AM
|
||||
|
||||
|
I don't know how long the cannon are, but Q-Tip swab sticks are fairly light
__________________
A fine is a tax when you do wrong. A tax is a fine when you do well. 
|
|
#42
02-19-2019, 08:49 AM
|
|||
|
|||
|
I am contemplating trying this model in 1:18 scale to match the Kenner Action Figures I got to go with the Millenium Falcon Cockpit I built at the same scale.
Of course I'd put Luke in the cockpit and possibly cut a hole for R2-D2 rather than build a paper version. Usually I'd just print at 267% for the correct scale, but given the current layout, even using my 11" X 17" printer, to many parts cross the page edges on poster setting. But right now I'm still wondering if I really want a 2 Ft long, 20" wide X-Wing? Who am I kidding, I'm really wondering if my wife would put up with it (-=
|
|
#43
02-19-2019, 11:22 AM
|
||||
|
||||
|
Quote:
Similarly as Peter said, you first glue the hull parts to one of the sides and then lightly to the formers. This image should explain it https://photobucket.com/gallery/user...My5qcGc=/?ref= Does it need a lot of precision? Definitely  Adding tabs to the backside thickens the part by a small amount, so it likely won't be able to wrap around completely anymore - the former needs to be downscaled in that case. Or you have to use a very thin paper for the tabs. As for cannons, I used carbon fiber rods - they are lightweight and have smooth surface. I got them in RC model store, I think.
|
|
#44
02-19-2019, 11:32 AM
|
||||
|
||||
|
Quote:
At this scale I would consider using wood. Even if you find a printer to upscale the parts and get a go from your wife, parts turn into sheets at this scale a will start to wobble and warp. But I get it, I often dream of stuff like this
__________________
website: http://www.papierschnitzel.com - patreon: https://www.patreon.com/papierschnitzel - facebook: https://www.facebook.com/papierschnitzel
|
|
#45
02-19-2019, 11:36 AM
|
||||
|
||||
|
Quote:
The challenge for me is that the formers are quite thin, so there is not a lot of room to glue the hull on properly let alone connect the next hull piece. I know this kind of technique with formers that are more like 2mm wide. I will use sanding next time to trim the formers a little. It was just a little gap in the end and I am quite happy so far. Thank you for the feedback. I checked my barbecue sticks and they are 3mm, so a little too thick. Carbon fiber sounds good. Will check out where I can get them here. Cheers, Chris
__________________
website: http://www.papierschnitzel.com - patreon: https://www.patreon.com/papierschnitzel - facebook: https://www.facebook.com/papierschnitzel
|
| Google Adsense |
|
#47
02-21-2019, 06:41 PM
|
|||
|
|||
|
Nice...maybe you could do this for the edges of the pieces. Instead of using markers you could use watercolor pencils. I use a set that came with 48 pencils and that gives me a large variety of hues and colors to match the pieces.
The model looks great.....nice job.
|
|
#48
02-22-2019, 10:08 AM
|
||||
|
||||
|
Quote:
That's a great idea. I have never thought about pencils but with the color variety they provide it should make matching color much easier. Thanks for the tip. Chris
__________________
website: http://www.papierschnitzel.com - patreon: https://www.patreon.com/papierschnitzel - facebook: https://www.facebook.com/papierschnitzel
|
|
#49
02-22-2019, 10:09 AM
|
||||
|
||||
|
Quote:
I am very happy with the current state. Practice makes perfect. My next build should be better (also no promises  ) )Cheers, Chris
__________________
website: http://www.papierschnitzel.com - patreon: https://www.patreon.com/papierschnitzel - facebook: https://www.facebook.com/papierschnitzel
|
|
#50
02-23-2019, 05:31 AM
|
||||
|
||||
|
Didn't have so much time this week but I made some progress on one wing.
I didn't take step by step photos on the first one as I was busy figuring out where everything goes. Will try to do that on the next 3 wings Here is my end result so far.  I haven't put the final details into the front round engine "opening". I reached that stage sometime in the morning during the full moon and then was too tired to continue 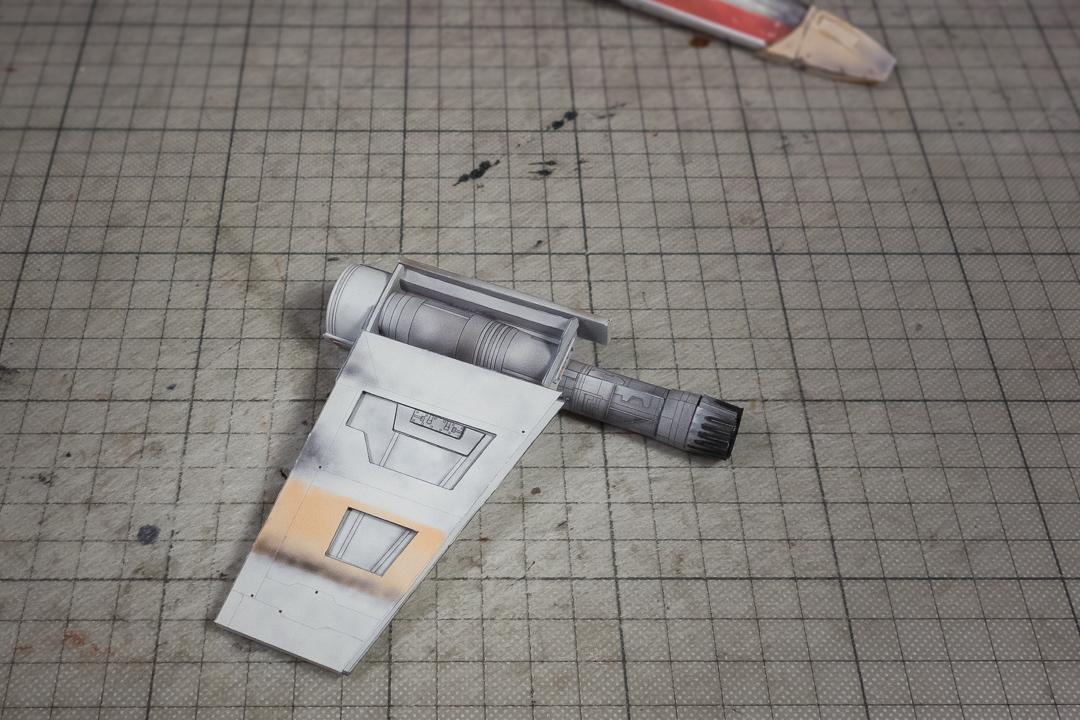  I am impressed how sturdy the wing turned out in the end. In the beginning I thought it would be a flimsy weak thing. I did double the inner former parts just to make sure but the design and how everything comes together makes it one solid assembly piece. I checked my BBQ sticks and sadly they are 3mm not 2mm as required, so I will need to check if I can get the right ones here or wait for additional stuff to order from Amazon. Don't want to pay 3 shipping for the 0.99 sticks I did use my 3mm ones for the axis in the engines though! Looking forward to making the laser shooting end piece of the wing ... and then repeat the whole process three more times! To be continued ... Chris
__________________
website: http://www.papierschnitzel.com - patreon: https://www.patreon.com/papierschnitzel - facebook: https://www.facebook.com/papierschnitzel
|
| Google Adsense |
 |
| Tags |
| star wars; x-wing |
|
|


 Linear Mode

