


|
|
|
#51
 03-10-2019, 03:47 AM
|
||||
|
||||
|
As I was ordering something else from Amazon I added the 2mm BBQ sticks! Hope they will arrive soon so I can continue the wing :-)
Chris
__________________
website: http://www.papierschnitzel.com - patreon: https://www.patreon.com/papierschnitzel - facebook: https://www.facebook.com/papierschnitzel 
|
|
#52
03-10-2019, 05:19 AM
|
||||
|
||||
|
... and then I thought I could give the in-engine details a try today as it was raining and it's sunday
 Those are really tiny AND curved! Takes a lot of focus to get them in shape for me.   But in the end (my girl friend asked me at one time if I was enjoying myself ... to which I replied I will enjoy the final result  ) I succeeded at a level I am very happy with. ) I succeeded at a level I am very happy with.These details are not much but to the fan of this space ship they do add an important visual element to the engines. So now I'll wait for the correct BBQ sticks to arrive and then complete the first wing! Chris
__________________
website: http://www.papierschnitzel.com - patreon: https://www.patreon.com/papierschnitzel - facebook: https://www.facebook.com/papierschnitzel
|
|
#53
03-10-2019, 06:21 AM
|
|||
|
|||
|
Great work on details, I have the same experience with my wife
. I love doing them. I enjoy them despite the fact I curse a lot while building them. Only thing that annoys my is that they constantly fell on grund under the desk. I must have black hole under my desk because very often I do not find the part and must start over again.
|
|
#54
03-10-2019, 11:26 AM
|
||||
|
||||
|
Quote:
I too curse a lot, and unfortunately there is thick carpet under my workbench so when things fall down (and they do), I have to get in there with the flashlight! Papierschnitzel, that is super clean building right there. Looks amazing!
|
|
#55
03-10-2019, 05:28 PM
|
||||
|
||||
|
It still impresses me how successful theese ship designs are, they have become downright iconic, and how actually aesthetically appealing they are.
__________________
Screw the rivets, I'm building for atmosphere, not detail. later, F Scott W
|
| Google Adsense |
|
#56
03-11-2019, 04:35 AM
|
||||
|
||||
|
Haha, that makes me feel not so weird :-) I noticed I don't really curse with actual words but make very strange whistling and puffing sounds. All my brain power seems to be focused on the crafting that I have no intelligible word power left!
About the black hole ... mine seems to be temporary. Usually at some time missing pieces start to show up again ... sometimes when I have made new pieces and the model is finished ;-) I agree about the ship design. The original trilogy Star Wars designs (and also the original BSG and Star Trek franchise) are so unique and good looking. Chris
__________________
website: http://www.papierschnitzel.com - patreon: https://www.patreon.com/papierschnitzel - facebook: https://www.facebook.com/papierschnitzel Last edited by Papierschnitzel; 03-11-2019 at 04:50 AM.
|
|
#57
03-16-2019, 10:05 AM
|
||||
|
||||
|
I finally received the 2mm diameter BBQ sticks and now I am stuck!
HELP! I have started the gun and I am not sure I am doing it right. Is the L1 part and actually the whole tip section separate from the BBQ section? How do I get the L1 part round? There is nothing to wrap it around? I got the L2 and L3 wrapped around the BBQ stick and that looks OK. For the next step I wrapped the L12 around the stick but also L13. I think that was a mistake. When I look at pics it's different. Do I have to cut at the red lines and manually glue lengthwise around L12? And then L14 around that? Haven't started that yet, but is L4 wrapped around or do I have to form the right sized cylinder and slide over the BBQ stick with the front and back parts cut out at the center? If any of the successful builders has photos to clear this up it would be a great help. TIA, Chris
__________________
website: http://www.papierschnitzel.com - patreon: https://www.patreon.com/papierschnitzel - facebook: https://www.facebook.com/papierschnitzel
|
|
#58
03-17-2019, 10:09 AM
|
|||
|
|||
|
L1 is separate from BBQ section. You just roll it around itself.
"Do I have to cut at the red lines and manually glue lengthwise around L12? And then L14 around that?" - exactly like you wrote. L4 is not wrapped around. You form the cylinder and slide itover BBQ stick. Here is photo from sagittarius: 
|
|
#59
03-17-2019, 11:47 AM
|
||||
|
||||
|
Quote:
OK thanks for the clear up and confirmation! Will retry and wish me good luck Chris
__________________
website: http://www.papierschnitzel.com - patreon: https://www.patreon.com/papierschnitzel - facebook: https://www.facebook.com/papierschnitzel
|
|
#60
03-18-2019, 02:45 AM
|
||||
|
||||
|
With the help I was able to achieve this! Very happy now how this one turned out after my first disaster try
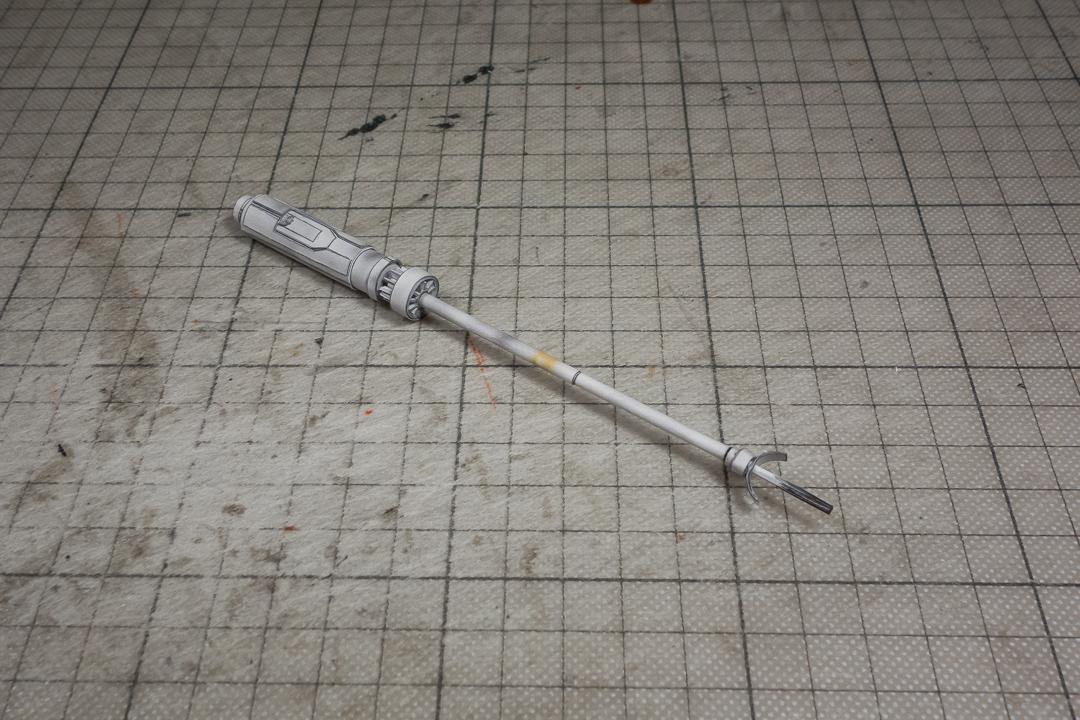 Didn't glue it to the wing yet, but just placed it there to see how it looks assembled. Maybe my future versions will be even better ...  Now I have one question about a detail I am missing. On the side there are these kind of "sensor antenna" going forward. 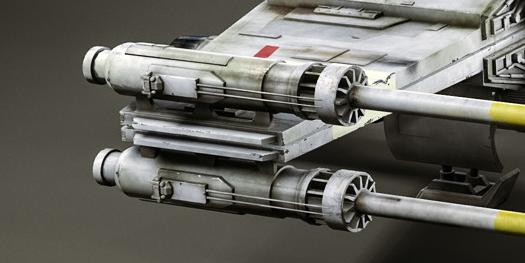 Image detail from https://www.artstation.com/artwork/ada88 You can also see it on https://www.starwars.com/databank/x-...etails-gallery Are they in the paper model and I have not found them yet or would it be something I need to add myself? It's just two strips and I think I am starting to be able to do these crazy thin parts now! So now I need to build 3 more wings and laser cannons. I will try to capture all the building steps in detail as this might be a help for future builders. Chris
__________________
website: http://www.papierschnitzel.com - patreon: https://www.patreon.com/papierschnitzel - facebook: https://www.facebook.com/papierschnitzel
|
| Google Adsense |
 |
| Tags |
| star wars; x-wing |
|
|


 Linear Mode

