


|
|
|
#1
 03-07-2009, 03:01 PM
|
||||
|
||||
|
Seversky P-35, 1/33/ Modelik
Seversky P-35 (first flight 15 August 1935) on my point of view is one of the interesting aircrafts. Actually this aircraft is grandfather of the famous Republic P-47 Thunderbolt.
Well, P-35 evolution was aircraft Seversky XP-41, than later on (the Seversky Aircraft Company changed its name to Republic in 1939) Republic P-43 Lancer and finally- Republic P-47 Thunderbolt. Experimental Republic XP-72 (first flight 2 February 1944) was the great-grandchild of P-35. It was the end of prop fighter era and no further development had place.         The Modelik issued Seversky P-35 model suppose to be simple. There are only two and half pages (A4 format) of parts and the rest half page with parts for frame. There is available a set of laser cut frames on the market. It does construction of model faster but it is not perfect on my point of view due to a bigger couple of parts than should be according other fuselage pats. Any way I think laser cut frames are good in common. There is used silver acrylic paint for edges of parts. So far the fuselage is almost done. Wings and other smaller parts are waiting for processing. To make model building more interesting few mistakes occurred. The first mistake occurred with forward fuselage pats marked by blue on photo. The putty was used to fill a gap. Sanding and painting with red aquarelle has turned me almost accept the result. The second mistake is related to cockpit windows marked by yellow on photo. Ill cut transparent single part from slide covering left and right windows the next time in a case of similar cockpit type. And Super Moment glue will be used instead of Micro Kristal Klear. Im not sure concerning the third mistake. It might be the inaccuracy of model design. An instrument panel is a bit higher than should be and the forward cockpit part doesnt fit. Possibly the cockpit parts problem is my mistake so it is interesting to read posts of other modelers doing the same kit. The rough parts marked by red on photos are silver paint layer. It will be sanded after becoming dry. To be continued 
|
| Google Adsense |
|
#3
03-07-2009, 06:01 PM
|
||||
|
||||
|
What was the problem with Micro Krytal Klear ?
I have been told super glue would fog clear parts.
|
|
#5
03-08-2009, 03:16 AM
|
||||
|
||||
|
Seversky P-35 was used in Swedish Air Force. 60 aircrafts replaced aging Gloster Gladiators in 1940 and served until 1946 as fighters. The last 7 planes retired in 1952.
Sevesky P-35 also strongly influenced design of Italian interceptor- fighter Caproni-Reggiane Re.2000 Falco I. 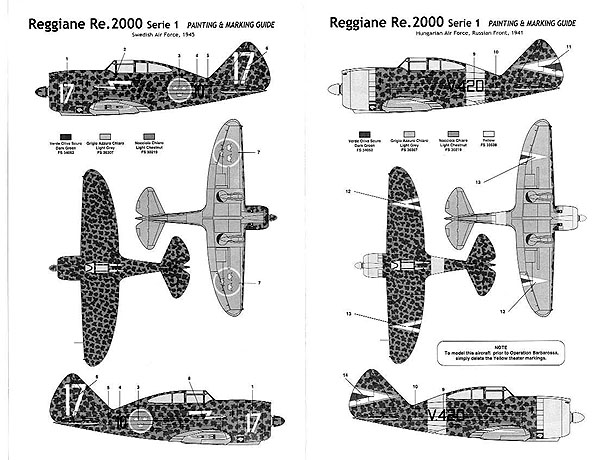 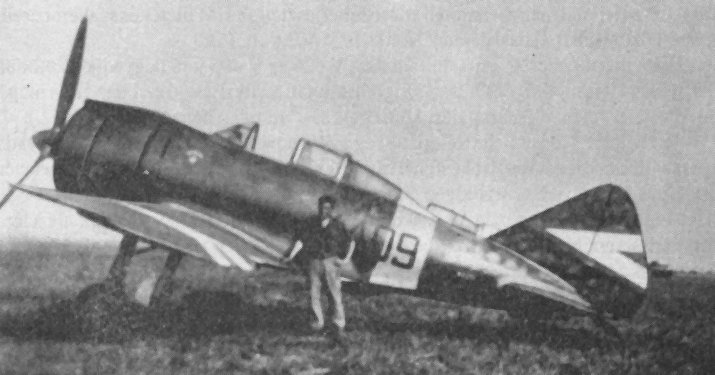 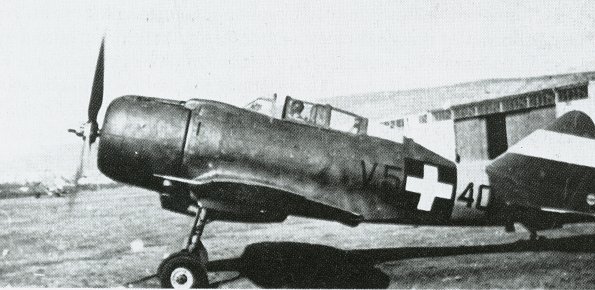 The Micro Kristal Klear is one of my favorite materials working with glass. I like it more than Humbrol Clearfix because its easy to remove Micro Kristal Klear in a case of getting onto transparent part. Especially I like Micro Kristal Klear features shining and refracting of light rays. Some models, like Maly Modelarz Mirage IIIC have no cockpit detailing and are designed to be without transparent glassing. So the use of darkened slide for glass and cover by Micro Kristal Klear makes, I think, model much better looking. Below is my second card model in a scale 1/33 with mentioned solution. The cockpit parts inside should be painted in black before. The Seversky P-35 is my fifth card model in a scale 1/33. So naturally my models so far arent perfect. Im getting experience yet and expect constructive criticism with suggestions of possible solutions. Quote:
Yes, there is a significant risk to ruin prepared glass by Super Moment. It has occurred though the glue didnt contact the glass in certain area. The fingertip becomes visible due to the Super Glue vapor. Since this I clear glass with alcohol before gluing with Super Moment. The glass should be dry before gluing of course. Plastic modelers use Future wax to make cockpit shiny ant protected from glue vapor. Ive made few experiments with Lundmark All-Wax floor finish and intend to try it for the next my model glass. Possibly Lundmark Acrylic floor finish is more close to mentioned Future. I would use Future family product, but it is not available in our stores. 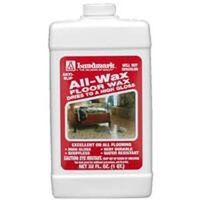  I used Lundmark All-Wax floor finish to clean glued glass parts and it satisfied me. Experiments show possibility to use Super Moment glue for already covered glass pars by Lundmark All-Wax floor finish. I didnt see the difference between paper glued directly to slide and covere by Lundmark All-Wax floor finish slide. Both examples were on my point of view equally strong. My mistake is a use of separate glass parts. It results into wrong form of cockpit and unstuck of a glass pars top as shown in picture. Now I think it would be much better to use a single part for both glasses. A glued slide should form a correct cockpit form and possible Micro Kristal Klear would be enough strong. I would recommend bend the part just after gluing to avoid split of paper later on during bending with dry glue. The paper is under pulling and a slide glass is under pressing during bending. A slide glass is stronger than paper so bending before glue dry allows paper to move a little bit on a top of bended glass.
|
| Google Adsense |
|
#6
03-08-2009, 03:36 AM
|
||||
|
||||
|
Nice job so far
__________________
My commercial models
|
|
#8
03-14-2009, 11:27 AM
|
||||
|
||||
|
Tank you for the interest.
 The next step is preparation of wings. Gears are simplified and wings are without internal bays. So gears construction should be fixed inside of wing. I put some glue to fix the internal leg of construction inside to the internal wings surface. The last photo shows draying main parts of wings.
|
 |
|
|


 Linear Mode

