


|
|
|
#31
 11-17-2015, 07:14 PM
|
||||
|
||||
|
Gerardo
I think it was mentioned earlier, but what color is the fuselage you are building? Looks like grey from your photos? Isaac
__________________
My gallery [http://www.papermodelers.com/gallery...v-r-6&cat=500] Recent builds  Meteor F1, Meteor F8, Mig-Ye8, NA Sabre, A-4E Skyhawk,Mig-15 red, Mig-17 repaint Meteor F1, Meteor F8, Mig-Ye8, NA Sabre, A-4E Skyhawk,Mig-15 red, Mig-17 repaint

|
|
#32
11-18-2015, 01:30 AM
|
||||
|
||||
|
Very Nice construction Photos! Will use the hint to laminate the motor piece-looks good! Does it help the cowl to hold its shape?
Mike
__________________
Cardstock Property Tables and Terms Flying Cardstock Models http://www.papermodelers.com/forum/m...uers-projects/
|
|
#33
11-18-2015, 07:44 AM
|
||||
|
||||
|
Lamnating the Engine Cowling formers is mentioned in previous P47 build threads
like here: http://www.papermodelers.com/forum/472577-post16.html 39A is the Engine part...and it has always been a thicker laminated part. Originally, there was an actual (39A) Former to which you attached the printed Engine part. I eliminated the need for two printed pieces, and I removed the Former 39A and made the Engine part alone 39A. I then showed Part 39A as being a thicker former in the Instruction diagrams ...but since the Engine Part (39A is on a different page than the Formers I could have made a note on the Parts pages (to laminate this part). 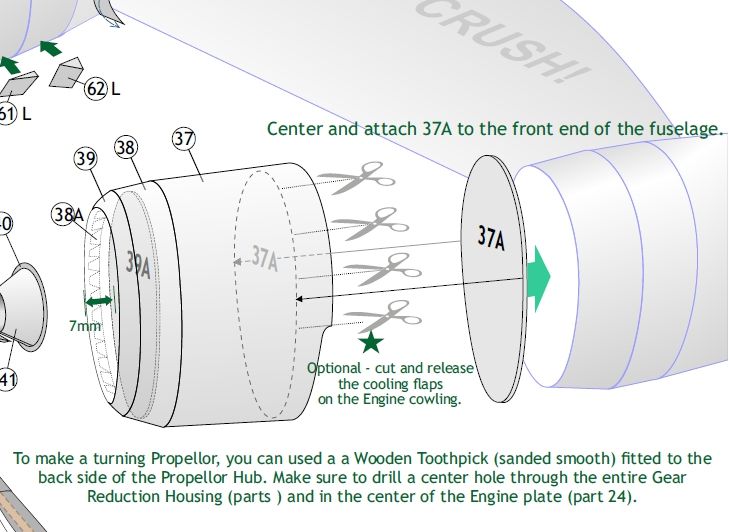 Once again, I really appreciate Gerardo showing us how the kit went together for him, but if it helps, please refer to my complete P47 Walkthrough Build thread for more help. Lets build a P-47! (Photo Walkthrough)
__________________
SUPPORT ME PLEASE: PaperModelShop Or, my models at ecardmodels: Dave'sCardCreations
|
|
#34
11-18-2015, 11:57 AM
|
||||
|
||||
|
capping strip
Gerardo
I've just tried your capping strip technique on a practise piece. It does work better gluing the fuselage first (then when dried) the wing later. I've always done both at the same time, what a faf, your ways is much simpler. Cheers
|
|
#35
11-18-2015, 03:44 PM
|
||||
|
||||
|
Quote:
Like I said, the paper I bought is not good. If I may be true, I need to go to Mexico and get the "Pochteca" brand cardstock, which is a high quality cardstock. I have to wait though to travel back to Mexico. Quote:
Continuing with the landing gear. First, the tail wheel. I had to go back to Dave's thread on "Let's build a P-47" for the photos of the tail wheel, and my own P-47. But nothing major.  Then the main landing gear. All the pieces for the wheels.  Sorry for not taking photos of the process of the wheels, but Dave's thread on buidling the P-47 are better. On this beta model, the landing gear doors, the ones used for the landing gear down, don't have the line that marks where to cut these. In other words, parts 71 L & 71 R (just besides the words "NO STEP"). I had to use the marks on the doors included on the wings. But Dave already fixed this little detail, so shop with confidence.  The jug is taking shape.     
|
| Google Adsense |
|
#36
11-19-2015, 11:21 AM
|
||||
|
||||
|
After checking with Dave about the front canopy window, I received a new one.
It happens that the P-47 had sometimes a slider window, in which the pilot could get things from the outside - or handle things from the inside - without the need to open the whole canopy. I remember that cars used to have a little window-let that you can open to allow air to flow to the inside of the car (like the VolksWagen bettle on yerdaryear). So I glued the canopy frames to plastic. The plastic is the one that comes with the cell-phone screen protectors. Once the protector is applied to the cell-phone, that plastic is what remains. Lessons learned: 1. First glue part 58 to part 59. 2. Glue the two parts of 60. 3. Glue the 58/59 set to completed part 60. Otherwise, there is going to be a gap between the 58/59 set and part 60.     
|
|
#39
11-20-2015, 03:18 PM
|
||||
|
||||
|
Thank you Yeti!!
And now, the bird is completed... or complete... anyway, is done.            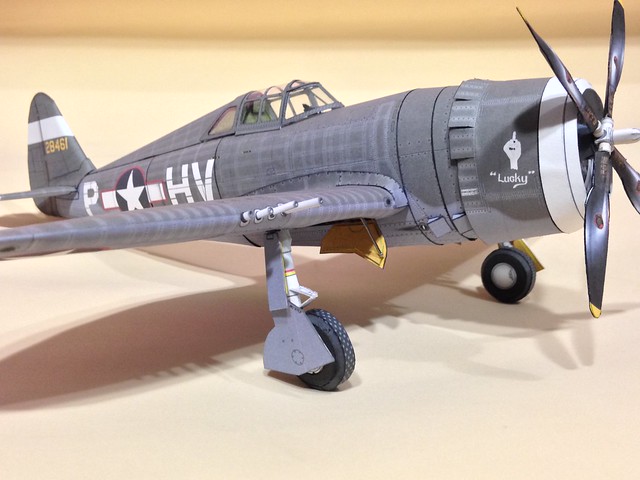      Remember, is available now at eCardModels.com and at papermodelshop.com.
|
 |
|
|


 Linear Mode

