


|
|
|
#1
 06-15-2009, 06:24 PM
|
||||
|
||||
|
SPI Models Blohm & Voss P.170 Schnellbomber
This was an early acquisition soon after I discovered the world of paper and is my first paper build. I realised after five minutes of building that this build would be a voyage of discovery into the techniques of paper modelling and that it was unlikely to be a museum piece but a learning experience. Got that right...
Rather than write a 'how-to' review where everything fits together perfectly, I thought it might be useful for new-comers to have a 'how not to' review so here goes. The model comes in 1/48 scale as a ten page PDF approximately 1.9 Mb in size. It comprises: A cover/history page. 8 pages of parts. A single page of instruction drawings. Undercarriage bays are provided for the main gear but not for the tail gear, and there is no cockpit interior. Engines are two dimensional but that's OK for a first kit. There is no armament or another parts other than what you see in the picture above. 
|
| Google Adsense |
|
#2
06-15-2009, 06:27 PM
|
||||
|
||||
|
Unfortunately we (I) broke the camera at the grandtwins birthday in April and it hasn't come back yet so at the moment, I have no pics to share only word pictures...
I have enlarged the model from its original A4 size to something closer to 1/32 because that scale it easier on my fingers and eyes. I say 'closer to 1/32' because it was only later I realised that simply upsizing the paper size from A4 to A3 does not automatically mean a scale increase of 150%. If I figured it out the actual scale for this kit would be somewhere around 1/35. Lesson #1. The first thing I did was to print all the parts onto 135gsm drawing paper, and then laminate the formers onto cardboard from a box that was left over after Christmas. I used a Scotch brand glue stick for this which pretty reinforced my opinion of 'permanent' glue sticks – they ain't. In the case it didn't really matter as all I needed were the shapes and no specific detail on the printed side. Herein, Lesson #2. The cardboard I had used was quite thin but corrugated so cutting the circular formers with my newly-acquired circular cutter ate through a blade in no time. OK, got that for next time: make sure I use normal card. I used scissors to cut out the non-circular formers and this went well. For me, the jury is still out over whether scissor or a good sharp blade are the way to go, especially on heavier card. The three fuselages for this aircraft are really simple as they are all just long cylinders. The instructions are only a couple of drawings showing where most of, but not all the parts go. I figured that it would be easier to join each of the formers together so that they would be like plugs on which each of the paper fuselage tubes would fit. Only later did I work out this butt-jointing thing where you make each of the sections complete and then join them up. This might have made life a little easier. Lesson #3. The old lessons were starting to roll in thick and fast now. Lesson #4 concerns rolling paper, initially into simple cylinders. Now hear this: YOU HAVE TO SHAPE THE ROLL, you can't just try to bend the paper to suit NO MATTER HOW BIG THE CYLINDER MIGHT BE – it just doesn't work and you WILL get stress fractures in the outer surface of the cylinder. What you need to do is collect a set of tubes, rods and cylinders of varying sizes and use these to shape cylinder, cones and other curves. My largest tube is about 15mm, my smallest around 2mm – I reckon I might need one or two even smaller than this for tight cylinders and cones. Start with a larger tube and roll it gently across the part in the directly that you want it to bend. You need to keep at it till the part is round all the way, gradually working down to the smaller sizes. You also need a rolling surface that has just a little bit of give in it so as to impart the bend into the paper – I'm using a piece of old rubber mat that seems to do the trick but I read a tutorial the other day where the builder just uses the palm of his hand – whatever works... Lesson #5 says that if you are going to use a joining strip to reinforce the join in a cylinder or cone, then you should a. add it from thin paper (so as not to affect the inner diameter of the part and its relationship with the formers so carefully cut out previously) and, b. make sure that you do this before rolling so that the strip gets the same curve as the rest of the part.
|
|
#3
06-15-2009, 07:21 PM
|
||||
|
||||
|
In addition to collecting tubes, pipe (PVC, copper, steel), and dowel rods - drill shafts and sockets provide extremely precise forms (and the drill shafts are precisely sized for small tubes and cylinders).
You can roll small parts on the palm of your hand - just put the piece flat and roll your former/dowel over the part. Works very well for small cones, put the piece flat on the heel of your palm and roll the dowel over it while keeping the dowel pointed at the center (tip) of the cone - easier than it sounds. Yogi
|
|
#4
06-16-2009, 12:14 AM
|
||||
|
||||
|
Cheers, Yogi...I was defeated by a couple of small cones last night so think I will try the 'roll in the had' approach - hadn't thought of using drills bits as formers so have grabbed a bunch from the garage to try (my wife is a bit of a Tin The Tool Girl so is always picking up DIY nicnacs so we have kazillions) in front of Coro tonight...
Lesson #6 is about wheels. How they come really only gives you a Flintstones wheel: just a cylinder that might pass at a distance under dim light which I didn't think was good enough. I went back and cut a series of 300gsm card disks that same diameter for the centre of the tyre and then incrementally reducing the diameter towards the edge of the tyre. Once I had my disks, I went back over all but the middle 3-4 and cut incrementally increasing holes in the centre. Once I had this, I laminated them with UHU and left them over night under some decent weight. Next night I applied an idea I had seen here from Gil and used his petalled tyre template to wrap around the wheel to cover the gaps. This has since had a couple of layers of superglue to soak in and harden it up. My plan was to then (somehow) mount each wheel on the good old Black and Decker and spin it up against a file to finish off the profile. I had done this before using a 2mm bolt through the centre of the wheel as an axis but someone here put me on to a far better idea. That was to use the mandrel that comes with sets of tools for microtools (Dremel etc) - this is far thinner that my 2mm bolt and thus easier to centre. I have the first wheel mounted and just need to book some power tool time (see above comment re wife) to try it out...
|
|
#6
06-16-2009, 07:55 PM
|
||||
|
||||
|
OK - am currently barred form the garage while Op Chicken Coop is underway so the confirm/deny on the wheels will have to wait...
Assembly the cylindrical fuselage components was easy although it was only later I figured out that I could (should) have constructed each section separately and then joined them together. Instead I doubled each former and fit the open end of each section over the protruding plug of the piece in front of it. This worked OK but would have worked better if I hadn't used corrugated cardboard for the formers (it didn't look corrugated when I started) and possibly my cutting of some of the formers was not quite so precise as it needed to be. But it all seemed to work on the night and the only issues arising from the simple bits of the fuselage from the engine to the cockpit was a gap running down the seam underneath (so not too visible). Lesson #7: I should have made sure that I used a dark colour joining strip and coloured the edges of the fuselage parts so that then the seam might be more easily passed off as a panel join. As it is, I used pink scrap for the joining strips and the little strip of pink that does show through the gap does jar somewhat - wish I had a working camera here...can't even find the charger for my phone to use that as an interim...
|
|
#7
06-18-2009, 04:18 AM
|
||||
|
||||
|
The tyre experiment seems to have gone well. I spun up each wheel on the minitool tonight and touched it up with an emery board...they have come out well for a first attempt, and only needed a little refilling with superglue in a couple of spots. Lesson #8 is that next time I will try a more porous paper for the wrap so that the glue can soak right it and give a hard all-round layer - I hit a couple of soft spots this time, hence the refilling. The other trick I learned by accident is to brush over any high spots (bumps on the wheel) with a dark marker: when these marks disappear when the wheel is being spun, then (in theory) the bumpy bits have been shaved off.
Word on the street from OC Home Command is that we might get over to Taupo on Saturday for some more dog food so should pick up the camera at the same time and will be able to backfill with pics...
|
|
#8
06-18-2009, 06:23 AM
|
||||
|
||||
|
Sounds like this is coming along nicely, looking forward to seeing some photos. It appears that you've learned some valuable lessons along the way too! I will be interested to see how it turns out because I too downloaded this some time ago but never started on it.
__________________
My website www.chrissmodels.webs.com My Facebook page www.facebook.com/chrissmodels
|
|
#9
06-24-2009, 04:53 AM
|
||||
|
||||
|
Ok...have finally got the camera back...ummm...see now what the 'editing posts' thread was all about, you can't go back and add stuff to a post...Ok, the logic for that is pretty clear so no worries, will just have to be a bit more organised in future...
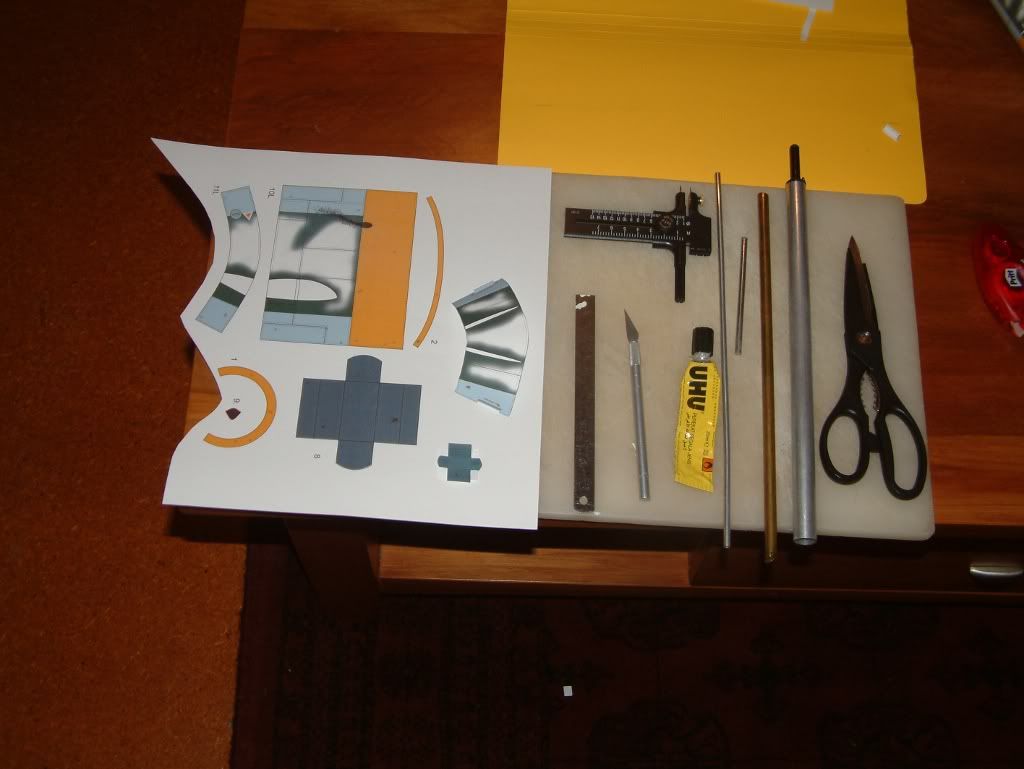 This first pic shows the tools I started out with: sharp knife with large supply of #11 blades, various rolling tools (a collection now grown somewhat), scissors for cutting curved laminated formers (I still find this better for curves on thicker card that a knife), the trusty UHU glue which is still the most reliable I have found stringiness and all; the circle cutter I can not live without: cuts 1-15cm circles perfect and only $10 from Spotlight; and a cutting board that was banned from the kitchen after I melted one corner of it on the range. The parts page you can see is from the enlarged P.170 and the yellow thing in the background is a filing envelope I use to hold parts between cutting and shaping; also spare parts for those try, try, try again parts...
|
|
#10
06-24-2009, 05:05 AM
|
||||
|
||||
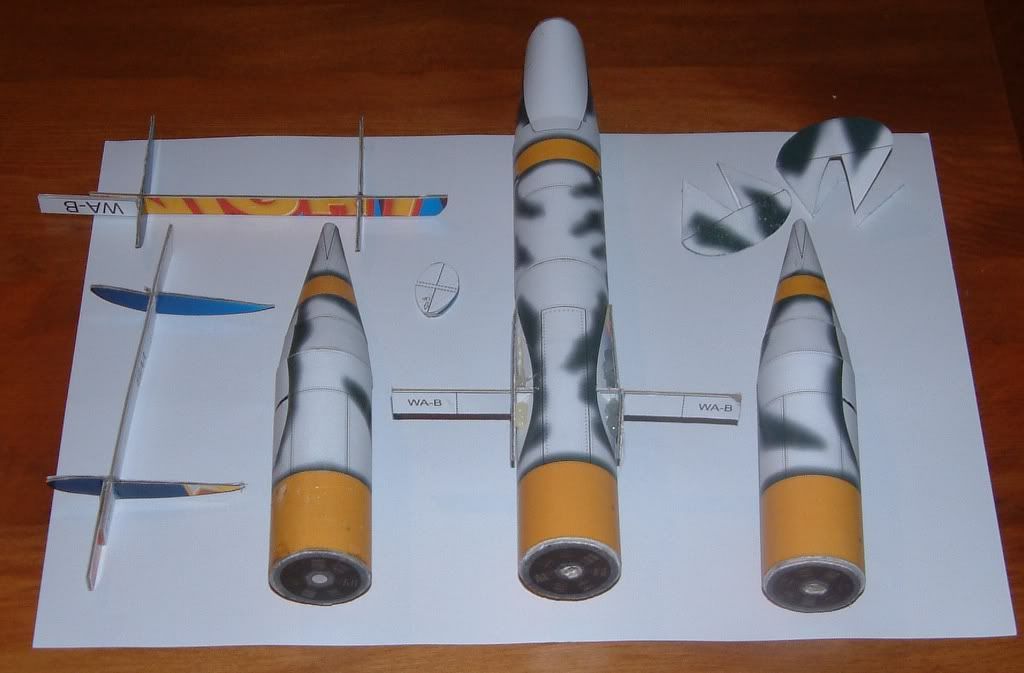 Here are the three fuselages, the easy bits as they are pretty simple cylinders til you get to the cockpit...as I said above, I had quite a few learning difficulties with the seams but it is my first paper model so i cut myself some slack here. Also seen are the internal formers for the wings - pretty simple once you figure out that they ARE handed and don't have to slice off and reconnect the ribs so that they face the right way! The rudders fit onto the two outer fuselages and are a real pain as there is a a former that runs vertically to give them their shape but the instructions aren't terribly clear on this. I think the pattern is slightly incorrect as both parts came out with a slight beak shape where they meet the fuselage but the fuselage front front-rear in this area is straight not curved. Nothing a quick slash of the #11 didn't fix.... Just looking at this picture now and it strikes me that this model would also make a primo pod-racer without too much extra work....hmmmm....
|
| Google Adsense |
 |
|
|


 Linear Mode

