


|
|
|
#21
 09-02-2023, 11:25 AM
|
|||
|
|||
|
Quote:
I probably didn't make clear that I usually do this, along with using thinner paper for the internal gluetab. In fact after reading your post I went and looked at the trailing edges of everything I have on display and all of them look nice and thin - although the Ju-88G did need planing with a knife after ending up about 3 layers of 160gsm thick. Leading edges which are in seperate pieces require a really good glue hold so that the join doesn't open when curled to form the wing.
__________________
Currently in the hanger: Thaipaperwork Martin B-26 'Flak-Bait' In the shipyard: JSC barkentine 'Pogoria' Recently completed: TSMC F-16, S&P Kawanishi N1K1 Kyofu diorama 
|
|
#22
09-09-2023, 08:37 AM
|
|||
|
|||
|
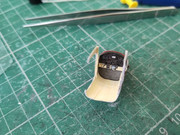
Some more progress on the Cessna taildragger:
Since these types of GA plane invariably have open intakes either side of the prop, some of the engine and radiator will be visible. In addition, I decided to open a side hatch, so will make a basic engine to fill the space. This is as simple as rolled paper for the cylinders and some mount board strips to create the general shape. The cylinder by the hatch was given some colling vents by glueing on a thin stack of paper layers sideways. Note that I only made four cylinders which would be visible. Exhausts are also rolls of paper painted silver - private aircraft tend to be kept clean and with some 'bling'
__________________
Currently in the hanger: Thaipaperwork Martin B-26 'Flak-Bait' In the shipyard: JSC barkentine 'Pogoria' Recently completed: TSMC F-16, S&P Kawanishi N1K1 Kyofu diorama
|
|
#23
09-18-2023, 10:51 AM
|
|||
|
|||
|
And now the cabin. Cessna 180 has two seats up front and (usually) a bench in the rear. These are all six layers of paper with a bit of carving and painting. Went for a red and white style to match the exterior as these aircraft seem to often get refurbished with custom interiors. The gloss paint does quite a good imitation of leather. And yes, the front seats really are that far forward, maybe somethng to do with CoG but not the easiest to get in and out of.
Some have seatbelts attched to the roof, others lap belts so I went with the latter as easier to install. The seat legs are stiffened with superglue. Rudder pedals are small and there is also a flap lever between the seats like a car handbrake. The panel is three layers with holes marked and punched through using a push pin. Again there is considerable variety in instrument layout so I copied from a picture. Being a simple airplane it's the basic six plus fuel and temp gauges and radios. Tried to add a bit of brown on the artificial horizon, and all the holes get a dab of gloss varnish to make the glass. Also made a simple display base which is a parking stand on an airfield. The corner is cut diagonally to help get a better view through the open door when the wing is on.       
__________________
Currently in the hanger: Thaipaperwork Martin B-26 'Flak-Bait' In the shipyard: JSC barkentine 'Pogoria' Recently completed: TSMC F-16, S&P Kawanishi N1K1 Kyofu diorama
|
|
#24
09-18-2023, 10:59 AM
|
||||
|
||||
|
you are sn awesome paper modeler
|
|
#25
09-18-2023, 12:09 PM
|
||||
|
||||
|
About the wing trailing edge tab treatment, I'm embarrassed to say that had I just looked more closely at your Yak photos, I could've readily seen that you were insetting them already! Absolutely didn't mean to question the technique, and the results are of course excellent regardless.
Love the Cessna cabin interior shapes and attention to aesthetic details. Really gives the feel of a general aviation cabin, into which one could picture oneself plunking down for a day trip, buckling the belt, and asking the pilot how the flight will go. Also, very nicely done with the fuselage shaping. Getting the flatness of the sides right versus the curvature of the corner edges—on a tapering shape—ain't simple.
|
| Google Adsense |
|
#26
09-18-2023, 12:41 PM
|
||||
|
||||
|
I echo Yankeekilo, a great job, congratulations,
|
|
#27
09-18-2023, 01:36 PM
|
|||
|
|||
|
Thank you all, the community here is a big motivation!
It's a compliment to Bruno's designs that even without formers they usually form themselves into the right shapes when the edges of the parts are matched. For this I found some blueprints with profile sections and had a look at pictures as well. Still to come is matching the front and rear halves when the cabin is complete. Having done a few test fits (the cabin floor is deliberately designed to act as a 'pin' to hold them together) there may be a bit of bending and shaping required to match the red stripes and close everything together. Maybe I mentioned before that there is a real lack of GA types available in paper, only a very few in the downloads here and on ecards. No 172 or 182 in particular, a surprise for one of the most produced aircraft in history.
__________________
Currently in the hanger: Thaipaperwork Martin B-26 'Flak-Bait' In the shipyard: JSC barkentine 'Pogoria' Recently completed: TSMC F-16, S&P Kawanishi N1K1 Kyofu diorama
|
|
#28
09-20-2023, 06:06 AM
|
|||
|
|||
|
Some more little details went in this morning (I don't work Weds am!). These are the side fabric pockets for maps/charts/stuff, the levers and yoke mounts on the panel, which is also glued in now, and a made a vest jacket that the pilot had hung over the seat, partly to hide the edge and add some colour contrast. Most of this required a VERY steady hand! Instead of trying to roll silly small tubes I cut a sliver off a stack of layers and pinched it into a curved form with the tweezers. Gives an acceptable result. Finally a little test fit to check everything lines up ok.
__________________
Currently in the hanger: Thaipaperwork Martin B-26 'Flak-Bait' In the shipyard: JSC barkentine 'Pogoria' Recently completed: TSMC F-16, S&P Kawanishi N1K1 Kyofu diorama
|
|
#29
09-20-2023, 06:31 AM
|
|||
|
|||
|
Quote:
__________________
Ryan Short Aerial / Commercial Photographer at www.RedWingAerials.com Models for sale at: www.lbirds.com and a few more that I'm looking for a place to sell them again.
|
|
#30
09-24-2023, 11:55 AM
|
|||
|
|||
|
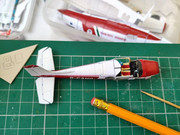
Thanks Ryan. I am suprised there are not more GA types in paper, you would think these might appeal to folks who fly them and want a miniature version of their aircraft.
I am doing a beta test for a 'secret' project, so not so much got done this weekend. However the cockpit is now complete with yokes, attached to the rear fuselage, and the wing and windscreen are on too. I got some new Bostik superglue which has made a difference as it dries faster and am having an easier time applying. Yokes were 3 layers coloured black with a pen. Seen a few versions of these and went with the simplest to cut out. There are some tiny pieces of wire for the throttle and mixture controls; yes the 180 also has a prop pitch lever but this wasn't going to fit with wire that was thick enough not to bend out of shape. I glued the two halves together in stages, starting by lining up the bottom seam and working up the 'closed' door to line up the red stripes. This door did have to be pulled a bit to achieve this and isn't a perfect flush fit but it hardly shows. The other side wasn't such a good fit as I didn't account for the extra layers of paper to make the interior, so it's a good thing the port side door will be open because the red stripes would certainly not line up. There's also a slight error in centering the rear fuselage which puts it about a degree 'off', hopefully this can also be hidden. The wing slotted nicely in place on top of the cabin with little fuss and sits at a centred angle. Struts will be added in due course once I've pondered the build order. The windscreen also presented a slight fit issue, again possibly due to interior but in theory this shouldn't affect it. It was built using the usual method of double-sided tape to attach a paper frame -cut from the kit part with a margin outside the glass - over clear plastic, with an internal divider VERY carefully added using superglue. (This also has the master compass mountedon it). I test fitted the part and found that it would slot very nicely into the wing but wouldn't reach both sides pillars. Eventually I glued it centred which reached the port side ok, and made a small filler part to hide the gap on starboard (handily this surface is white). After that some paint touch-up and varnish were applied over areas of the model that nothing now needed to be glued to. Still remaining are the struts, main and tail landing gear (done the front wheels), prop and spinner, port door attachment, radio aerials and the little fins on the wing, and the luggage. I also have a possibly foolhardy plan to create some figures from some combination of a wire frame and tissue...         
__________________
Currently in the hanger: Thaipaperwork Martin B-26 'Flak-Bait' In the shipyard: JSC barkentine 'Pogoria' Recently completed: TSMC F-16, S&P Kawanishi N1K1 Kyofu diorama
|
| Google Adsense |
 |
| Tags |
| scissors and planes, scratch build |
|
|


 Linear Mode

