


|
|
|
#12
 11-16-2007, 12:07 PM
|
||||
|
||||
|
Herr Doctor has spent too much time in the Inner City of Wilmington.
Do I have to break you from that Ted? Rick
__________________
"Rock is Dead, Long Live Paper and Scissors" International Paper Model Convention Blog http://paperdakar.blogspot.com/ "The weak point of the modern car is the squidgy organic bit behind the wheel." Jeremy Clarkson, Top Gear's Race to Oslo 
|
|
#13
11-16-2007, 01:44 PM
|
||||
|
||||
|
Wow! After the curtailed North Carolina build, this is getting back on the horse for sure! A real bucking bronco, laser cuts notwithstanding. It will be interesting to watch this one come together.
Don B.
|
|
#14
11-16-2007, 04:01 PM
|
||||
|
||||
|
Laser cut ribs - very nice. When I scratch built the 1902 Wright Flyer the only tedious part was the ribs. This looks like a very impressive model. I am really looking forward to more build pictures.
|
|
#17
11-18-2007, 07:33 PM
|
||||
|
||||
|
Wing Framing and Covering
Some meager progress to show. I've started on the upper wing. Actually, the wings are identical except for the bits printed on the upper vs lower skins where miscellaneous parts mate later. I found the first real error in the drawings here, they have the skin sets numbered backwards in the drawing.
First picture is an attempt to capture a shot of the full wing skeleton resting on the jig. Actually, it's not resting - I actually spot glued the main spar in several places and the leading edge spar at the tips to keep things steady and aligned while the ribs were installed. The second shot is a view midsection from the front. I used thick CA with accelerator to glue in the ribs. Once it was all built I carefully cut loose the glue spots holding it to the jig and painted thin CA with a brush applicator on the spars. Even with this step, the frame is VERY flimsy! It's obvious that the main strength will come from the skins! The 3rd pic is of the center section skin glued to the bottom of the ribs. One addition I made here was to apply a thin bond paper glue strip to the back of the skin first, as the butt joints occur right over these tiny 1/2mm ribs - they REALLY need the glue strips! As you see I also drew "rib lines" on the back of the skin for alignment. The leading edge is such a sharp, small curve I went ahead and sort of scored it from the backside with the ball end of my scoring tool. Not a sharpe score, but it makes the bend easier. Picture 4 shows that I have tapered the back ends of the ribs with an emory board, so it will make the transition at the trailing edge of the skin smoother. Finally, the 5th picture shows the finished middle section in place. Last edited by rlwhitt; 11-18-2007 at 07:39 PM.
|
|
#20
11-27-2007, 01:01 PM
|
||||
|
||||
|
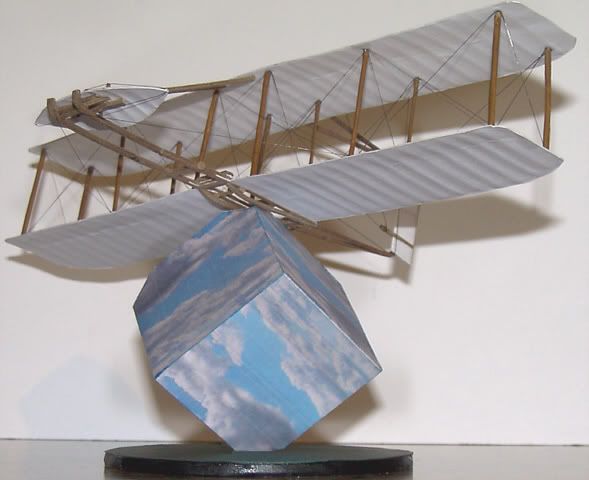
Finally, the upper wing is complete. It did not turn out as well as I'd hoped, but this is a frightfully hard covering job! The ribs supply NO structural support at all, so the old habits of anchoring an edge and pulling the skin taught around nice solid framework just don't apply here! Still, it'll be OK, and I've got another chance to do better with the bottom!
Here is a top view showing a bit of the downward curve aspect, and a look at the bottom where the various strut anchoring plates go.
|
| Google Adsense |
 |
|
|


 Linear Mode

