


|
|
|
#31
 08-24-2010, 09:45 PM
|
||||
|
||||
|
I bet!
It is an excellent model, just a lot of work to change some things around with some limited programs that I have to tinker with. But I will persevere and eventually it will come around to my way of thinking.  I will admit that building a couple of the parts up so I can see how they fit and what I have to work with is going to make things go a lot easier when I go to build the complete model. One of the saving graces of card model construction, you can reprint things if need be.
__________________
Jay Massey treadhead1952 Las Vegas, NV 
|
|
#32
08-25-2010, 05:09 PM
|
||||
|
||||
|
Hi All,
I got to slicing and dicing a little bit of card today. I started out by cutting the bottom plate, two half formers and 18 ribs that make up the basic hull form for this one. Gluing things together being judicious with the amount of glue, Aleenes Tacky Glue, that I used saw it go together reasonably well. I tried to keep the ribs up on the sides of the former that glued to the bottom but no matter what I did, it was still a little short leaving a gap that the deck would have had to go over and make for a ill fitting arrangement. I used two copies of the original brown printouts that I had on hand, clipped out the deck sections, split them down the middle and then glued them over the ribs to bring the height I needed to make a smooth glue job for the newly colored deck. With it all leveled out the final deck piece went on like it should, nice and straight, level and without any humps or bumps anywhere. 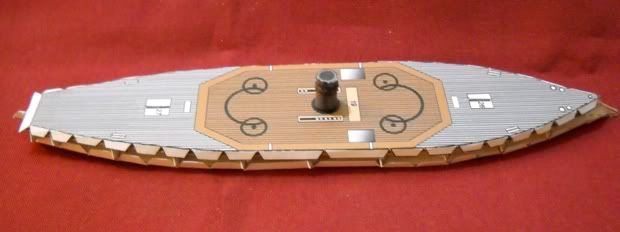 Since I am waiting on glue to dry, coloring the caisson and hull side plates still, I just had to have a little something to do, construction wise. Having already built up the caisson once in the original color as a trial, I decided to build up the two stack sections, one that goes inside the caisson and the other that sits on top. I have yet to add the ribs and other details to the outer stack section but I did alter the plan by taking one of the extra stacks that I had, trimming it down so that it fit inside the outer one, colored it black with a sharpie marker and then glued the two together so that I had a stack that was black on the inside and dark gray on the outside. This also eliminates the little strip that they furnish to make a gluing surface inside the stack. I want to work on the grating sections, not satisfied with how they look on the roof of the caisson. I also need to work on the armored cupola on that same roof. It was a trip to get the bottom sections to fold under and make a smooth transition when glued to the roof. I will also have to drill out the holes for the anchor chains I plan on using in the face plate of the caisson. I am considering ways to open up one side so I can show off the details on the inside of this little gem. It seems a shame to close it all up never to be seen again once built. 
__________________
Jay Massey treadhead1952 Las Vegas, NV
|
|
#33
08-25-2010, 06:08 PM
|
||||
|
||||
|
Looks like a very good start. When repainting my copy, I combined the two separate sides on the cupola with the center section to make one piece. I then shrunk it down in size slightly to better fit the markings on the top deck. Also, I would forget about bending the tabs and using them to attach the various parts. Aleene's tacky glue is plenty strong enough to hold the parts together without tabs, and without tabs the parts fit much closer together. I also didn't use the tabs on the main deck and base to attach the sides, just butted them together with tacky glue.
|
|
#34
08-25-2010, 09:46 PM
|
||||
|
||||
|
Hi Knife,
Some very good suggestions on getting that little cupola to do as it should. Trial assembly is almost a must on some of these little models, it certainly does show up a lot of the woes that you can deal with before you do a complete build. I got to spend some quality time with the caisson repainting and got one end and about half of the roof done. At this rate, I should have it done and ready to go in a few more days. In the mean time I can work on adding a little detail and life to the other parts of the ship, a large part of what I consider entertainment in these builds. On a side note, talking to our IT Guys at work the other day I was bemoaning having to use Paint to do all my color changing and my lack of Adobe Photoshop and they gave up an old and legit copy of CS3. I know it isn't the newest version, but I was tickled to get it and load it onto the 'puter. Now I need to spend a little time to familiarize myself with it through the videos included as well as some You Tube and other lessons around the web and I will be well on my way to being able to do some serious work on a card model.
__________________
Jay Massey treadhead1952 Las Vegas, NV
|
|
#35
08-26-2010, 03:13 AM
|
||||
|
||||
|
Good score on the software. I doubt you need the "latest, greatest" version for home use. Now you just need to convince work to send you to a photoshop class to learn how to use it!
|
| Google Adsense |
|
#36
08-26-2010, 07:17 PM
|
||||
|
||||
|
Hi Knife,
Yeah, I got to spend a little time thumbing through and watching a few videos on You Tube on CS3, it will take a little time to upgrade my abilities. The last Photoshop that I used much at all was PS7, they got a few new things since then. I spent some time and painted some on the caisson sides, sharpening up details and making things a little more uniform. I also worked on a few details like the davits, adding pulleys and thread for lines, the grates adding a little depth with some extra card and doubling up the support beams so they appear more realistic in size. I also made up one of the small boats, planning on two for this one which means I will need another set of davits. 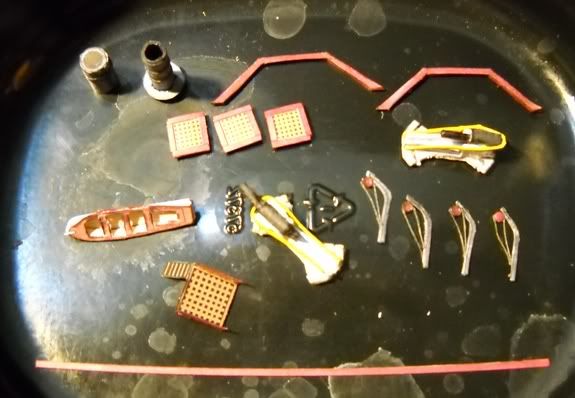
__________________
Jay Massey treadhead1952 Las Vegas, NV
|
|
#37
11-03-2010, 07:14 PM
|
||||
|
||||
|
Received a copy of the book "Ironclad of the Roanoke - Gibert Elliot's Albemarle" today, and have been reading it. It nicely puts the building of the Albemarle in context of Elliot's shipbuilding career during the war. I really recommend it to anyone that has already got the "Iron Afloat" book.
Porter and Brookes are coming up a lot from the very beginning. Oh, and if anyone wants to see a special treat... put this address into google map with satellite imagery on: 233 West Gordon Street, Kinston, North Carolina, United States Then zoom in slowly. It's wild that it's just sitting there by a four-way intersection. Really gives a sense of the scale of the design next to the cars. And it's one of the smaller designs the confederacy built. Last edited by Torakaze-222; 11-03-2010 at 07:32 PM.
|
|
#38
11-04-2010, 11:55 AM
|
|||
|
|||
|
CT- Absolutely beautiful models! I've been making toy boats for my kids(and others) out of scraps of wood, wire, paper, cardboard and any junk that works for years but until I saw Ollie Bizer's "San Pablo" had not considered paper. After seeing your civil war boats, I decided on "Pioneer" as a good first project, well designed and thought out- thank you for the download- I'll send you a picture soon as I can figure out how that's done. I made a lot of monitors,casemate ironclads and a paddlewheel gunboat but no submarines- thanks to you I plan on a few more. Keep it up, this is good stuff! Lance
|
|
#39
06-13-2011, 07:39 AM
|
|||
|
|||
|
CSS Albermarle Download
I tried downloading the kit from the myspace link, but was directed to a 3rd party host website. Did this happen to anyone else trying to download the kit? I'm a bit weary registereing for this sight - looks like a spam dump. Does anyone know if the kit is available anywhere else online? I trie ecardmodels... no luck.
Thanks.
|
|
#40
06-23-2011, 04:35 AM
|
|||
|
|||
|
CSS Neuse never recieved her deck or hull armour as she was overweight when launched (poor or no CSN supervision ?).
|
| Google Adsense |
 |
|
|


 Linear Mode

