


|
|
|
#41
 11-24-2010, 10:22 PM
|
||||
|
||||
|
Tapcho, I'll take your word on the link. Never did stick my head between the wheels and I'm too lazy to go back to the airpark and crawl under the dang thing again (unless someone asks really nicely, and it stays warm down here, and it doesn't rain, and the wasps have all frozen out for the year, ...).
Yogi 
|
|
#42
11-24-2010, 11:32 PM
|
||||
|
||||
|
I posted earlier how much I like the Spectors especally the later versions with the big guns. Thank you for taking on the job of generating the spook. Another stunning Hurc is the Navy DC-130. The photo is all Ted Taylor. He is at Ted's Modelworks, beautiful even if it is from the dark side. Would love to have the five birds in card.
__________________
All parts fit, Have hammer
|
|
#43
11-25-2010, 06:41 AM
|
||||
|
||||
|
Happy Thanksgiving!
I figured out what looks strange on that photo of diecast landing gear: The C-130 does not have "scissors" on the main gear struts. That pole strut running between the forward and aft main struts does the job. Best regards, Kurt
|
|
#44
11-25-2010, 08:17 AM
|
||||
|
||||
|
Thanks guys for all the input.
The "Spectre" was obviously my motivation for starting this project, but it will be cool to have a base model that I can "repaint" into various versions. I'm not an aircraft expert and definitely not a Herc expert! I learn as I go, and I am doing my best to simulate things in a visually accurate way. ...and I do appreciate related input. Obviously there are so many versions of the Herc, and many more subtle and distinct variants. Since I haven't focused on one particular model or variant of the Herc, and because Nobi's original model was somewhat generic in its design, I am also ending up with more of a generic design that probably has elements of more than one C-130 aircraft. I'll do my best to keep anything really radical out of the design, but feel free to point out any design elements that you think do not fit or should be altered. 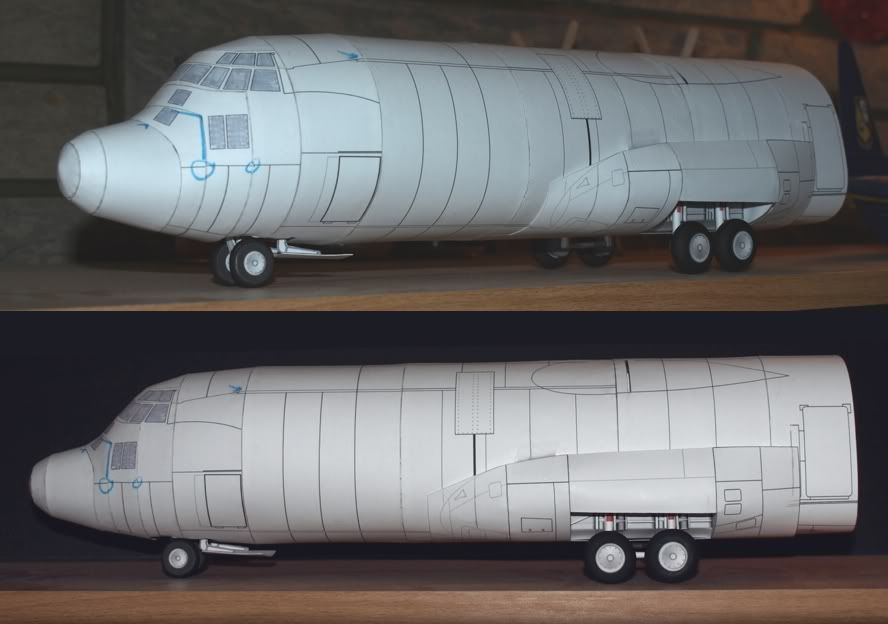 as I posted in Giraffes thread last night, I fitted some wheels to the plane and dry fitted the sponson assembly. First step was to check out the gear ride height, which as you can see, is much better than I had anticipated. I figured I would make the main gear a little longer than necessary ad then cut it down to get the correct ride height. I never thought i would be this close! Looks like I will be removing only a couple of millimetres. ..... Sponson part fits okay...its just held on with some clear tape at the moment. I needed to check its position and mark out various panel lines and trim spots. Now I will remove the part and cut it back into its separate components for scanning and to transfer the handdrawn reference marks. more to come
__________________
SUPPORT ME PLEASE: PaperModelShop Or, my models at ecardmodels: Dave'sCardCreations
|
|
#45
11-25-2010, 08:21 AM
|
||||
|
||||
|
Goodness, those landing gear look GOOD! Fabulous! The good news is that all of the Herc variants use the same landing gear design. Well, except for the ski birds.
How did you do those wheels? I like! Take care, Kurt
|
| Google Adsense |
|
#46
11-25-2010, 08:32 AM
|
||||
|
||||
|
I wasn't gonna advertise the wheels, in case i got dubbed a "cheater"! lol
I was in Michaels Craft store yesterday and found packets of wooden wheels. Various sizes - I bought about four packs for about $2 each Two of the sizes turned out to be very close to the sizes needed for this model. So I painted the wheels with a black (Dollar store) craft paint. Dries super fast and has a nice almost flat, slightly grayish tone. For the Main wheels I cut out the printed Tire/Wheel parts and then I trimmed off almost almost the black tire leaving only the Wheel Rim with a bead of black surround, and then I glued the inner and outer parts to the wooden wheel. (Unfortunately I wasn't paying attention to the shadow/highlights in the artwork and some wheels are not positioned correctly) For the front wheels, I followed the same method, however I glued the full Tire/Wheel parts to the sides of each wooden wheel ...to make the wheel a little thicker. They are still a little thin in my opinion. But I might just use these for my "good" build. ...really saves cutting out tons of little discs! lol Only thing I might do is flatten the bottom side of each tire. Just sand out a little flat section so the tire sits a little squatter, kinda like how a real tire bulges out at the bottom from the weight. Who knows, I might even add a little putty and create the sidewall bulges? 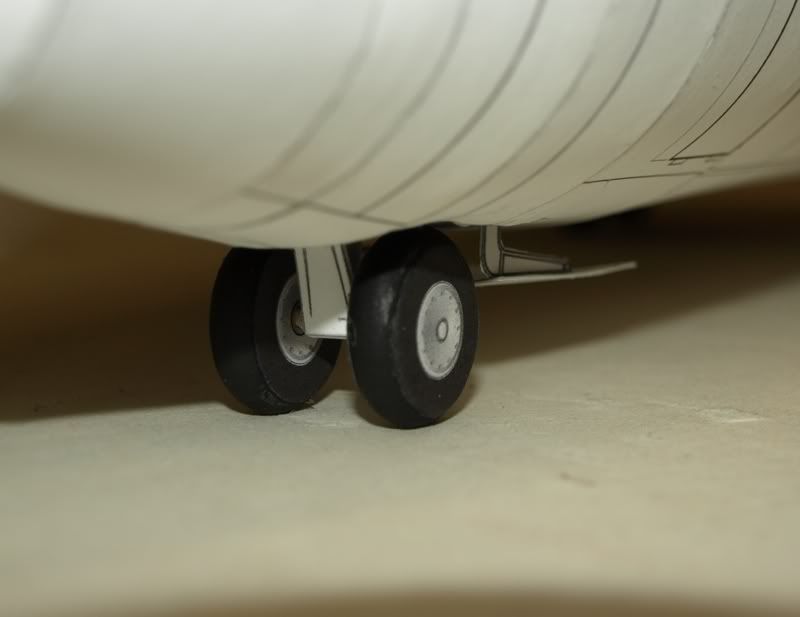 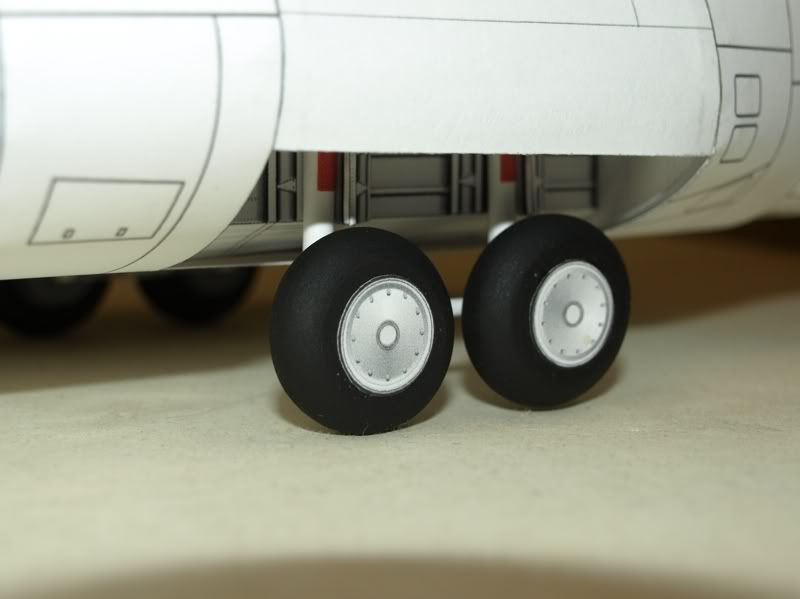
__________________
SUPPORT ME PLEASE: PaperModelShop Or, my models at ecardmodels: Dave'sCardCreations Last edited by airdave; 11-25-2010 at 08:50 AM.
|
|
#48
11-25-2010, 09:38 AM
|
||||
|
||||
|
Quote:
(actually this is what I have left from 4 packages) I used Medium Wheels for the main gear (about 23mm) and Small Wheels for the front (about 18mm) and as I said, the front wheels are a little too thin for this plane, but aren't too bad if you add the card outer layers. 
__________________
SUPPORT ME PLEASE: PaperModelShop Or, my models at ecardmodels: Dave'sCardCreations
|
|
#49
11-25-2010, 12:26 PM
|
||||
|
||||
|
This is cool! I'm not at all looking forward to cutting out dozens of cardboard disks and am not at all opposed to getting help in the form of pre-made wheels. The idea of adding a disk to each side to shore up the overall thickness is quite good.
Did you have a problem with that fuselage section #14 (the very end section on your photo from your 09:17 post this morning) being too small a circumference to fit #13? I'm not sure whether I printed mine wrong or cut too much off the end (we're talking 0.5 - 0.75 mm, here). I added some to the very bottom and it fits up front, but now #15 is a bit snug. This just seemed odd after all of those nose pieces fit so nicely. Take care, Kurt
|
|
#50
11-25-2010, 01:36 PM
|
||||
|
||||
|
I may get mixed up on the part numbers, since I have thrown them all away...
(I will number everything when I am done) but the second to last fuselage section (in my photos above) needed to have a small adjustment. I removed about .5mm from the top and bottom seams where it meets the last section. So a total of about 1mm removed from the circumference. If you are saying your last section is small, then that correlates to what I am saying. But the adjustment I made will not affect the next (#15?) part. Don't be surprised with anything here...Nobi's kit is a pretty good kit, designed for the more novice builder I think, but its far from being a "well fitting kit". I have built the nose 4 times so far and each time it goes a little bit different, so be thankful yours went smooth!
__________________
SUPPORT ME PLEASE: PaperModelShop Or, my models at ecardmodels: Dave'sCardCreations
|
| Google Adsense |
 |
|
|


 Linear Mode

