


|
|
|
#51
 11-06-2011, 12:22 PM
|
||||
|
||||
|
even at this scale, I am designing and cutting some very small parts!
thats one of the problems with a larger scale like this... it calls for more detail, more accuracy in component design. But that just means more small detail and a more complicated model to build. I need to strike a balance... I'm not going to get crazy with all the lines and linkages but I am hoping to put enough details and chassis parts that you will be happy to turn the model over and look underneath.
__________________
SUPPORT ME PLEASE: PaperModelShop Or, my models at ecardmodels: Dave'sCardCreations 
|
|
#52
11-06-2011, 04:44 PM
|
||||
|
||||
|
Dear AirDave:
YES, YES, YES, Go Dave Go, YES, YES, YES, Thanks For doing this model, MILES
|
|
#54
11-06-2011, 05:52 PM
|
||||
|
||||
|
persevering yes...succeeding?...not sure yet haha
a little stuck at the moment with the front Leaf Springs. My first design hasn't worked too well, and now I am considering some other methods of assembly. It looks like I might have to create individual leafs, to be assembled into a full Spring. I was trying to avoid this method because it relies on the builder assembling the spring in the correct shape and height. This of course controls the ride height and level attitude of the vehicle. What I am thinking of now, is...a cutout "jig" for assembly of the springs. I think I could create a pattern of the correct leaf Spring shape and the builder could print it and stick it to heavy card. Then cut out the pattern making a "cookie cutter"jig ...then you just glue the Leafs together inside the jig and let dry to the proper shape? Ideas?
__________________
SUPPORT ME PLEASE: PaperModelShop Or, my models at ecardmodels: Dave'sCardCreations
|
|
#55
11-06-2011, 07:13 PM
|
||||
|
||||
|
Dear AirDave:
KenWest in his Olds 1/12 project used templets to form Leaf springs to. however his was just bend and hold to the sheet to match curve. I like the idea of a form that you could use clamps or better yet rubber bands to hold till the glue drys. My 1cent worth, MILES
|
| Google Adsense |
|
#56
11-06-2011, 07:33 PM
|
||||
|
||||
|
yes, Ken's springs were only three Leafs...but mine are about 10/12 to each front spring.
Ken's were cut from thick card...mine have to be made to print on paper or cardstock. (because of the multiple layers, thick card would be unneccessary) Ken's was a scratchbuild project (wasn't it?), whereas I have to keep in mind I am making a kit. .... I just tried another Spring assembly using an internal former, but it didn't work any better than my first efforts. Its a fight at this size to assemble them cleanly. First I tried with glue tabs and then without. I tried making the side pieces a little smaller, but it just got harder to glue the edges. No, I think I will try individual Leafs and see how that works before I make any more decisions.
__________________
SUPPORT ME PLEASE: PaperModelShop Or, my models at ecardmodels: Dave'sCardCreations
|
|
#57
11-06-2011, 07:41 PM
|
||||
|
||||
|
I'm coming late into this thread but I wanted to compliment you on your choice of projects, as it is an unusual one from a period far too often neglected, and for your choice of scale, as it is easier to scale down a detailed model that scale up one without the detail.
I am looking forward the this threads evolution and like the framing so far. Just wanted to add my support and interest.... The DC
__________________
"One does not plow a field by turning it over in his mind..."
|
|
#58
11-08-2011, 10:26 AM
|
||||
|
||||
|
SUCCESS!
this new leaf Spring method works great! 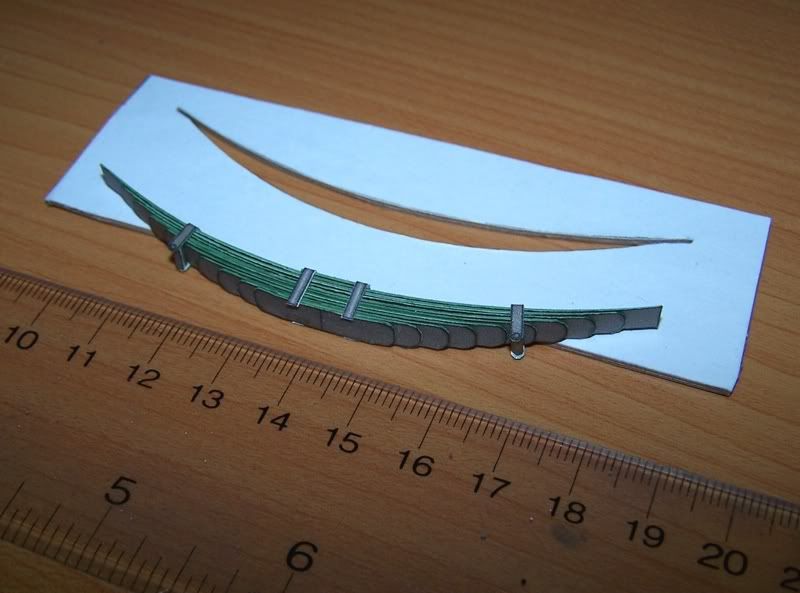 Each Leaf is assembled from two folded sides, glued and then loosely curved with my fingers. The front spring has ten springs, which seems like a lot of work at first, but it actually takes a lot less time than my first design method! I made an outline template of the spring assembly, which I glued to thick card (about 1mm) and then I carefully cut out a "jig". Once all the Spring Leafs had been glued and formed (and let dry for about 30 minutes) I glued them all together while fitting them into the "jig" one at a time. I started with the top, largest leaf and worked toward the bottom. After making sure they were all properly lined up in the jig, I let the whole Spring dry for at least 30 minutes before removing it from the jig. The longer the glue is allowed to properly dry will guaranty the Spring retains its shape. This was just a test assembly...for the two final Springs, I will alternate the position of each Spring Leaf. Flipping the the folded sides of each Leaf right to left will help keep the Spring assembly square and flat ...for this test assembly, I fitted all the Spring Leafs in the same direction and the complete Spring is slightly thicker on one side making it slightly off-square. Off to try a test build of a rear Spring now. Rear Side*Springs are slightly larger than the front springs with two extra Leaves. *There are three rear Springs, one across the back of the Chassis. I have all the Spring Leafs ready... I just have to make sure the Rear "jig" works properly.
__________________
SUPPORT ME PLEASE: PaperModelShop Or, my models at ecardmodels: Dave'sCardCreations
|
|
#59
11-08-2011, 11:17 AM
|
||||
|
||||
|
Great looking work, Dave! I like the jig idea. That should keep it consistant. This is definately a project that has pequed my interest! Can't wait for more!!
__________________
Chris Currently have way too many hobbies
|
|
#60
11-08-2011, 11:38 AM
|
||||
|
||||
|
Quite amazing!
This project is already waaay beyond my "Fiddlers Green" comfort level.  But despite that, I think the Autocar is fascinating and I am hoping to try to build it myself once its completed and AirDave offers it up for sale. But despite that, I think the Autocar is fascinating and I am hoping to try to build it myself once its completed and AirDave offers it up for sale.Thanks again for taking this project on.
|
| Google Adsense |
 |
|
|


 Linear Mode

