


|
|
|
#91
 04-23-2013, 09:28 PM
|
||||
|
||||
|
Quote:
lol what did I miss?
__________________
SUPPORT ME PLEASE: PaperModelShop Or, my models at ecardmodels: Dave'sCardCreations 
|
|
#92
04-26-2013, 05:30 PM
|
||||
|
||||
|
Excellent

|
|
#93
05-27-2013, 08:07 AM
|
||||
|
||||
|
Centurion Update May 26
........................................ wow, over a month since the last update! sorry about that. ...but I had to deal with the Spitfire redraw and the release of the Spitfire Beer truck model. So, I'll try to make this update a good one. Work has continued behind the scenes, on the Centurion's suspension parts. Unfortunately, what I thought was going to be a straightforward component, has turned into a very frustrating exercise. Numerous tweaks and changes have slowed down the design but the biggest problem is still the fitting of the "tires" to the main suspension wheels. I don't know all the names and actual terms for the parts, so please forgive my inaccuracies. The Centurion has three main pairs of suspended Axles and Wheels on each side. The track is driven and supported at each end by two large Gear Wheels. Supporting the upper area of the Track are four main Idler Wheels, and two minor Idlers front and rear. 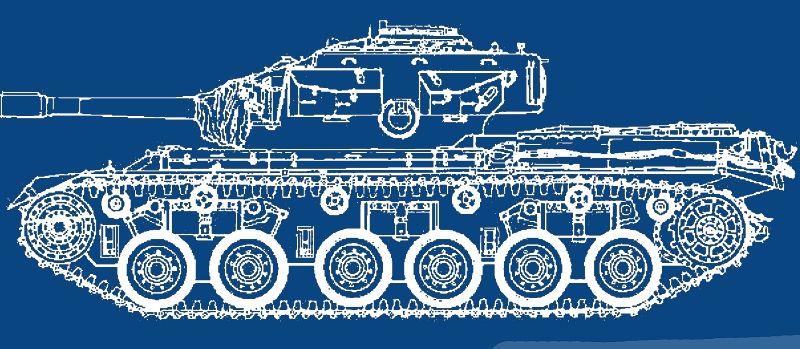 Here is one the upper Main Idler assemblies. Basically a supporting bracket and two rubber tyred wheels. I was going to make these with an axle and rotating wheels, but I changed my mind and kept the assembly simpler. Its really not necessary for a static model...and thats the kind of thing the builder could change if they wanted to. 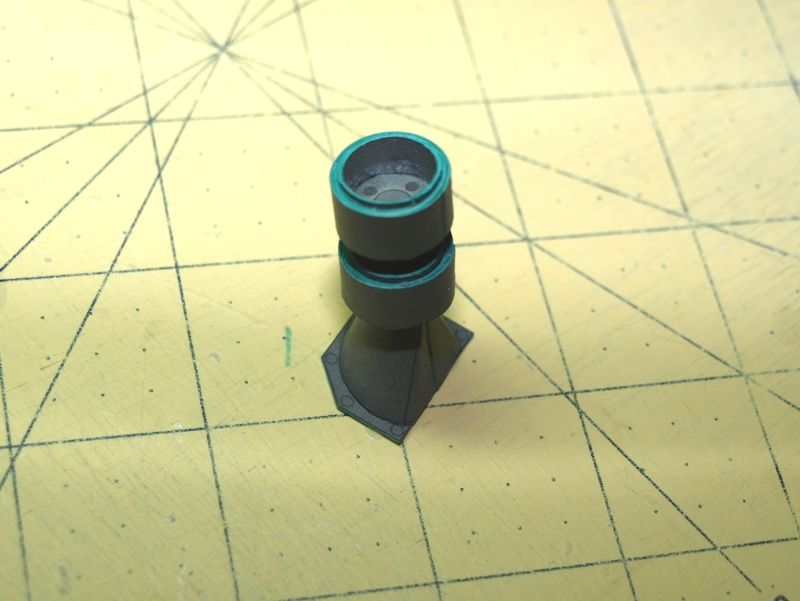 I had a basic idea for the main Axle/Wheel sets and it worked out fine with a few small tweaks. This is one of the two outer Suspension units...with pivot limiting linkages. (The center suspension unit is only required to pivot a few degrees, so it doesn't have the external linkage) Even though this unit is fairly large, I went for simplicity of build and tried to keep the part count to a minimum. I went with the simplest method of attaching the Wheels to Axles, and the end result gives you rotating wheels (if you want them). Small Hub Caps lock the wheels on to the Axles.  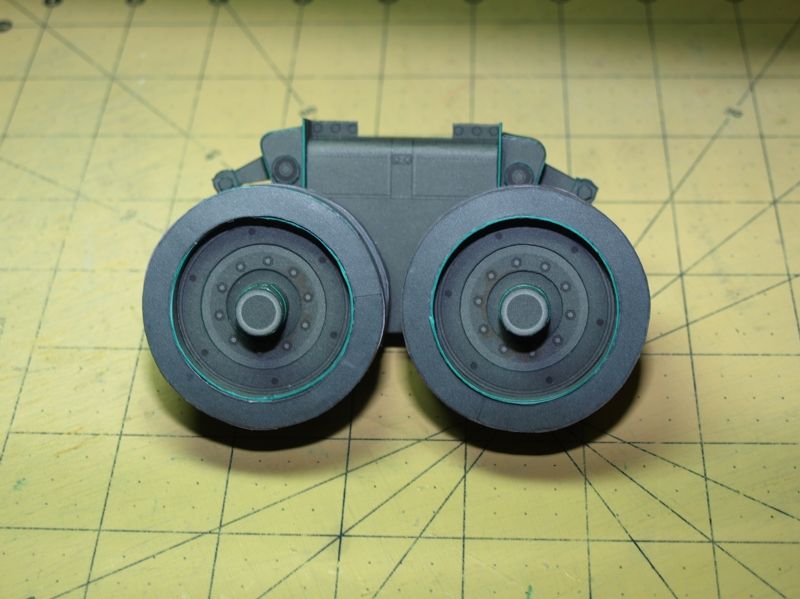 This is where I ran into the biggest problem with my original design. Fitting of the Main Wheel Tyres turned into a frustrating project. In fact, I am still not happy with the design and am going to try some more alterations. (If anyone would like to help by test building these parts, please let me know) At first, I used two strips, around the wheel rim, to locate each assembled tyre. But to keep the tyres fitting tightly to the rim meant I couldn't cleanly get them on to the rim (over the locator strips). I tried about 6 different resizes and variations of the tyres to make them fit...before giving up. Eventually I settled on one center strip around the rim, which the inner and outer tyre can butt up to. This helps locate the tyre, but still leaves the outer edges of the tyre very loosely fitted. And you can't easily glue the outer edges because the glue will be visible and messy. So the tyres in these pictures aren't even glued in place yet. 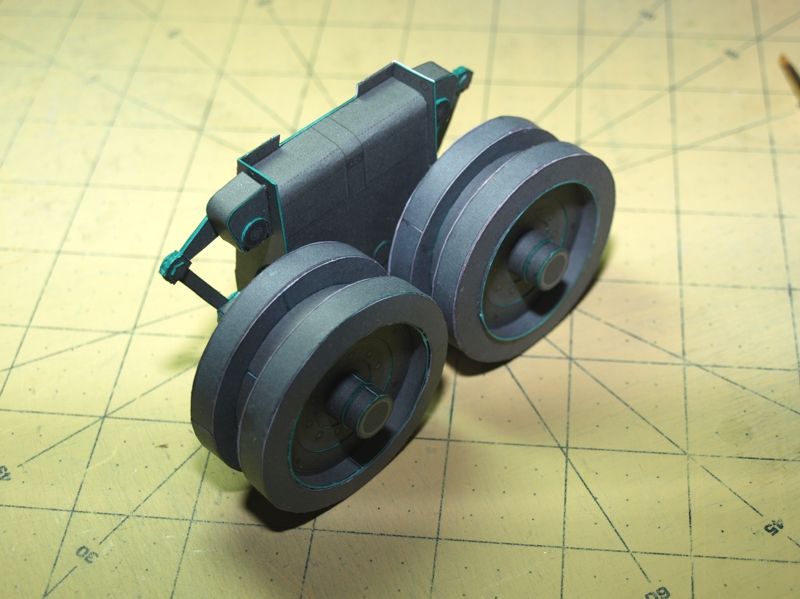 To assemble, the Main Suspension Units and Idlers just glue flat to the Hull at the marked locations. Not the strongest connection I admit, but there's lot of surface area to glue and once all six units are in place, the weight of the tank will be spread out sufficiently.  After the Units are attached to the Hull, pop on the Wheels and Hub Caps. Other than some possible Tyre modifications, I like what I have so far. I wish there wasn't so many Wheel Units to assemble! But I think I will get them all done first, before tackling the minor idlers, and then its on to the front and rear Drive Gears. The rear Drive Gear will also include the Main Drive output housings.  And to give you some "scale" sense, heres the model sitting on the side cabinet. She's getting bigger... Thats it for now. 
__________________
SUPPORT ME PLEASE: PaperModelShop Or, my models at ecardmodels: Dave'sCardCreations
|
|
#94
05-27-2013, 05:13 PM
|
||||
|
||||
|
apologies...
I'm sure most of you could figure out the general scale of the model, but I realized that it would have been nicer if I had included an actual measurement for reference. The main suspension wheels are each about 2" (5cm) in diameter. 
__________________
SUPPORT ME PLEASE: PaperModelShop Or, my models at ecardmodels: Dave'sCardCreations
|
|
#96
05-27-2013, 10:40 PM
|
||||
|
||||
|
Very impressive...
__________________
Buy me some coffee at https://www.buymeacoffee.com/thaipaperwork Visit our Online shop at https://thaipaperwork.wixsite.com/onlinestore or https://www.buymeacoffee.com/thaipaperwork/extras
|
|
#98
05-28-2013, 06:19 AM
|
|||
|
|||
|
I'm quickly running out of room. Gonna need a bigger office. Impressive design.
|
|
#99
06-08-2013, 09:58 AM
|
||||
|
||||
|
Just a short update...
works continues on the Centurion Tank...slowly. Family issues and other projects have slowed down the work, but I try to put in a few hours here and there. I have been doing much repetitive cutting and preparing many little parts necessary for the Suspension components. This is the only real negative aspect to doing Tank models in paper. Lots of duplicate parts that make up the drive wheels and tracks, etc. Anyway, I have all the suspension units (for main road wheels) finished and am installing them now (to the Hull). Next up will be assembling the upper return Rollers and all the Road Wheels. You may notice a slight colour difference between the earlier installed suspension unit (at the rear) and the newly assembled units. This is the problem with not printing everything at the same time. However, in this case, I also printed this last batch of parts with a lighter ink level. My fault. But to be honest, it is barely noticeable in person. I think the camera flash exaggerates the colour difference. 
__________________
SUPPORT ME PLEASE: PaperModelShop Or, my models at ecardmodels: Dave'sCardCreations
|
 |
|
|


 Linear Mode

