


|
|
|
#1
 06-24-2016, 01:18 PM
|
||||
|
||||
|
Model Instructions...what do you like?
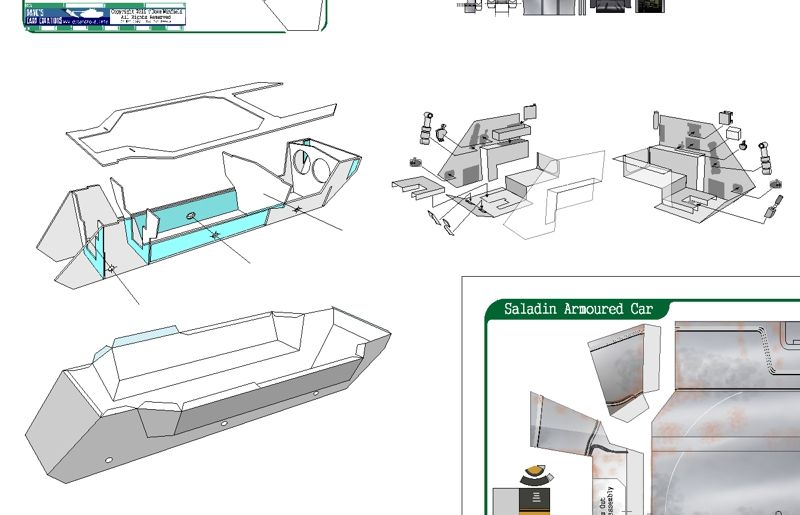 In my Saladin Armoured Car thread I was discussing the idea of getting caught up on all those Assembly Diagrams I will need when it is time to create the Instruction pages for the kit. With those diagrams done in advance, I can worry about the layout of the actual Instruction Pages later. Which brings up some questions...about the layout of the Instruction pages. Everytime I do a kit, I struggle with the look, layout and feel of the Instructions. I try to follow a pattern, but it never seems to work out that way. I know we have already had related discussions ...and I remember that many of you prefer to see a visual diagram for the assembly (rather than text instructions) and I prefer to include both, starting with a diagram, and then adding my own instructions and notes. What I really struggle with is the size of things...images, fonts... and the overall layout of the page... I often look at Instruction sheets and booklets from plastic kits for layout ideas, but plastic kits tend to have more straightforward assembly procedures. Pre-Molded (plastic) objects just need to be located ...as opposed to paper assemblies that require sub-assemblies, multiple parts, varying creases and folds and shaping, and eventually location and attachment. Question 1: I wonder if you have found any Instruction Pages/Booklets/Sheets that you find more attractive, informative and/or helpful which you might recommend I refer to? Anything that could suggest some layout ideas. Question 2: Do you print your Instruction Pages? or do you refer to them on your computer? Would you prefer to see larger or smaller pages, diagrams, fonts? Working on standard sheet size (Letter/A4) means fairly limited space on each page. Do I cram more into less pages? or make things bigger and more spaced...adding more pages to the kit? ... Your ideas and opinions are invited.
__________________
SUPPORT ME PLEASE: PaperModelShop Or, my models at ecardmodels: Dave'sCardCreations 
|
| Google Adsense |
|
#2
06-24-2016, 01:42 PM
|
|||
|
|||
|
I just looked at a couple of you kits, and I vastly prefer the more detailed instructions to just an expanded 3d drawing that you see on a lot of kits. When you get into the more detailed kits, it is very important to know what order to build things otherwise you may leave things out. Your instructions are quite clear and concise which really helps the modeler (especially the less experienced ones). Putting instructions for sub assemblies on the page parts are found is also quite handy so you don't have to go through a sheaf of instructions to find the item. Admitted this will chew up more paper but it is handy.
Beard
|
|
#3
06-24-2016, 01:50 PM
|
||||
|
||||
|
Dave,
I print your instructions. They are detailed and extremely helpful (and in English). You're layout is great, don't change the layout. Saying that, I do spend a lot of time on your build threads, you explain the "How To" put it together, not just where it goes on them. Possible Recommendations: 1) You might be able to use photos from your build thread instead of the drawings; 2) Add a hyperlink to your build thread in your instructions. Thanks, Gary
__________________
"Fast is fine, but accuracy is everything" - Wyatt Earp Design Group Alpha https://ecardmodels.com/vendors/design-group-alpha
|
|
#4
06-24-2016, 01:53 PM
|
||||
|
||||
|
In regards to question 1: I like clear 3D drawings myself. Notes on sequence if different than assembling by part number would be helpful. For plastic kits, I have always found wingnut wings instructions to be the best. They have all of them on line on their website here: Wingnut Wings
In regards to question 2: I like when there are fewer drawings on a page with more detail in the drawings. I can always conserve paper by printing two pages per sheet if needed. Just my 2 cents worth. greg
__________________
In dry dock: ? In factory: CWS T-1. In hanger: Fokker triplanes? under construction: ? 
|
|
#5
06-24-2016, 02:27 PM
|
||||
|
||||
|
The instructions for the models at Welcome to currell.net are very helpful and well layed out.
I prefer a less crammed page so more pages would not be objectionable. I tend to create booklets for model instructions with many pages that I intend to print. The graphics are reduced since two pages are printed on each side of a single sheet of paper so if any area needs more study I will open the original model file on the computer to look at the graphics in the original size. 
__________________
~Doug~ AC010505 EAMUS CATULI! Audere est Facere THFC 19**-20** R.I.P. it up, Tear it up, Have a Ball
|
| Google Adsense |
|
#6
06-24-2016, 03:09 PM
|
||||
|
||||
|
Quote:
__________________
Carborundum Illegitimi Ne Herky
|
|
#7
06-24-2016, 03:52 PM
|
||||
|
||||
|
i just want to say that the type font (on your Mustang or Koolwheelz model) are easy to read not to small or big and the layout of the diagram instruction for me is easy to follow, its simple and not using unnecessary color. I do print the instruction just because i like to hold the piece of paper(it makes me look 'kinda' smarter LOL!)... no seriously your instruction diagram are easy to understand (english are not my first language)...
__________________
WIP: None
|
|
#8
06-24-2016, 04:45 PM
|
||||
|
||||
|
I never print instructions unless (rarely) there is a part or two on the instruction page.
I always view on the computer. That being said, I wish folks would do instruction pages Landscape instead of Portrait. If I need the instructions larger, just change the view, but I don't like to scroll up and down all the time. I was going to say that I couldn't remember whose instructions I really liked, but then I remembered. Chris Roe of Genet Models does excellent instructions. If there was one thing I wish he would do different, it would be showing the tabs in his diagrams, but Chris does very nice instructions, Genet Models | We design and sell print-and-build paper models and toys!. Better on his newer models than his older ones. His models sold on the World Works Games website are even better than the ones for his free models
__________________
A fine is a tax when you do wrong. A tax is a fine when you do well.
|
|
#10
06-25-2016, 06:23 AM
|
||||
|
||||
|
wow...some great comments and critiques.
Thanks guys. Let me respond to some things... BurningBeard... I agree. I do try to create my Instructions based on the assembly order I have created with photos. I use my memory as best as I can combined with the photo record. And yes, I often put little diagrams next to sub-assembly parts, but I try to limit those because of wasted space on Parts pages. MacSongLi... When you say 'don't change the layout"...lol which layout? This is part of my problem. I seem to have a different layout for aircraft kits, as opposed to vehicles and boats. The Centurion instructions are a bit different to Little Willie's. And so on. I agree, the forum walkthroughs are the best aid...but I have to create Instructions assuming they will be the only thing the builder has. I do use the build walkthrough for my Instructions. I use them to make the drawings that you see in all my instructions. But the vector line drawings offer very little file/data size. I have to limit photo uses to a minimum. And I have to find ways to make them much lower resolution and quality. One of the things I do when I compress and optimize my final PDFs, is eliminate alot of the extra things that can be buried in a PDF document. Active text and hyperlinks, for example. Best thing I can do is just include a weblink/address. I already include my general domain, and anyone who visits my online store (papermodelshop) will see some downloadable photo sets. modelperry... I never used the number order for assembly because everytime I put ordered numbers on Parts, I would end up adding more parts, or shifting parts, or changing a design, and then my number system is all messed up! I decided a long time ago, just to number everything at the end with a loose connection to the diagram order. So, yes, its important to show an assembly order within the the instruction diagrams. The Wingnuts stuff is pretty nice. Obviously that is part of their presentation. The Instruction/Information/History/Guide Booklets included with their kits are serious publications that make a nice addition to the model. Keeping in mind, that the booklets are preprinted and come included with the models. I would love to create such beautiful layouts, but I have to think about the modeller and their paper/printing costs. But one thing is more obvious to me...maybe less on the page is a better thing. Larger diagrams...easier to see...with more room for more details. And don't worry so much about how many pages are used for the instructions? SCEtoAUX... I am going to pull a couple of the Currell instructions as reference. If nothing else, they are very clean and orderly. Once again, it appears as though less is more. Herky... I will continue to do small subassembly drawings on the parts pages, as they are necessary...and when room allows. Loui.... I had to go back and look at the Fonts I used. There are multiple fonts, so I am unsure which ones you prefer. Maybe that just means I have made acceptable font choices on most models? and I will continue to do the same? My biggest issue was font size. I found a couple f times, that what looked okay on my screen, turned out to be very tiny when printed. I'm trying to avoid that again. Vermin... Landscape?...I never thought about that. I wonder if that would be an acceptable option? It gives you a bigger page to work with...or allows you to make a diagram larger on the page. Doesn't it cause a small problem when viewing the PDF though? Unless I make the entire kit Landscape pages. This won't work with my cover page format though. Or with the store formats. Cover pages are usually Portrait.
__________________
SUPPORT ME PLEASE: PaperModelShop Or, my models at ecardmodels: Dave'sCardCreations
|
| Google Adsense |
 |
|
|


 Linear Mode

