


|
|
|
#21
 05-12-2021, 01:22 AM
|
|||
|
|||
|
What a great idea for a model and it is coming on fantastic so far airdave. Is the resolution of the images you are creating such that they could be blown up to 1/4 scale (ie 300%) and still maintain all the detail (so without becoming large pixelated blobs if you get what I mean)?
Regards Kevin
__________________
Normally the most advanced tech I use is a pencil. 
|
|
#22
05-12-2021, 07:19 AM
|
||||
|
||||
|
Quote:
In this case, the four capsule skin sections are made up of a LOT of artwork elements. Too much to stay just in vector. Many layers make for a complicated and large data file. The data size can get out of hand when saving the vector file. So, to keep it manageable, I stack artwork layers and convert as much as possible to a single raster (bitmap) element. I'll even combine multiple bitmaps to be single larger bitmaps. For example, when building the image, there may be some separate shading and highlighting layers that can be positioned all on the same level and combined into one single bitmap image to reduce the overall data size. Adjoining layers can be combined to do the same until finally the whole image is one bitmap. I save all bitmaps to 300dpi, but if the PDF must be optimized to reduce overall file size, bitmaps may be reduced to 150dpi. The final PDF save may still contain both vector and bitmap elements and I will only optimize the file if it is really necessary. Since this model is 1/12 scale to begin with, 1/4 scale isn't as huge a step. Obviously some pixel enlargment will occur, but I think the bigger problem is how do you print it that big? Thats some big cardboard sheets! And would require a decent size printer!! Not to mention, the need to triple the thickness of cardstock!!! Anyway, here is a zoom in on the artwork so you can judge the quality. Its more than 300% blow up.
__________________
SUPPORT ME PLEASE: PaperModelShop Or, my models at ecardmodels: Dave'sCardCreations
|
|
#23
05-16-2021, 09:04 AM
|
||||
|
||||
|
Looks like the skins are finished...I've sent off a set to my "test builder".
I think I will also build up the capsule, without its interior. That way I will be able to take my own photos of the completed splashdown capsule and wait to see what my test builder does with his display version. I just have to figure out a way to support the capsule exterior with some sort of interior structure. ... For now, I have moved on to the Earth Return Equipment which is housed above the crew compartment. After re-entry into Earth's atmosphere, the upper capsule heat shield is jettisoned exposing the "Return Equipment": parachutes, flotation devices, etc. I realized that these items need to be exposed if the Capsule is presented in "splashdown" look and so, I wanted to do some recolouring and weathering if necessary... although the equipment looks pretty clean in photos. I also discovered some differences between Apollo capsules, and Ken's model doesn't match Apollo 11 exactly...so I am redesigning most of the equipment and structure. One of the things I noticed is the Tunnel that accesses the LEM, is sealed with some sort of hatch or plug. Anyone can tell me where this hatch or plug was stored? How it works? What its called? 
__________________
SUPPORT ME PLEASE: PaperModelShop Or, my models at ecardmodels: Dave'sCardCreations
|
|
#24
05-16-2021, 02:26 PM
|
||||
|
||||
|
doing good work Dave
__________________
David........... Paper modelling gives you a happy high. currently building. c GAZ 51 ALG 17, wagon 111a. unex DH411 excavator and spitfire Mk 9
|
|
#25
05-18-2021, 07:46 AM
|
||||
|
||||
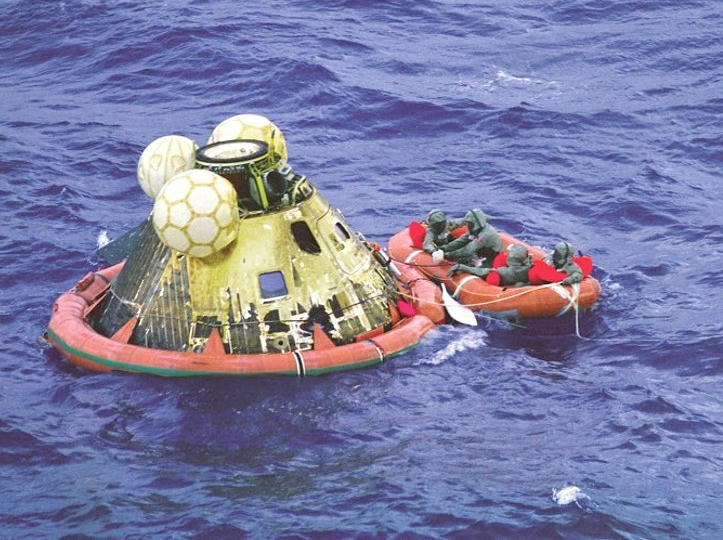 I've been continuing to search for more information about that hatch or plug in the upper tunnel of the ACM. But I haven't found anything else, yet. I've also become interested in those flotation(?) balloons at the top of the capsule. Might make an interesting addition to the model. What I have discovered is that my model doesn't look like Apollo 11 (up top). I mean, there are some understandable differences between Ken's model and Apollo 11 (as it looks after splashdown). As I said before, I don't know what version of the Apollo capsule Ken based his design on...there are differences across all 16? versions. And Ken's model is basically a pre-flight mock-up, intended for exploded view display...so I don't want to be critical of its accuracy in this case. In my case, I'm trying to make a rendition of the Apollo 11 splashdown look...but at the same time not modify Ken's model so it cannot be assembled as originally intended. This is proving to be difficult if I want to get closer to the Apollo 11 splashdown look. I've decided to modify the crew tunnel at the top, where the hatch/plug fits. Basically remove the top expanded rings of the tunnel section, and design a new set of parts that better match the look of A11 as you can see in these photos. I don't think this will affect Ken's original assembly...its all hidden inside the upper Heat Shield, and I don't think its a critical connection for the model build up. 
__________________
SUPPORT ME PLEASE: PaperModelShop Or, my models at ecardmodels: Dave'sCardCreations
|
| Google Adsense |
|
#27
05-20-2021, 07:09 AM
|
||||
|
||||
|
All new Earth Return Equipment level finished!
with a new crew tunnel and top plate thingy. Looks good, although I wondered about the amount of weathering. My original thought (when I first realized I had to repaint the exposed ERE) was to make everything dirty and smoky and heat blasted... but as I studied photos, I realized that this level of the Capsule is protected under a heat shield that is jettisoned before the Chutes are deployed. Other than smoke burn inside the Drogue Parachute Mortars (those two large pots in front), everything else looks clean and unweathered in photos and video of the splashdown. The capsule did spend some time almost upside down in the rough water, so it got a bit of bath after splashdown! *I will be going back to my artwork and adding some smoke inside the Drogue Mortar Canisters. 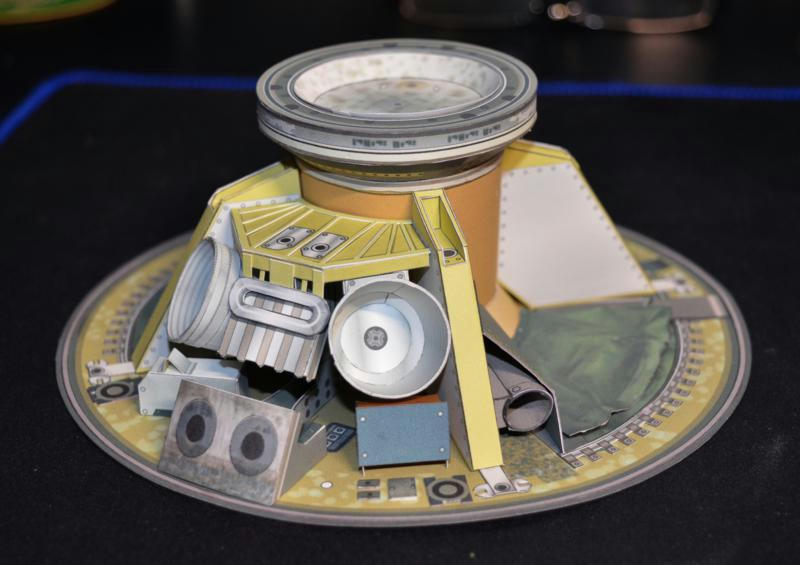 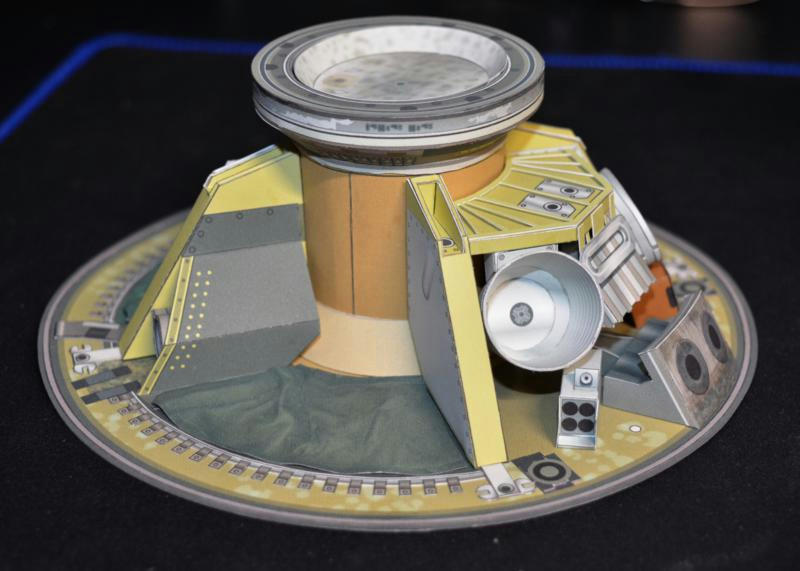 
__________________
SUPPORT ME PLEASE: PaperModelShop Or, my models at ecardmodels: Dave'sCardCreations
|
|
#28
05-20-2021, 08:23 AM
|
||||
|
||||
|
Great work Dave!
I think the splashdown/recovery phase was an excellent idea. In all of Apollo modeldom, this phase of the flight probably has gotten the least amount of attention. And it's hard to have a better foundation than Ken West's CM. Beautiful work, can't wait to try it. I'll certainly buy a kit from you! James
|
|
#29
05-21-2021, 03:03 PM
|
|||
|
|||
|
Quote:
I personally use the "take a snap shot" feature in Adobe for scaling up (or down) of parts on a pdf. You can actually do most things using A4 since most "parts" can be made of multiple "bits" with natural joints. I tend to use A3 just to cut down the number of joins. Quite a bit of the time you actually don't need to scale up the thickness of the cardstock by much (or not at all) since the strength is more than adequate due the overall shape of the parts when assembled. However you are right sometime "strength" is a major puzzle to solve. But then that is all part of the fun (well at least for me). Finally in a post you question-marked "floatation" devices. You are correct. The shape and centre of mass of the command module meant it could stably float either "pointy bit up" (like in the photo), which was called "stable one" (position) or "pointy bit down" (so the astronauts would be upside down and hatch under water) which was called "stable two". The three inflatables had enough buoyancy to make stable two impossible and so the craft would go into stable one position. If you watch the following footage of splashdown of Apollo 17, as the helicopter flies out to send in the frogmen you can here one of the navy personnel in the helicopter report that the capsule is at "stable one" Regards Kevin
__________________
Normally the most advanced tech I use is a pencil.
|
|
#30
05-21-2021, 09:21 PM
|
||||
|
||||
|
Quote:
Found these as I was a-Googlin': https://www.hq.nasa.gov/alsj/CSM06_C...ew_pp39-52.pdf https://history.nasa.gov/afj/aoh/aoh-v1-2-13-dock.pdf Your work looks great, Dave! Glenn
__________________
Glenn
|
| Google Adsense |
 |
|
|


 Linear Mode

