


|
|
|
#1
 05-08-2021, 08:22 AM
|
||||
|
||||
|
Apollo 11 CM - Ken West mod kit
Not sure if anyone will be interested in this, but it interests me...
I've always had a fascination with all things Space and Rocket... I was there for the Apollo program (even if I was young). And the recent loss of Mike Collins (and Neil Armstrong) turned on the memory lane lights. Anyway, this was a private request...it interested me, and I thought it might make a viable retail project. *I'm honestly not sure it will sell, but I can justify the work in my mind by saying "it interests me, and it might sell"" LOL It will be an "add-on" kit, similar to what I did with Ken West's SR-71 model. Ken has given me his thumb's up for the project. I'll try to keep it cheap, maybe a few dollars. It'll contain parts to modify the outside of Ken's Apollo Capsule to look more like the Apollo 11 Capsule "Columbia" after re-entry and splashdown. 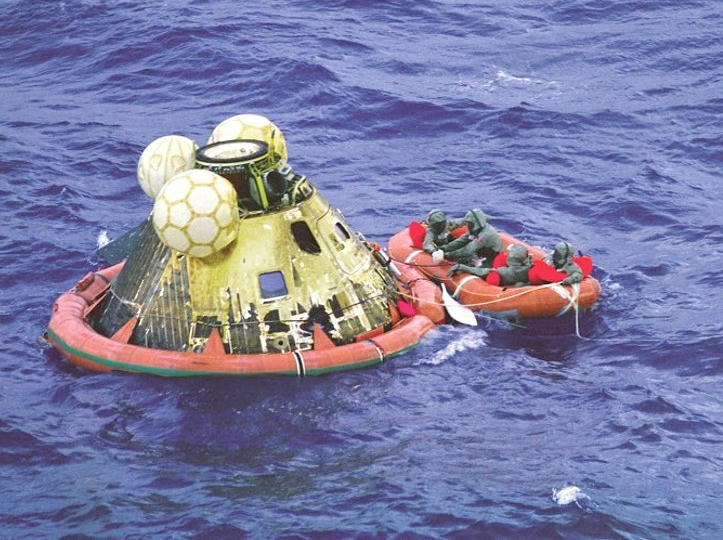 I am focused specifically on Columbia, which I have already discovered looked quite a bit different than other Apollo capsules. I'm referring mainly to the re-entry/splashdown look, but there are some physical differences between capsules and with Ken's model. I'll talk about those differences as I update. FYI I have exhausted the web searching for reference images and have plenty to work from. So, while I appreciate the desire to inundate me with photos of Apollo 11...don't...thanks. I'll even try to share some of the reference sources in case you can't find them. I've been working on this for a few weeks now, so I have plenty to report. Thats why I decided to start this thread. I've already learned a few things I didn't know...and I want to share some of that. More on this as it progresses. 
__________________
SUPPORT ME PLEASE: PaperModelShop Or, my models at ecardmodels: Dave'sCardCreations 
|
| Google Adsense |
|
#2
05-08-2021, 09:24 AM
|
||||
|
||||
|
I have decided to focus on the "moment of splashdown" look.
In other words while it was bobbing around in the ocean. Determining the exact look of the capsule has been tricky. Heres some of the reasons why... Black and White photos abound...but there are plenty of colour shots. Except colour processing from that period often includes over processed and exagerrated colours. In one photo things might appear overly one colour...and in another, they look entirely different. Lighting and reflections also play a huge part in colour and surface detail. Not to mention, film quality and resolution. While I am sure NASA used the best cameras they could find, many things are shot on the move, from a distance and under poor conditions. Another thing I learned to watch for...make sure its Apollo 11 in that splashdown photo! So many photos are incorrectly labeled..the Apollo capsules look similar, but they are all a little bit different. Project Apollo - Command Module Photos | Historic Spacecraft And most importantly, they all came through re-entry and splashdown in diferent states of undress and discolourization. First thing to understand is the bare capsule is protected by a layer of foil tape. Looks a lot like the foil tape you put on your Furnace ductwork! And it was applied in strips, by hand, to the capsule, in a seemingly aligned but random pattern. In fact, different capsules seem to have a different application pattern.   The foil tape didnt stick well everywhere and was damaged during re-entry. While the foil came off the capsule in strips, it was also torn and damaged in chunks and patches too. Then theres the layering...it looks like multiple strips and layers were applied over various panels, frames and the hatch. So, those areas were stripped less during re-entry. And then theres the discolouration of the foil. In many photos it looks burnt and orange. I think this explains the theory that it was all burnt and discoloured. But in other close up photos you can see its not as discoloured as you think. In fact, some of the burnt orange colour (I think) is also reflection. Much of the discolouration will be fade through of overheated glue. 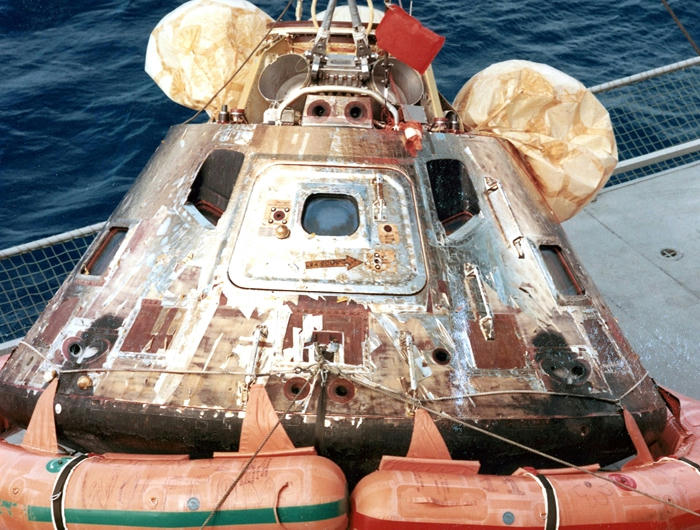 But there's no denying that the capsule suffered smoke and heat damage and discolouration to the surfaces. One thing I discovered was almost immediately on spashdown, once recovery crews reached the capsule, they had to start pulling off chunks of the foil, obviously in an effort to get to panels, the hatchway, and other things. By the time the capsule was hoisted and lifted to the recovery ship, more tape had been removed. Covers were then added to protect windows and other areas, and even more tape had to be removed. By the time the capsule reached dry land, it had been stripped even further of its foil tape.  And, if you look at the capsule on display now at the Smithsonian, you'll see it has been completely stripped and cleaned of all foil, and re-entry damage. Great for seeing all those surface details as they really are! Terrible for establishing colouring, weathering and that splashdown look! 
__________________
SUPPORT ME PLEASE: PaperModelShop Or, my models at ecardmodels: Dave'sCardCreations
|
|
#3
05-08-2021, 09:44 AM
|
||||
|
||||
|
Dave,
Excellent concept. I can't wait to see your weathering and choice of diorama set-up. Very exciting.
__________________
~ Christopher ~ "Art is whatever you can get away with." Andy Warhol
|
|
#5
05-08-2021, 10:58 AM
|
||||
|
||||
 Keeping in mind Ken's original model is an Apollo Block 2 Command Module and not specifically any one of the flown Apollo missions. Therefore it make sense that as a display piece, with the option of exploded view, it should be a clean and unused look. I was given the impression, by the fellow that originally requested the repaint, that he is creating some sort of display for a Museum or the like. I won't comment further since I don't have all the details or his permission to reveal anything. But maybe there will be a diorama to see. I probably wont build the entire model myself, maybe just focus on the parts I need to verify...so there won't be any sort of "diorama" from me.
__________________
SUPPORT ME PLEASE: PaperModelShop Or, my models at ecardmodels: Dave'sCardCreations
|
| Google Adsense |
|
#6
05-09-2021, 02:40 AM
|
||||
|
||||
|
dave,
Some thoughts on the color issue. White interior lighting in the 60's would have had a yellow cast some thing in the range of 2200 to 2500 degrees Kelvin. Outdoor sunlight is in the range of 5500 to 7500 degrees kelvin which give it a blue cast. so what I'm trying to say along with the color developing process used you have to deal with the color of the lighting. what caught my eye was the photo of Apollo 11 on the starboard elevator on the Hornet was that the flesh colors on the people looked correct. Also the flotation gear on the capsule had a orange tint verses the splash down photo they are more on the red side. all flotation gear I seen is more orange than red. I would think that the photo on the Hornet would have been "more" correct. In the end what ever color you chose too use will be a good choice. I have some bragging rights I worked on Apollo 11, 12, 13 and 14. I never saw the capsule when it was shipped but during assembly parts of the hull were painted a matt black. I suspect that the foil tape was applied at the cape. Jim Nunn
__________________
There is a very fine line between paper modeling and mental illness.
|
|
#7
05-09-2021, 07:14 AM
|
||||
|
||||
|
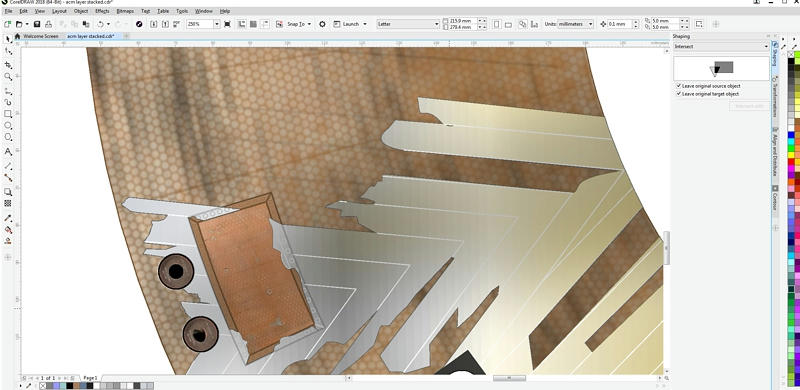
Thanks Jim...I posted that screengrab of my artwork to show where I was with the colouring.
This is the third complete render I have done, and the best so far. Each time I seem to go a bit too far with the weathering. I want to introduce some of that orange/golden tone, but i don't want to lose the metallic effect. I've just added more smoke and burn damage, but I don't want to muss this up any further. Sometimes less is more and overdoing it might ruin it (again). I might do a small scale test build of the capsule skin today to look at the current colours. Here is where I am now: 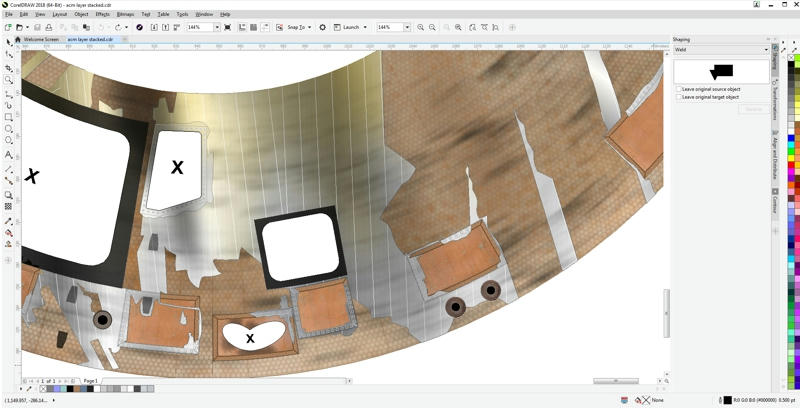 ................................... Can anyone tell me what these things are? Are they eggs? is the capsule gonna lay them? I've tried to find good side angle views, but no luck yet (haven't looked too far). There are three of these on Columbia. Two below thrusters...and one on the Hatch. Looks like they were completely covered in gold foil (only the one on the hatch retained all the foil) I'm incorporating a lot of surface 2D artwork ...not sure if I should try to 3D these things or just render them flat? Dome things are hard to build in paper. 
__________________
SUPPORT ME PLEASE: PaperModelShop Or, my models at ecardmodels: Dave'sCardCreations
|
|
#9
05-09-2021, 08:12 AM
|
||||
|
||||
|
Quote:
Adam Savage Visits National Air and Space Museum's Restoration Hangar! - YouTube They are the "urine and waste water dump"
|
|
#10
05-09-2021, 08:47 AM
|
||||
|
||||
|
Quote:
And one is for urine and one for solid? waste water . but what is the one on the hatch then? 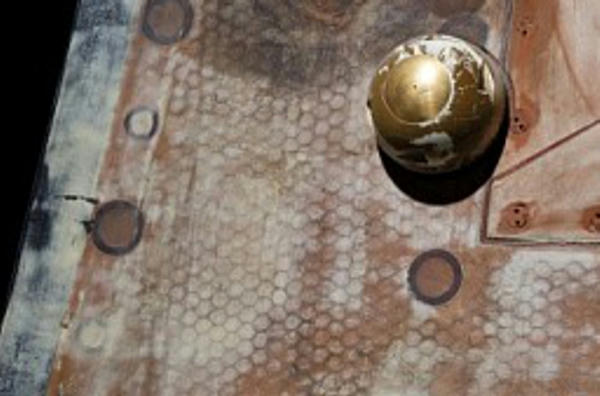 Im still not sure if I want to create a 3D object... 2D artwork works a lot better than a bad dome. Ken has a conical part for the dome on the hatch. I'll have to try a test build to see what that looks like. Looks like he didnt bother with anything 3D for the other two. So maybe I am correct to consider 2D artwork?
__________________
SUPPORT ME PLEASE: PaperModelShop Or, my models at ecardmodels: Dave'sCardCreations
|
| Google Adsense |
 |
| Thread Tools | |
| Display Modes | |
|
|


 Linear Mode

