


|
|
|
#32
 10-22-2009, 03:55 PM
|
||||
|
||||
|
You're welcome, birder
 Midship board is laminated in a different way than the other two boards. I've made a xerocopy of this part and laminated it on 1mm card. From the part I've cut away the white edges and glued them to the xerocopy. The board was laminated on 1mm card, edges of both parts were painted white and then I glued them together.    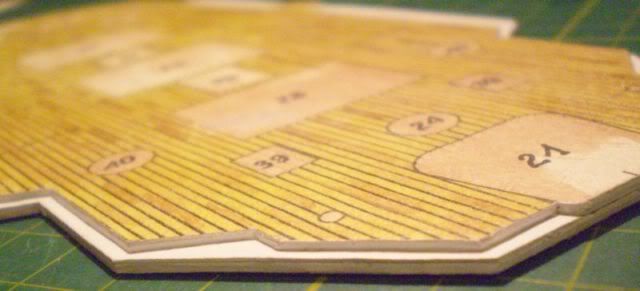 In the other boards I painted edges black and again dry-assembled the hull with boards:     -- 
|
|
#33
10-23-2009, 06:25 PM
|
||||
|
||||
|
Hull sides will wait for their montage - they're complicated and I don't feel comfortable enough to start making them yet - anyways I must spray the bottom first.
For the moment I'm doing the small stuff. Starting from one of 14 air catchers: 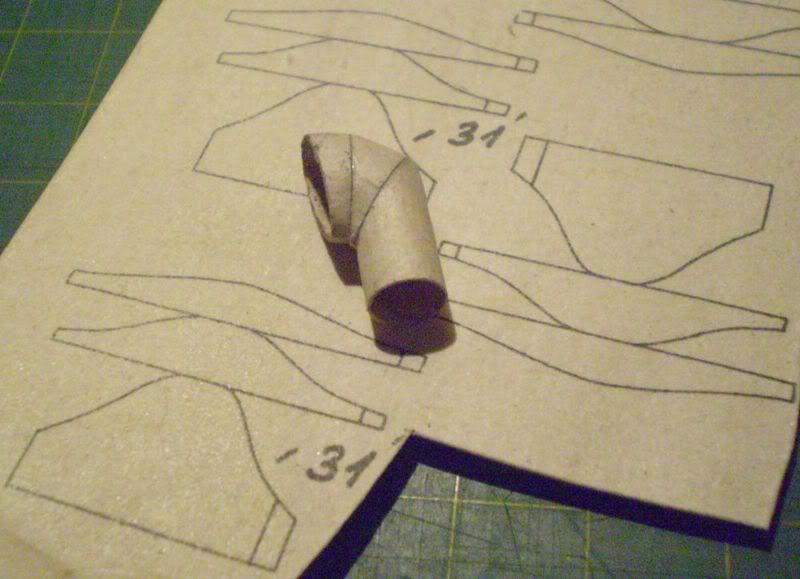   Painted white:    The part was cut up into three rings rolled and glued (BCG) separately and then connected together. No leafs - everything glued "on touch". Then with additional BCG I impressed them from inside using end of a brush - to smooth the connections and round them as much as the panzer card allowed.
|
|
#35
10-24-2009, 04:35 PM
|
||||
|
||||
|
Thank you, Papercut - I'm glad to hear that
After making the first air catcher there are left 13 more. I've cut them all out, dissecting into segments. As I'm cutting on the inner side of the black line I marked the inside with pencil mark - The outside was covered with cyanoacrylic glue and so BCG wouldn't soften it.     And then I glued them - I explained my methods here. For gluing the first one I've made an instrument by glueing masking tape around a stick until it fit the inside diameter of the segment. To the second segment fit my automatic pencil, and to the third fit the handle of my Olfa knife.    I've assembled all the segments - Now I need to glue them together into 13 air catchers: 
|
| Google Adsense |
|
#36
10-24-2009, 08:14 PM
|
||||
|
||||
|
Your techniques for bringing this old ship kit to life has me looking @ several Maty Modelarz ship kits I have collected. One of my favorites is the KPACNH, I believe to be a Ice Breaker drawn/published 1985. I just may give your tips a try on this one! Like how you came up with the formers for building the funnels. Look forward to more. The hull bottom turned out just great, did not understand the deck modification?:DRick
|
|
#37
10-24-2009, 09:47 PM
|
||||
|
||||
|
Great work! I like your description of the tooling you've made from "found" items. I've got a tub full of round-things and keep an old set of drill bits handy for forming tools. Your technique of over-wrapping with masking tape to adjust the diameter is very elegant.
Yogi
|
|
#39
10-25-2009, 05:19 PM
|
||||
|
||||
|
Papercut: I also have Krasin and consider making it
It is a Russian icebreaker built in years 1913-17, taken by Great Britain in 1919. Bought back in 1921 served well in Arctica - saving lives of survivors of Umberto Nobile expedition, and saving numerous ships or their surviving crew. In 1941 went to USA - armed, came back in PQ15 in 1942. In 1967 was finally moored in Murmansk as a floating electric plant and museum.The "deck modification" was simply following the instruction - the midship deck is supposed to be assembled this way (with the only exception of using xerocopy - in instruction it is written to outline the contour of the deck on 1mm card with a pencil). Retired_for_now: I also have a lot of rods of varying diameter. I use tape when none of them fits. redhorse: The age shows in bleak colours and brittle paper. Fortunately BCG and cyanoacrylic glue are very good at keeping it in good shape. Thank you all for comments. I'm glad you like this build. I decided to show precisely step by step how I assemble the funnels. Perhaps you'll find something you can use in your models. Assembled first segments I make even on sandpaper. Comparison. I remove freckles inside using toothpick with sandpaper glued around it.    I flatten the second segment on a rod with an appropriate diameter. To this shape. I glue just the top to the first segment. In all of them at once.     After gluing one side I cut the excess away. I finish gluing second segment to the first.   Using rounded end of a brush dipped in a drop of BCG i round the connection of segments on an eraser. And then on the cutting mat.   And again I make it even on sandpaper. Ready - after removing freckles inside (repeated with all the other funnels too).   After gluing on - in identical manner - the third segment I again round the connection on eraser. And make it even on sandpaper.   The third segment I glued on only in one funnel - there are 12 left to make. 
|
|
#40
10-25-2009, 05:42 PM
|
||||
|
||||
|
Wow, you make it look easy!
 Thanks for the info om the Ice Breaker. I got out again last night and have started looking at preparing to laminate to card board. Will be a good project to build between the Sub I am now working on.:DRick Thanks for the info om the Ice Breaker. I got out again last night and have started looking at preparing to laminate to card board. Will be a good project to build between the Sub I am now working on.:DRick
|
| Google Adsense |
 |
|
|


 Linear Mode

