


|
|
|
#21
 01-26-2008, 09:44 AM
|
||||
|
||||
|
The cowling lip exhaust collector is common to he whole Bristol family of engines. Same on The Sunderland, Beaufort, Beaufighter, Halifax (round motored ones of course) and also PZL 23, 37 et c.
It's copper/bronze plated steel and should be the colour of an old water pipe in service.
__________________
I'm not making it up as I go along, I'm establishing precedent 
|
|
#22
01-26-2008, 10:04 AM
|
||||
|
||||
|
Cool choice............ I too look forward to this build............ one of my favorite PLASTIC builds was the Hawk Model of this plane. That and the Banshee models were two of my favorite builds when I was young and naive and didn't know about cardmodeling!:D
Is there any possible way of contacing Maty and requesting them to re-color these old kits? I for one would go for them more if they were just a little bit more color and panel accurate..........
|
|
#23
01-26-2008, 10:28 AM
|
||||
|
||||
|
Quote:
John, one of my favorite plastic model planes was the little 1/72 Matchbox version of this one! And thanks, everyone, for being my research team on this one! I'm going to need all the help I can get! Chris
|
|
#24
01-27-2008, 09:04 AM
|
||||
|
||||
|
The key here, methinks, is to make the internal wing frame structure functional, so that the wing does not rest on the flimsy canopy, but on the internal tube framework. Thin tubes for dowel/wire wingspars, wired & glued to heavy wire framework? Long dowel/wire spars then pushed through holes in the finished canopy, and through the tubes of the framework.
Internal wings support framework made of heavy duty solid copper electric wire, including insulation, painted grey? Should be pliable enough to bend into required pattern, yet rigid enough when assembled to carry load from wings. Or something like that. Also, in view of that photo, it seems a good idea to make the canopy framework parts even thinner than they are in the kit. Should make for a very attractive & realistic canopy. If you go for recolouring, have a look at the b&w pattern too. Could do with considerable elaborating. Why not use 50 percent grey for the panel lines, etc? From what I've learned studying the work of some of all the talented designers/paint artists out there a uniform 50 percent grey should work fine on both dark and light surfaces. It seems to turn out dark on light surfaces, and light on dark surfaces; quite a blessing! I attach all the four drawings I have; one you've already seen. Note that the 1/72 originals no longer are to any particular scale here. I always thought the MM Lysander would be an excellent project for this kind of restoration/improvement project (mostly because MM version is the only one there is, strangely enough). The basic surfaces & camouflage pattern are OK, what the kit needs is some further detailing in the paintwork (plus the engine, of course, but you already have plans for that). Also, rudders, flaps and ailerons really ought to be separated for good effect. I don't think anything more complicated is required than cutting them apart, edgecoluring them, and glueing them back on with black paper on the underside as a joining strip, and a half millimeter slot. I would stay short of deployed slats, though! (Accurate though they may be on a stationary model, since they were automatically deployed.) That would requite a complete and complicated redesign of the now very straightforward and simple wing. I admire and appreciate your serious approach to this, and look forward to the build eventually! L. Last edited by Leif Ohlsson; 01-27-2008 at 10:03 AM. Reason: Added the drawings and several afterthoughts
|
|
#25
01-27-2008, 09:45 AM
|
||||
|
||||
|
Thanks again, Leif! I like your ideas for the wing mounts. I was thinking of using brass stock, possibly soldering as much as possible, then cutting apart the canopy sections and literally rebuilding it around the support structure. Not sure yet how feasible that really is. I should be able to get to starting this for real some time this week, but I'm planning on taking my time and getting it right if I can!
Chris
|
| Google Adsense |
|
#26
01-27-2008, 10:12 AM
|
||||
|
||||
|
I did it very much like that (built the canopy around the wing fixture with long rod spars already fastened). As far as I remember, the design actually allows for that, since the top goes on last. Even if not, it's entirely feasible to do it that way.
|
|
#27
01-29-2008, 02:16 PM
|
||||
|
||||
|
Well, I spent some time yesterday in a forlorn attempt at recoloring. I finally had to give up; I just don't have the facility with Photoshop I should. Sorry.
So to refortify the effort, I put blade to paper. Somewhere in this pile is a Westland Lysander. I have officially begun! 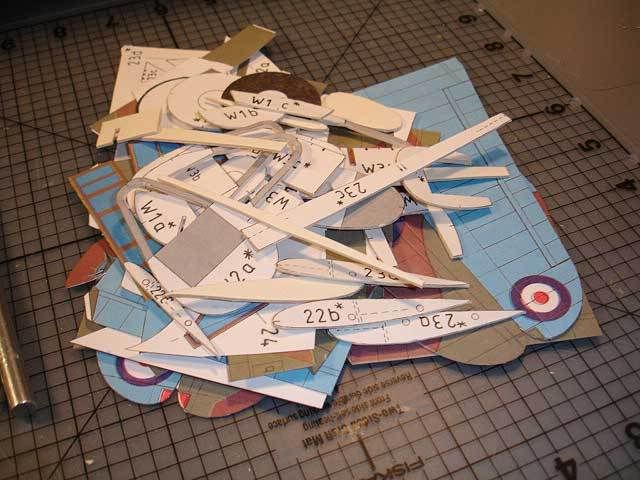 I'm reticent to start gluing because I've been over and over the instructions and there's still one or two points I just don't quite get, both having to do with the wing/canopy arrangement. I may start with the cockpit section just to get more familiar with it; then I can reprint it as often as I need to when I have to start again! 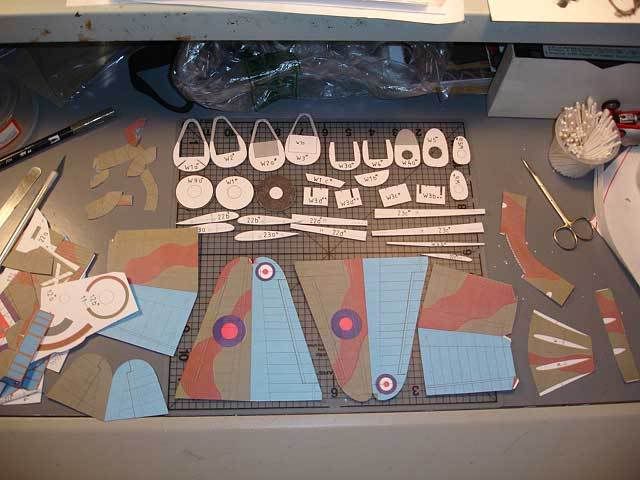 The rest of it looks to be straight forward, but I haven't checked the fit on anything yet! The color printing misalignment is really distracting when cutting the smaller parts...too many edges! Leif, do you have any construction photos of your build showing how you did the wings? Chris
|
|
#28
01-29-2008, 05:09 PM
|
||||
|
||||
|
Quote:
Regards, Charlie
|
|
#30
01-30-2008, 02:03 AM
|
||||
|
||||
|
No pictures, Chris, that was before my forum time. I hardly even got an electronic camera at that time. What I did was to drill holes in the two ribs of each wing for the l-o-n-g wingspars made of rods (welding rods in my case). These were marked and spars dryfitted while the wing framework was propped up at a correct dihedral.
I don't particularly recommend this method, since it's awfully hard to find those holes when the cover is on. I think a better way would be to add an extra rib a few inches from the root rib, plus connecting these with pieces of card to form slots for the spars. Easier to find your way, plus shorter spars. You don't really need all that length. Or make tubes in the wing framework. Fasten these in any fashion you like (scrap pieces of card glued to the root rib) with the framework propped up at correct dihedral and shorter spars in them. Then you should be home free. L.
|
| Google Adsense |
 |
| Thread Tools | |
| Display Modes | |
|
|


 Linear Mode

