


|
|
|
#282
 11-28-2011, 03:25 PM
|
||||
|
||||
|
Quote:

|
|
#283
11-28-2011, 08:09 PM
|
|||
|
|||
|
Quote:
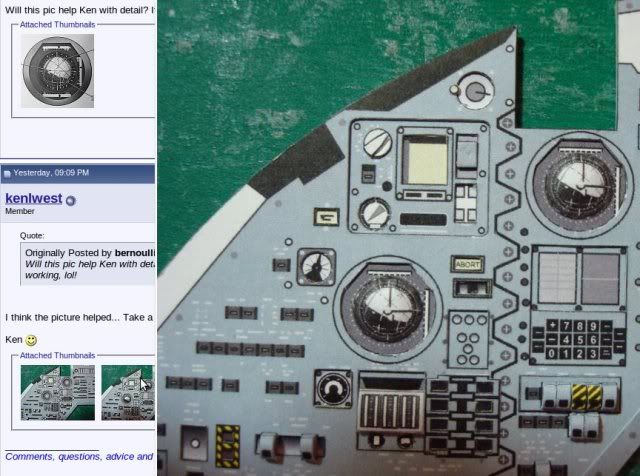
I think the picture helped... Take a look at the "before" and "after" pictures... Nando will like these a little better. Ken 
__________________
Comments, questions, advice and critical feedback are welcome!
|
|
#284
11-29-2011, 03:37 AM
|
||||
|
||||
|
Nice one, Ken! That does looks good! Nando has got to like that result, surely?
Perhaps I haven't quite appreciated just how physically large this model is going to be.
|
|
#285
11-29-2011, 06:27 AM
|
||||
|
||||
|
This is a beautiful design and build Ken. Not to nitpick, but since you asked for input, if you're going to go the distance with the 8-balls, might as well center the right-side indicator and add the bottom one. It stands out comparing your after pic to the thumbnail of the photo from the manual. Otherwise, nicely done. Nobody would ever notice if they didn't have the photo right next to it. See what I mean:
__________________
Put on hold build (someday I'll finish): F-35A Lightning II 1:72 Previous builds: cMags' Card Model Builds
|
| Google Adsense |
|
#286
11-29-2011, 10:44 AM
|
|||
|
|||
|
Quote:
Thanks, Ken
__________________
Comments, questions, advice and critical feedback are welcome!
|
|
#287
11-29-2011, 11:34 AM
|
||||
|
||||
|
Quote:
__________________
Put on hold build (someday I'll finish): F-35A Lightning II 1:72 Previous builds: cMags' Card Model Builds
|
|
#288
11-29-2011, 03:00 PM
|
||||
|
||||
|
Ken this control panel gets better and better. viserley i think your plain herizon looks deeper set in the panel. the 8 balls are viserly more dinamic and 3d but i think stand out too much,i whoud cut out an other ring and set the 8 balls in deeper in the panel. thik this makes sence
|
|
#289
11-29-2011, 08:27 PM
|
|||
|
|||
|
Quote:
Also, here is a picture of the second layer, which shows the updated indicators that cMags was talking about earlier. Ken
__________________
Comments, questions, advice and critical feedback are welcome!
|
|
#290
11-29-2011, 08:33 PM
|
|||
|
|||
|
Tonight, I decided to build the right-hand side console.
Picture 1 - layout of parts Picture 2 - Built up. I took a picture under the lamp so that you could see the 3-dimensional effect that the layering has. Picture 3 - Installed. This console contains one of the food storage bins, waste management system (I can only imagine what that is for), Sanitary supplies (goes with the previous comment), and the Bio Instrument Kit storage. Ken
__________________
Comments, questions, advice and critical feedback are welcome!
|
| Google Adsense |
 |
|
|


 Linear Mode

