


|
|
|
#1
 12-27-2012, 02:54 AM
|
||||
|
||||
|
Nose cones help
I'm working on a rocket and having trouble with the nose cones. After cutting out the parts I find that the cones are always too small to fit properly on the cylinder part. It seems as they are always too small to cover the cylinder completely and the result looks sloppy. I don't know how else to describe this and I don't have a digital camera to use to post a picture. If you can visualize what I am referring to I would appreciate any advice.
__________________
Eternal vigilance is the price of security. 
|
| Google Adsense |
|
#2
12-27-2012, 03:36 AM
|
||||
|
||||
|
Might be worth trying to form the part on thinner paper
If you use the original as a template, and make several copies and use them to practice on and pick the best one to use. Tim
|
|
#3
12-27-2012, 05:20 AM
|
||||
|
||||
|
Quote:
If the conic fits over tabs that are part of the lower cylinder (or conic) you can cut off the tabs and replace them with a tabbed joiner strip. I often draw parts with tabs because it's quicker and reduces the parts count, but the tradeoff is in the fit (see Falcon9 in our downloads for tabbed parts - Currell's SpaceShipOne for internal joiner strips for conics). If the fit is off by about the thickness of the card you have a very precise set of parts (and great cutting skills). What you need to do is to replace the tabs at the top of each conic section with an internal connector strip. Make a curved strip of card (same radius as the top of the large conic you're connecting) with tabs on the inner edge. Glue that band of card inside the top of the lower (larger) conic with the tabs out and slip the upper (smaller) conic over it. This better blends the seam and allows the parts to distort a bit as you gently push the conics together. The internal strip also closes any visible spaces between the parts. Yogi
|
|
#4
12-27-2012, 06:51 AM
|
||||
|
||||
|
This stuff isn't nearly as easy as it seems at first glance. Thank you both for the replies. I'll keep at this until I get the parts right. Your advice will be a great help. Love this forum.
__________________
Eternal vigilance is the price of security.
|
|
#5
12-27-2012, 10:22 AM
|
|||
|
|||
|
the other answer for a tight fit is to shim the cone as well. take a strip of paper and and layer up the either the insert section of the cone or line the inner part of the cylinder with a turn or two (or 3 or 4) of cardstock to narrow the diameter. the has the added benefit of strengthening the parts as well.
look at the former design I use, its the same thing, make the former a small diameter on purpose, and then put layers of shim material to build it up for an exact fit: 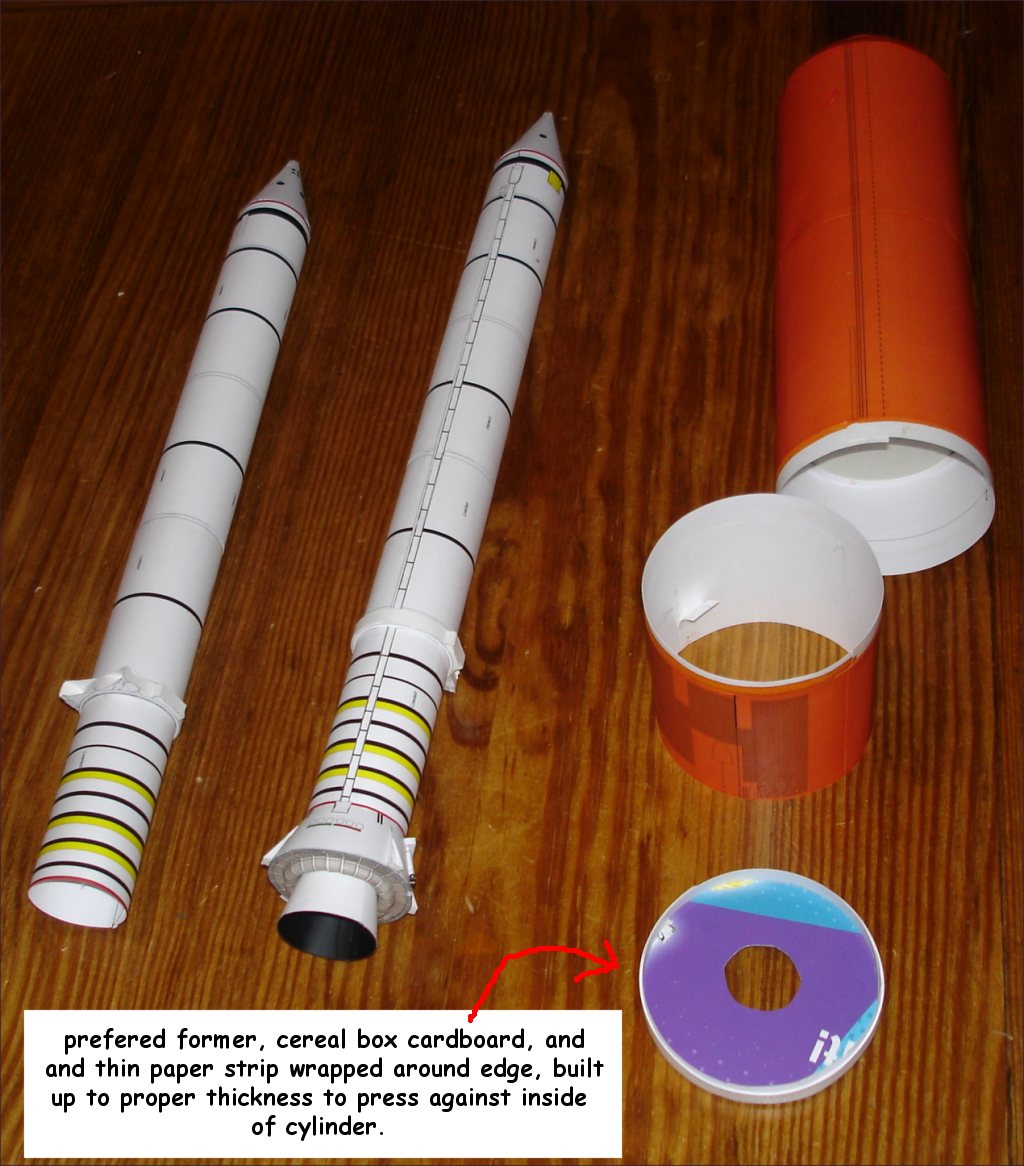
|
| Google Adsense |
|
#6
12-27-2012, 10:31 AM
|
||||
|
||||
|
This may sound like a stupid question, but are you sure the cylinder is the right size?
Yogi's points are great ones and there isn't much to add. If the nosecone parts are genuinely too small, then print them out at a larger percentage. But you don't need much larger. And if the joining tabs are still attached, cut them off and make your own tabs. Another thought I might have involves your printer settings. Are you fitting to the page? If so, the propensity exists that you're winding up with distorted parts when the printer/computer software shrinks or enlarges the model page to fit the printer page. (Trust me, I know about this first-hand....) That's why I am a HUGE fan of designers who include both horizontal and vertical scale references on their pages.
|
|
#7
12-27-2012, 01:31 PM
|
||||
|
||||
|
Quote:
__________________
Eternal vigilance is the price of security.
|
|
#8
12-27-2012, 08:04 PM
|
||||
|
||||
|
Quote:
|
|
#9
01-02-2013, 06:38 PM
|
||||
|
||||
|
Jleslie's method is a good one. just cut the top part of the tab strip to a sawtooth so it will bend inward to match the angle of the cone. Or another method is used a lot by airplane designers for the fuselage. Cut two identical formers one for the cone the other for the cylinder. Glue them flush to the edge and then glue the formers together to join them.
__________________
Tim Hinds "Oh wisdom thou are fled to brutish beasts and men have lost their reason" (Bill Shakespear)
|
 |
|
|


 Linear Mode

