


|
|
|
#211
 11-01-2013, 04:09 PM
|
||||
|
||||
|
Quote:
 
__________________
Greetings from Germany Manfred Under construction: Launch Pad 39A with Challenger STS-6 (1:144) 
|
|
#212
11-01-2013, 04:21 PM
|
||||
|
||||
|
Quote:
 It is very instructive for me too, to learn something better understanding this fantastic space technology by my project. Therefore, I explore a lot of details and their context during scratch building. It is very instructive for me too, to learn something better understanding this fantastic space technology by my project. Therefore, I explore a lot of details and their context during scratch building.
__________________
Greetings from Germany Manfred Under construction: Launch Pad 39A with Challenger STS-6 (1:144) Last edited by spacerunner; 10-07-2016 at 06:01 AM.
|
|
#213
11-01-2013, 04:36 PM
|
||||
|
||||
|
Quote:
I fully agree with you, that good reference close up photos are essential for scratch building of any details. You can not have enough of it.  I do not mind if you want to use some of these pics as a reference to upgrade your MLP. That is no problem as long as you provide the source, you know.
__________________
Greetings from Germany Manfred Under construction: Launch Pad 39A with Challenger STS-6 (1:144) Last edited by spacerunner; 10-07-2016 at 06:04 AM.
|
|
#214
11-01-2013, 04:54 PM
|
||||
|
||||
|
Thanks Rich for your encouraging nice words, that makes me happy.
As you know, to me it was like, I was inspired by the experiences of other Real space modelers first and then infected, and it acts to be almost like a drug.  BTW my friend, meanwhile I am also excited about your skill level, because you're doing a fantastic job. Keep on scratching!
__________________
Greetings from Germany Manfred Under construction: Launch Pad 39A with Challenger STS-6 (1:144) Last edited by spacerunner; 10-07-2016 at 06:08 AM.
|
|
#215
11-01-2013, 05:14 PM
|
||||
|
||||
|
Once the inlet pipe is painted, the Emergency shower could be installed now also fixed.
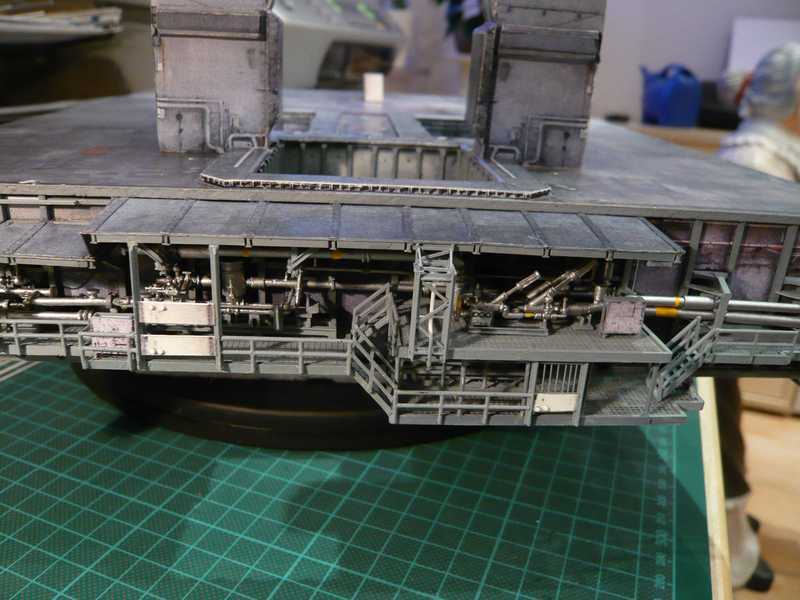  And already it goes on with the small Eye wash, which got also a supply, 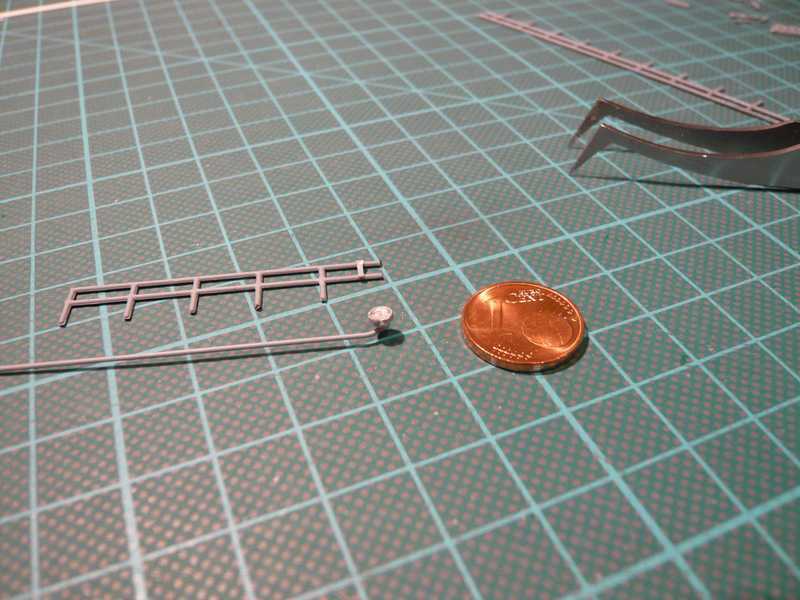 that goes through the railing and was adapted to the inlet pipe of the Emergency shower. 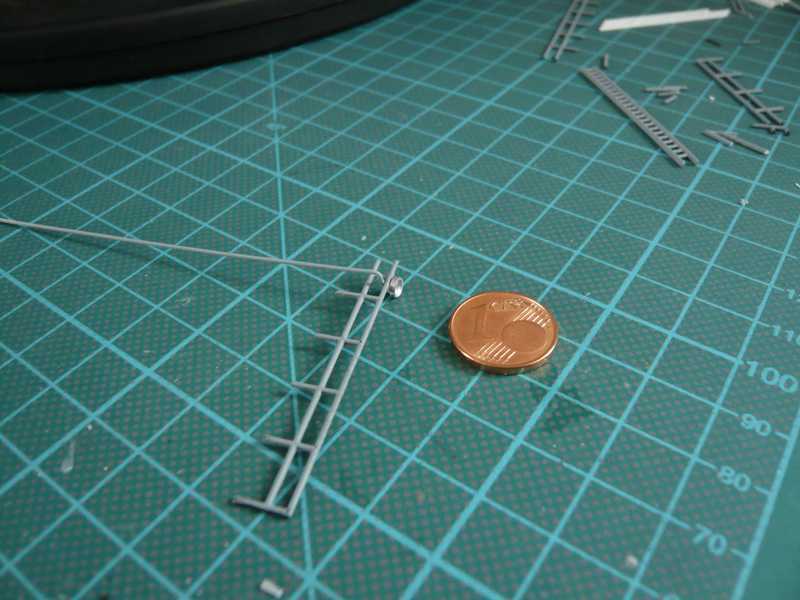 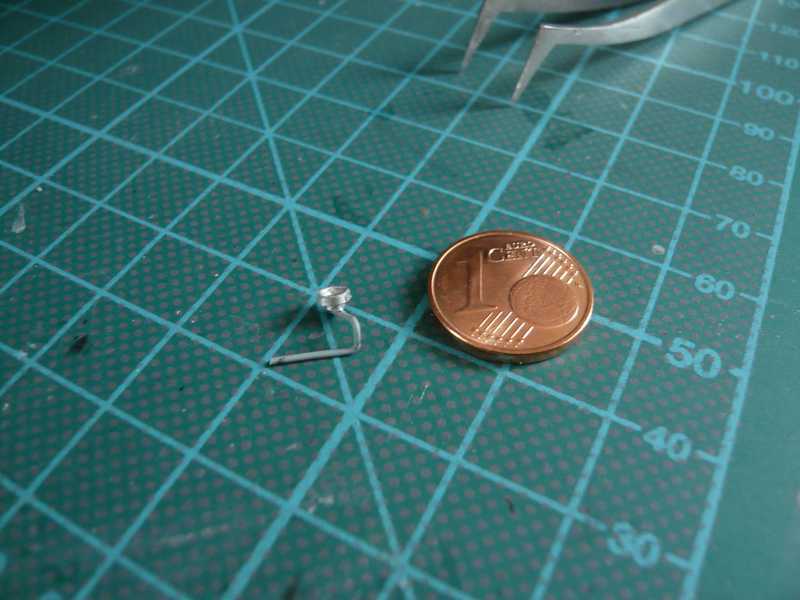 Before connecting the Eye wash I still glued the railing, 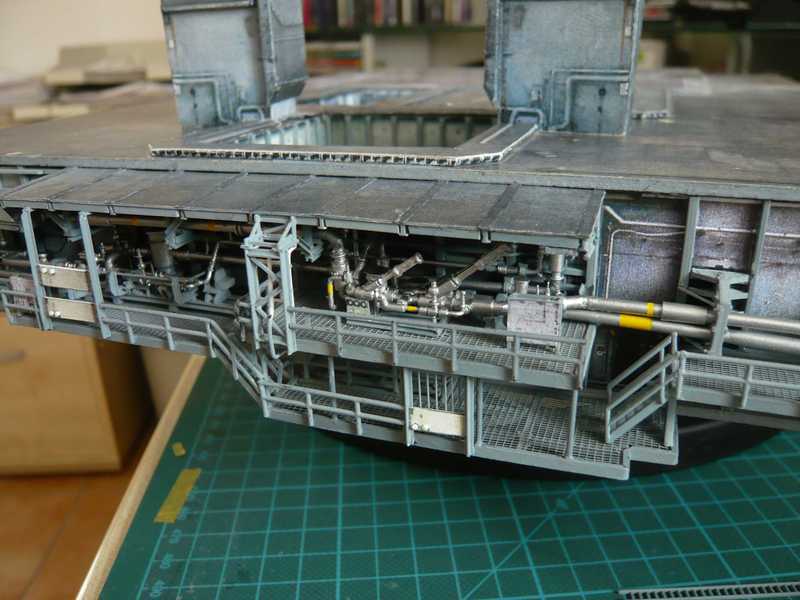 and then the Eye wash was installed. Thus, the safety instructions on the Side 1 would now also met. 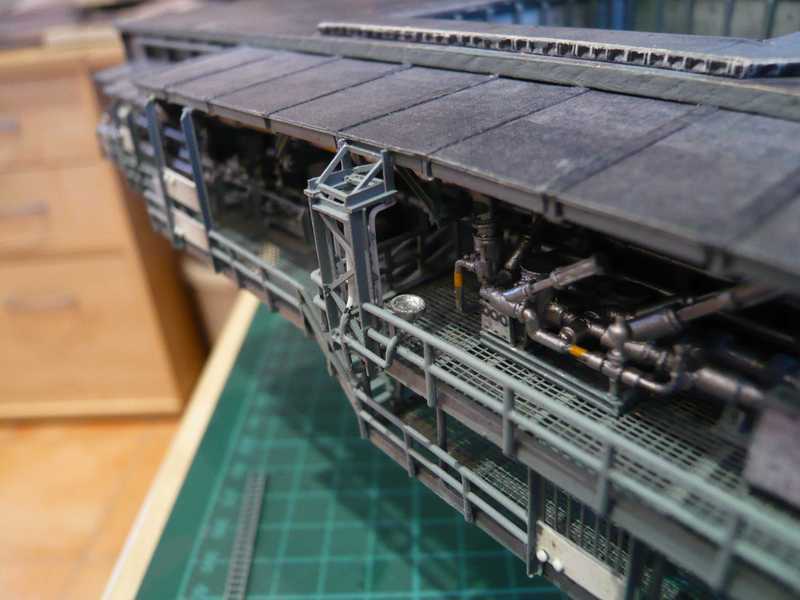 Behind the railing, then follows a ladder that leads from the lower platform AP 2 to the upper platform AP 3 and the upper part has a Ladder cage, 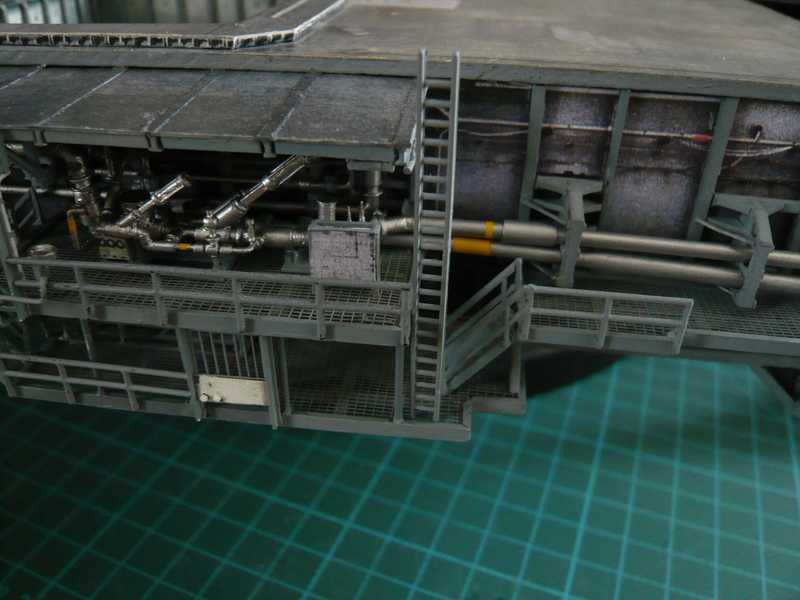 as is shown in this picture. And therefore now after a long time again a Ladder Cage is to scratch-build, which is but not so long as on the corner right next to it.  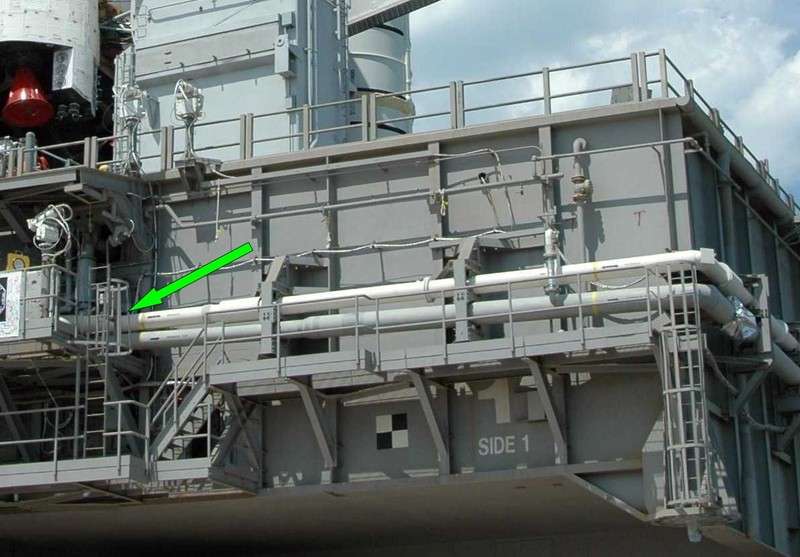 Source: NASA As far as once again for today.
__________________
Greetings from Germany Manfred Under construction: Launch Pad 39A with Challenger STS-6 (1:144)
|
| Google Adsense |
|
#216
11-03-2013, 12:27 PM
|
||||
|
||||
|
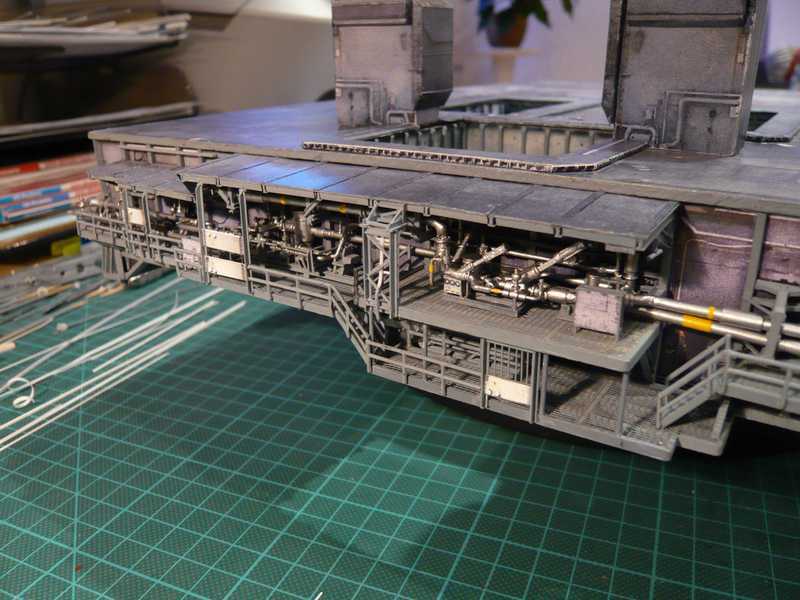
And now to the Ladder Cage from the Access Platform AP 2 to AP 3. For making I have resorted again to my successful practice. I had picked up the core for the winding of the basket so wisely.
 First strips were cut from Evergreen strips 0,25x0,5 mm and rings bent under hot air, this time but only five instead of seven, as the passage to the platform remains free. 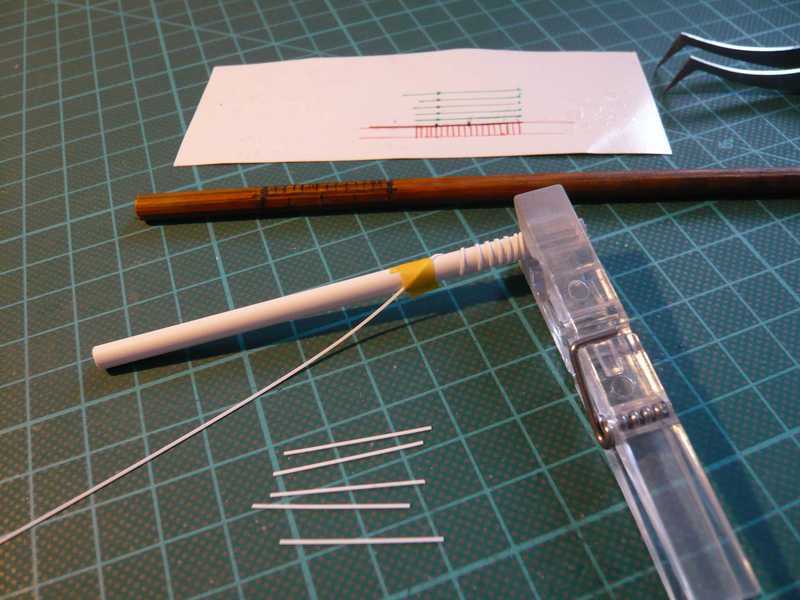 The struts and the ladder were then placed on tape strips and together wrapped around the core and so fixed. 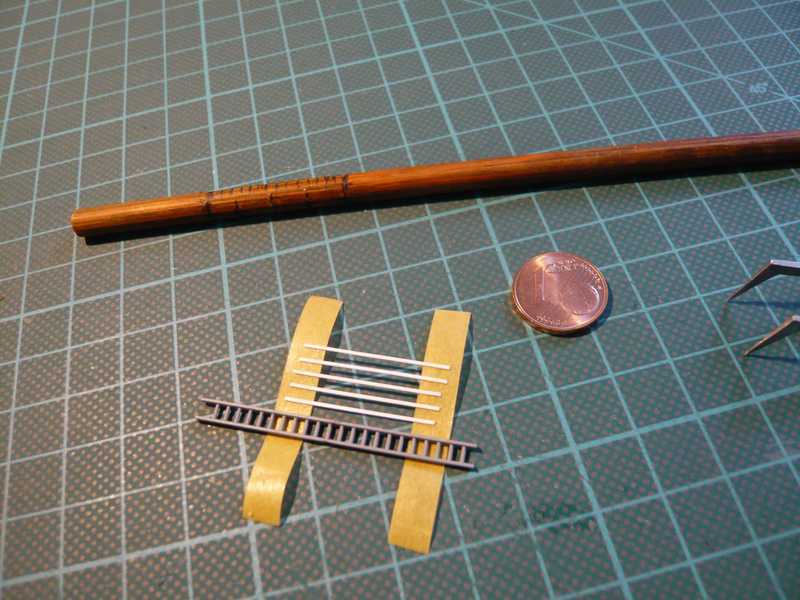 This time, only two rings are required for happiness, because the basket is only as high as the railing.  The rings were glued again with Superglue, so that your seat is just fixed.   And so the small basket was almost finished after depositing the protruding parts and was omitted only at the transit point.  After cutting the ladder on the final length the ladder cage could be painted.  Then, installation of the basket and the railing before and behind followed. Meanwhile, even the handrails on the Access platform AP 4 have been mounted. 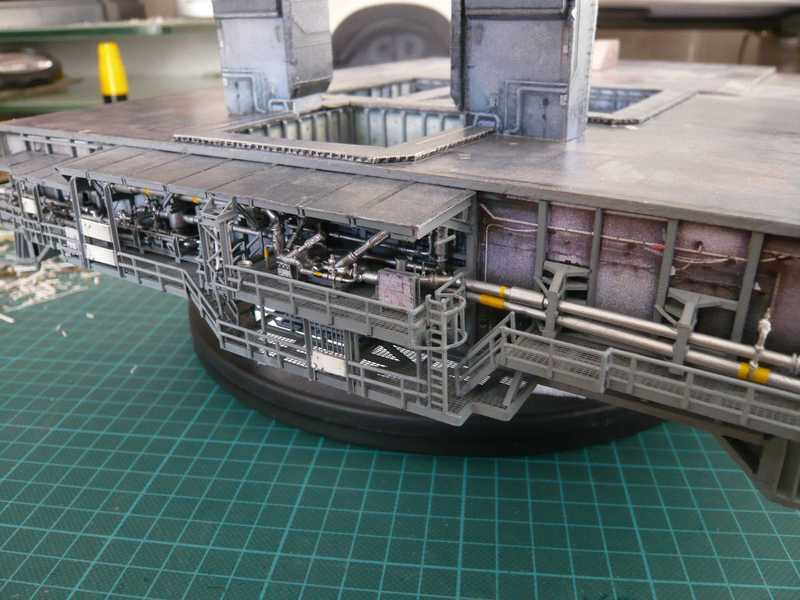 Yet the last parts of the railing before the stairs were attached at the end, 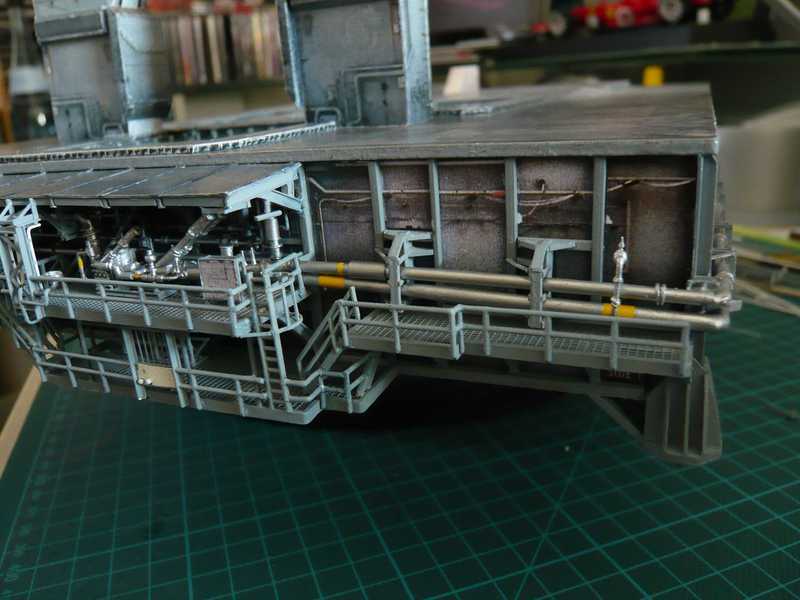 thus, the railings on the Side 1 are now finally complete.  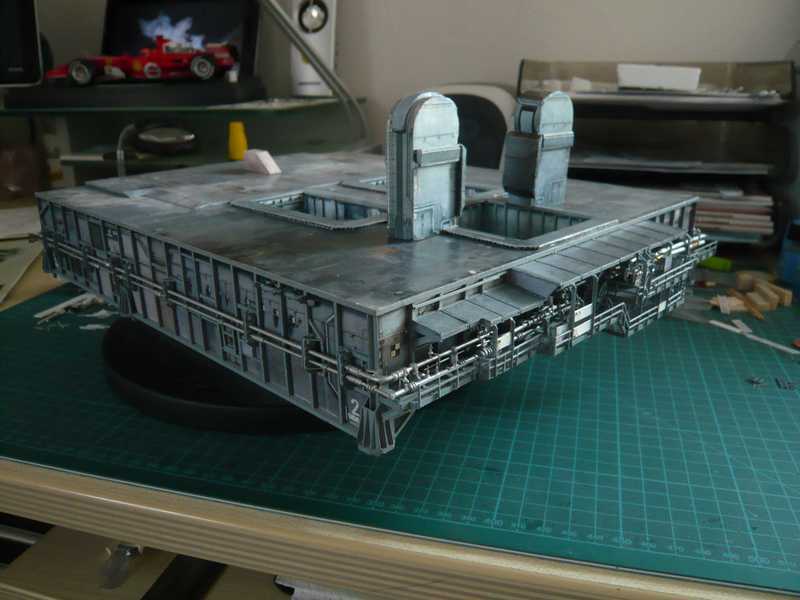 I will not initially install the two large Ladder cages at the corners, because these fragile structures during another handling with the MLP body would probably only an obstacle and could go to break, which would be a shame.
__________________
Greetings from Germany Manfred Under construction: Launch Pad 39A with Challenger STS-6 (1:144) Last edited by spacerunner; 10-07-2016 at 05:48 AM.
|
|
#217
11-03-2013, 12:53 PM
|
||||
|
||||
|
Hi, Manfred, nice to see you back!
And going on with your accurate work!
|
|
#218
11-05-2013, 09:32 AM
|
||||
|
||||
|
Thanks Michael, here come the next steps.
Today I did again something for fire protection. I had made me recently's thoughts on the striking red wires on the MLP-2 on STS-6 and tried corresponding colors. 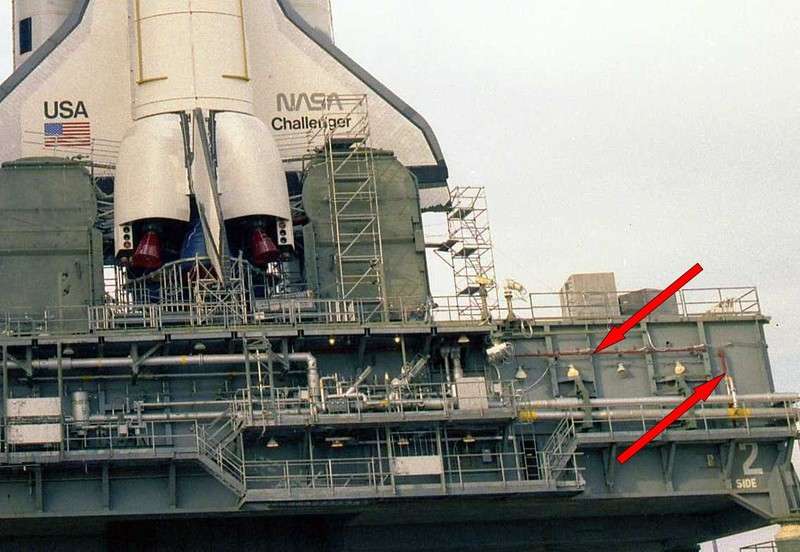 Source: Retro Space Images.com (STS-6) As I have now learnt from NSF by padrat, a longtime employee at the Launch pad, these are FIREX lines that provide various Sprinkler systems. And that I've retrofitted today as a precaution, because anything can happen ...  As you can see in this old photo of the MLP-2 on STS-6, this line runs almost over the entire length of the Side 1, runs under the two Blast shields and is therefore on most pics hard to detect. 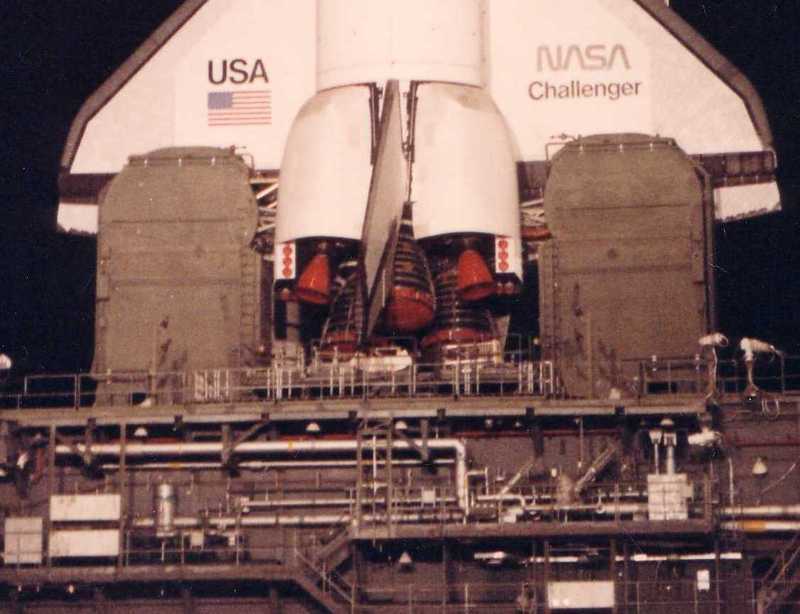 Source: Retro Space Images.com (STS-6) The pipes are from 0.5 mm or 0.8 mm Evergreen rods. 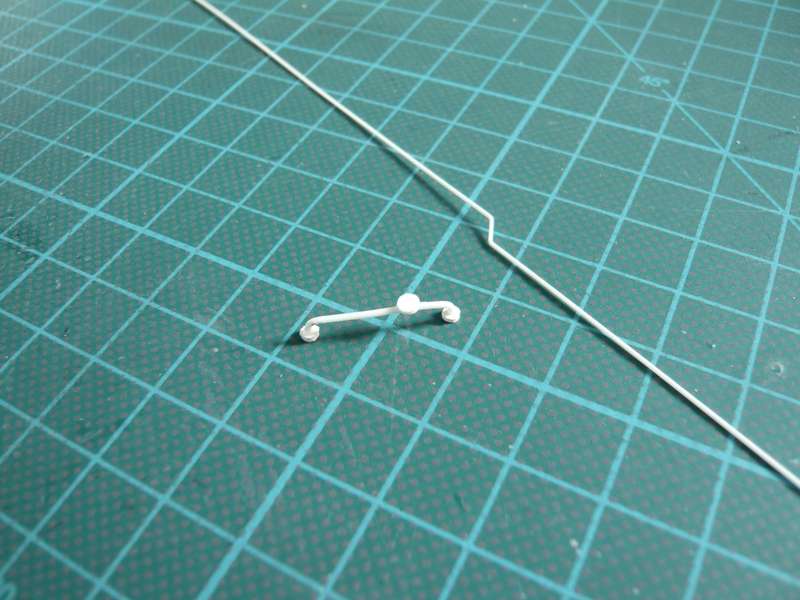 And I have installed now the painted pipes in several parts. 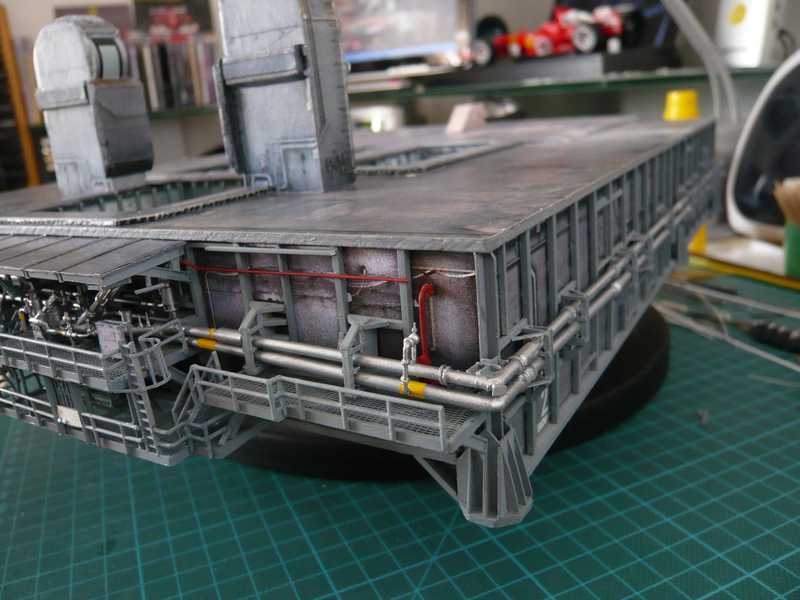 Although the normal viewer hardly can see the other parts of the line under the Blast shields, I've installed it but still, safety first ... 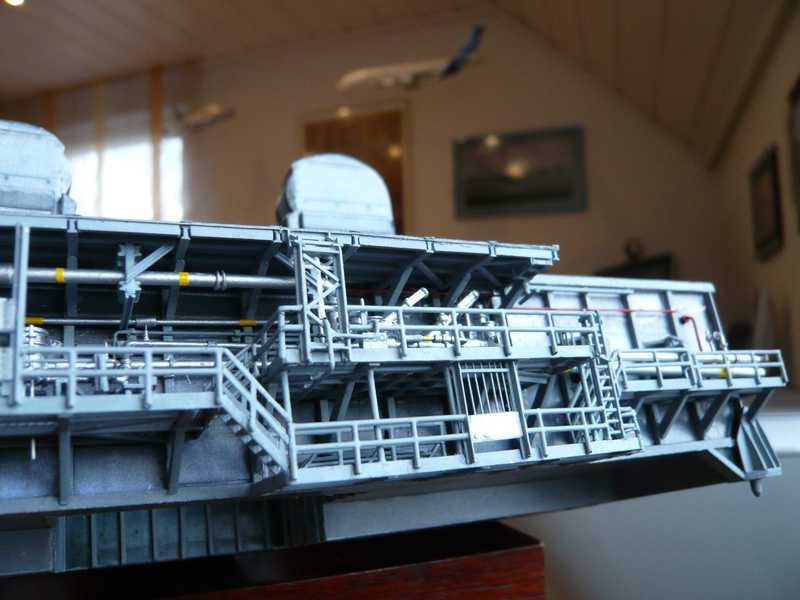 Unfortunately, the colors in the sunlight are too distorted by a blue color fog, because I had to go very close to the window so that the red lines are visible. 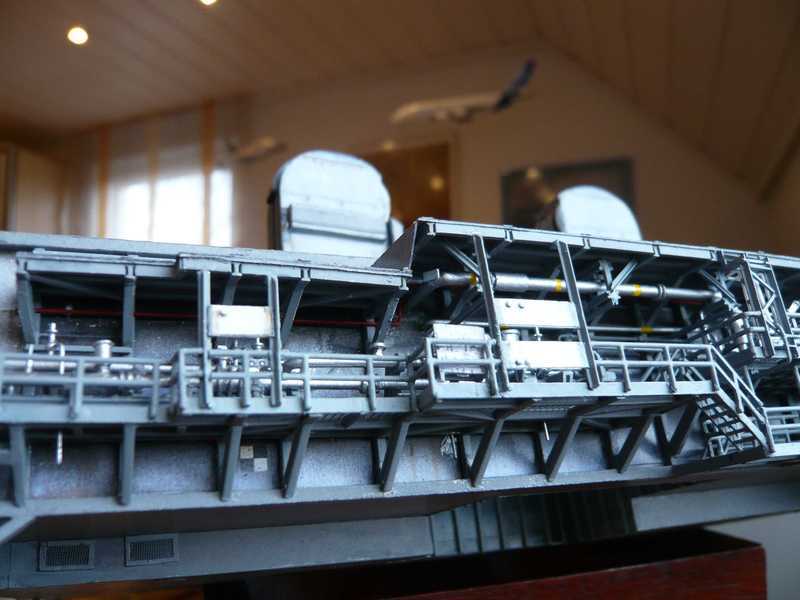 Now, the safety inspection can come safely ... 
__________________
Greetings from Germany Manfred Under construction: Launch Pad 39A with Challenger STS-6 (1:144)
|
|
#219
11-06-2013, 06:16 AM
|
||||
|
||||
|
Hello together,
now work on Side 1 up on odds and ends are as good as finished, now another important part of MLP equipment is to build and that's the Sound Suppression Water System (SSWS), which is seen in this picture. 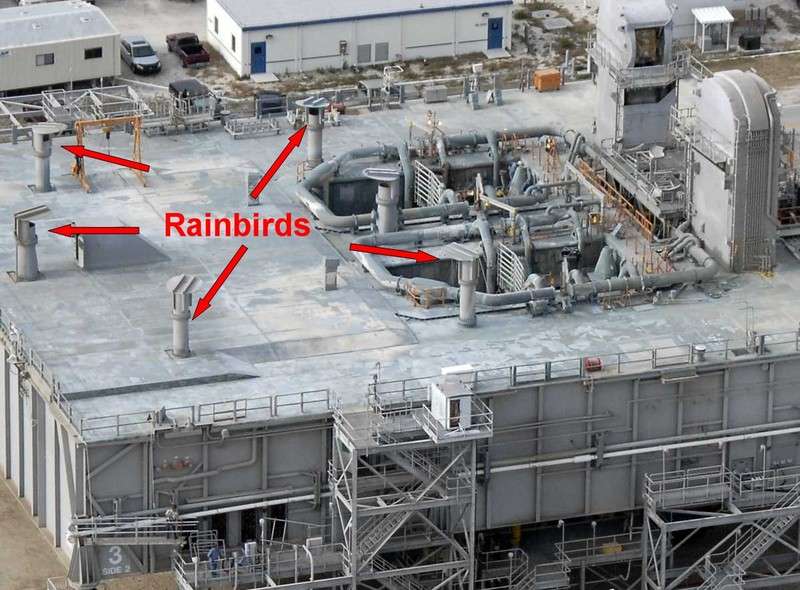 Source: NASA This system is to protect the orbiter with its payload from the acoustic energy reflected from the upper deck of the MLP during launch. For this reason, during Lift-off huge quantities of water are pumped through a piping system and special outlets in the SRB- and SSME exhaust holes and sprayed through six so-called Rainbirds over the MLP deck as you can see here during a SSWS test impressively. 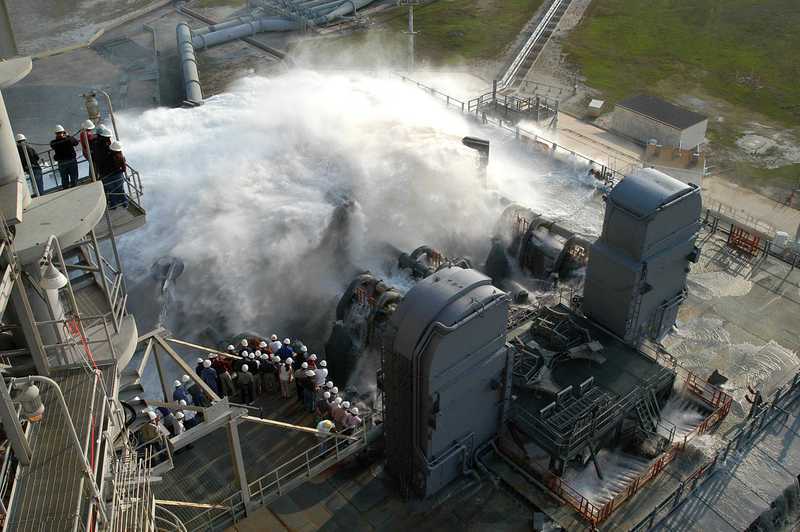 Source: NASA The SSWS includes also respectively 30 Water bags, which in addition are hung from above in the SRB-holes and are intended to support the effect. 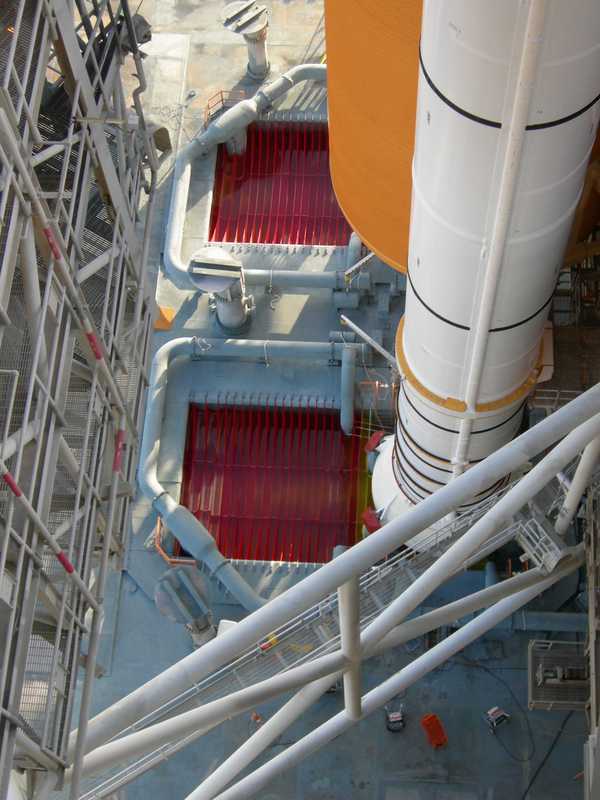 Source: NASA The following drawing gives an overview of the SSWS with precise details on the respective tube diameters, which are needed for the scratch-build. 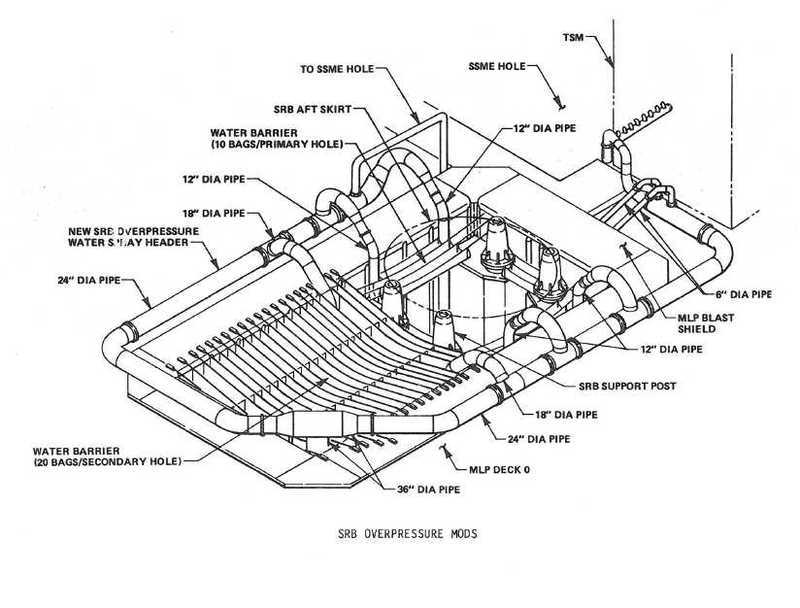 Source: NASA From this picture, it is already clear that the pipe fitters are now really required, the difficulty being that the pipes in some places even rejuvenate. In the Paper kit all looks and loads one formally to a stressful action, which I'll save me dear again, 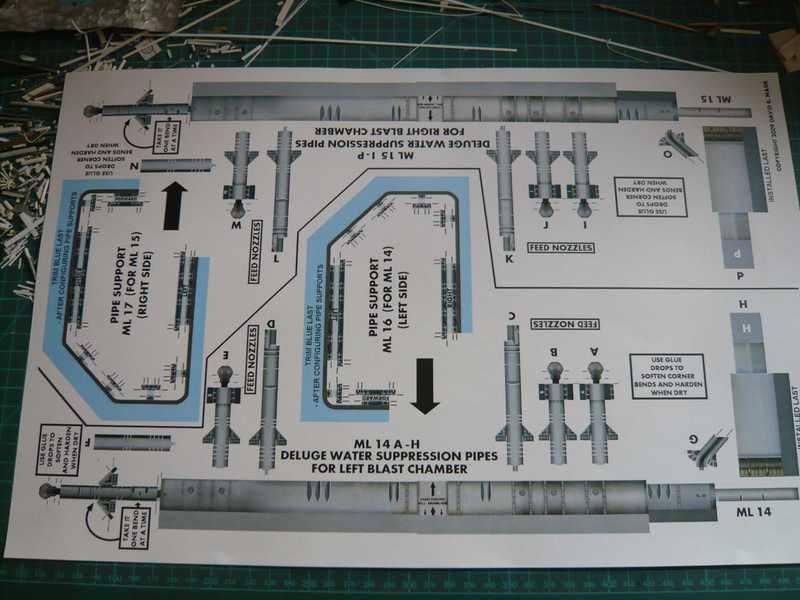 already at the sight of the installation instructions joy comes up but determined, or about goosebumps? 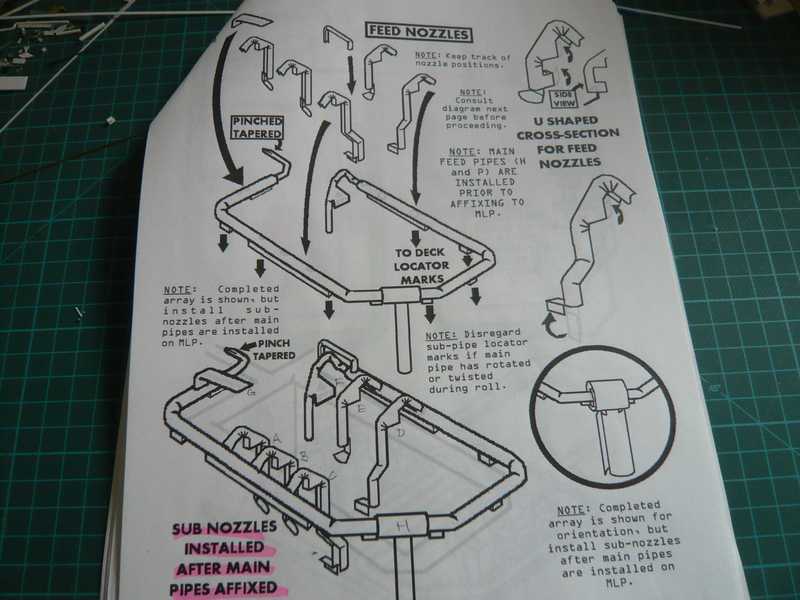 I'm still not sure whether I'll build the Rainbirds for the Kit template or may scratch-build them.  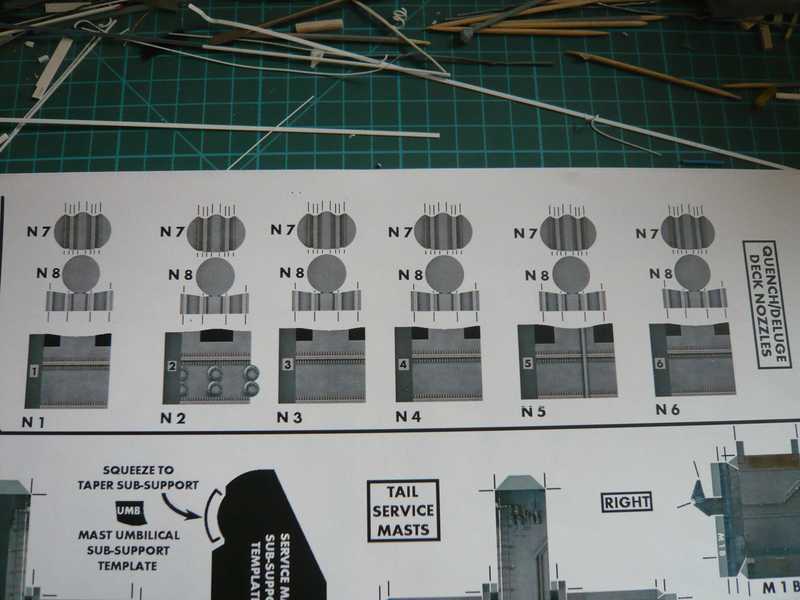 And enough of the preface and pure enjoyment. These are the different round profiles that are required with diameters ranging from 1 mm to 6 mm. 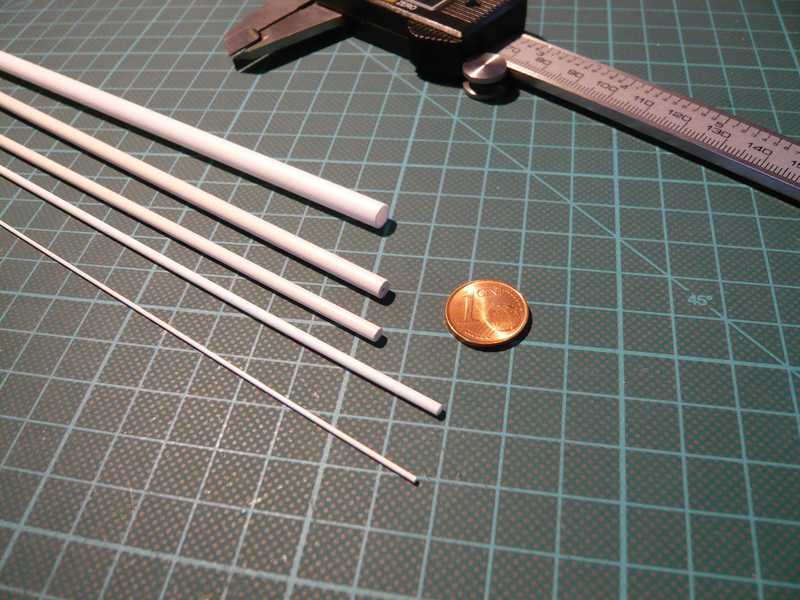 On the main pipes with a diameter of 4 mm, you could use also the sprues of the orbiter from the Revell Kit that had been a beautiful 90° elbow.  Here are the templates for the pipe support, after which I first will try the bending variant for the pipe with 4 mm. The actual line is only the outer gray border, the rest is support base.  The bending of 4 mm rods is not easy due to the strength, to do this you must preheat well already with a hair dryer, in order to get a 90° elbow then after bending bit by bit. And before the next bend you must inflate the 6 mm pipe for the thicker inlet pipe downwards, otherwise it afterwards would have a problem. 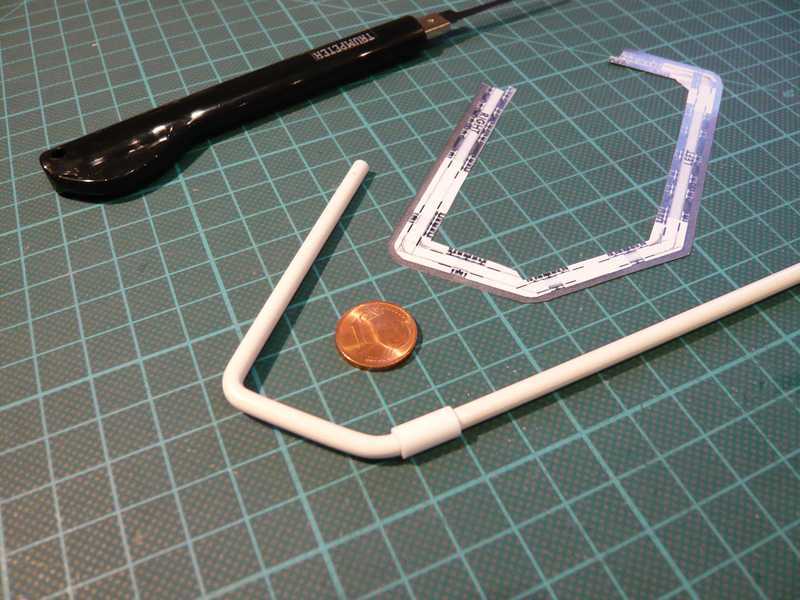 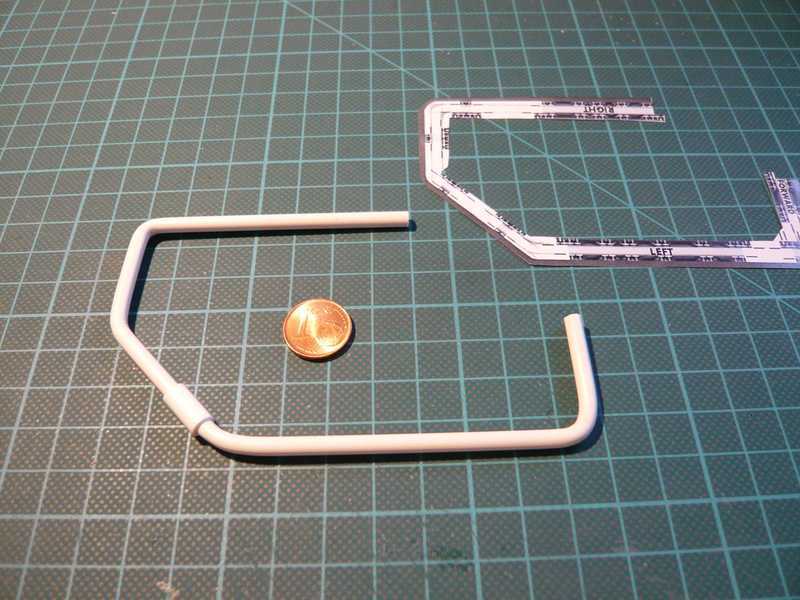 And so the pipe fits then about the SRB-Exhaust hole. The last section is a little further on the TSM than is provided in the paper kit.  As far as today for the beginning.
__________________
Greetings from Germany Manfred Under construction: Launch Pad 39A with Challenger STS-6 (1:144) Last edited by spacerunner; 10-07-2016 at 05:59 AM.
|
|
#220
11-07-2013, 08:44 PM
|
||||
|
||||
|
CLever use of sprue!
__________________
"One does not plow a field by turning it over in his mind..."
|
| Google Adsense |
 |
|
|


")
 Linear Mode

