


|
|
|
#2481
 07-30-2021, 02:09 AM
|
||||
|
||||
|
Thanks Luro for your proposal,
 I've already thought of this option now and then too, but I am not very familiar with this technique.  I could still imagine it for the gearbox, but not for the engine, which has too many tiny details and undercuts.  
__________________
Greetings from Germany Manfred Under construction: Launch Pad 39A with Challenger STS-6 (1:144) 
|
|
#2482
07-30-2021, 03:30 PM
|
||||
|
||||
|
Hello everybody,
Shapeways has complained about the wall thickness of some thin struts, which are 0.240 mm and therefore would not correspond to the Design Guidelines.   Source: Shapeways Customer Service Team My friend Joe could counter this rejection by increasing the wall thickness of this and other thin walls to 0.3 mm, which would then, in my opinion, comply with the SW Guidelines.  It says in it: A supported wall is connected at least on two sides of the wall, while an unsupported wall is connected only on one side of the wall. Walls that do not meet the minimum requirements may not survive printing and cleaning processes. Additionally, models may still be rejected based on the wall geometry of the model. Please consider the size of your model and reinforce the walls or add support structures as needed as minimum guidelines will not always be adequate for large models. And, as I understand it, this criterion should apply to most, if not for all, of the thin walls of the model.  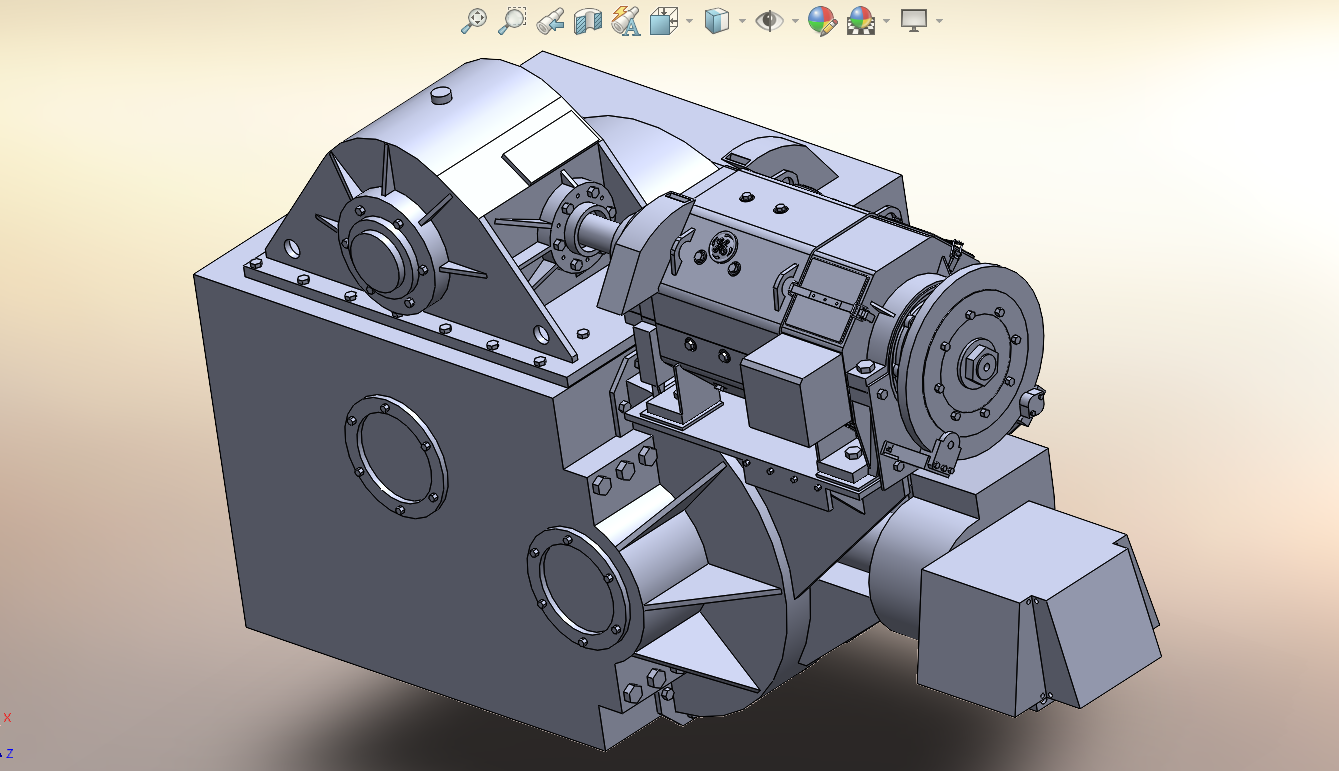 Source: ARC Forums (crackerjazz) So let's wait and see if SW sees it that way too, or what comes next ...
__________________
Greetings from Germany Manfred Under construction: Launch Pad 39A with Challenger STS-6 (1:144)
|
|
#2483
08-02-2021, 09:15 AM
|
||||
|
||||
|
Hello friends,
my request at Shapeways whether the reinforcement of the wall thickness of the critical areas to 0.3 mm would be sufficient to eliminate the printing problems has been confirmed by SW as this would meet the minimum requirement for supported walls made of Fine Detail Plastic. There we go!  That's right, changing the thickness to 0.3 mm should fix the issue on this design, this is the minimum requirement for supported wall thickness on Fine Detail plastic. Consequently my friend Joe (crackerjazz) should be able to modify his 3D model, which initially calms me down.
__________________
Greetings from Germany Manfred Under construction: Launch Pad 39A with Challenger STS-6 (1:144)
|
|
#2484
08-07-2021, 05:23 PM
|
||||
|
||||
|
Hello everybody,
unfortunately, my friend Joe from Toronto is very busy professionally, so that he has apparently not yet got around to making the changes to his 3D model, which is why Shapeways has canceled my order, as advertised, after 7 days of possible changes and has initiated a refund, which allegedly is on its way ... So first of all, patience is required and a second attempt is necessary ... Before I forget, I have therefore turned to the manufacture of the 3 lamps without a shade on the Side-1, which are corresponding to the shape and size of the Caution lights (Beacons) that I still need too.  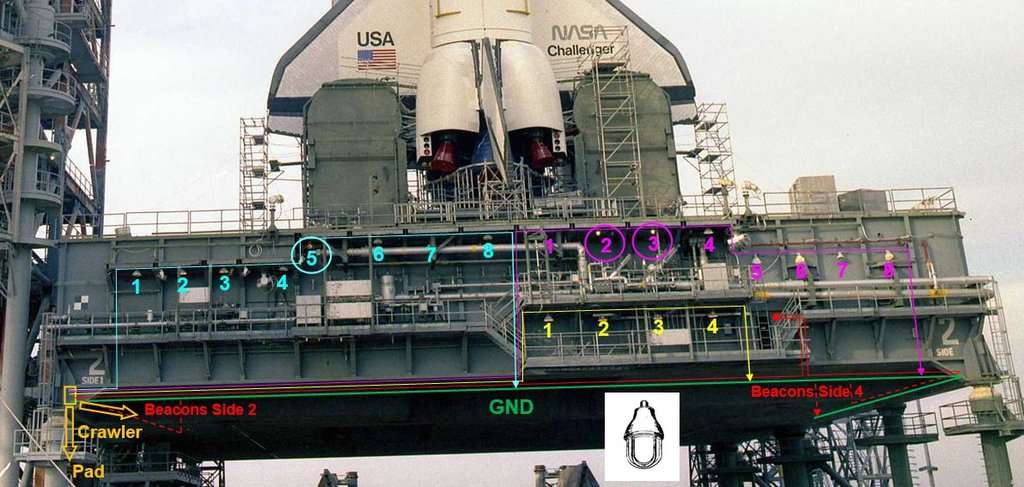 Source: retrospaceimages.com (STS-6) Their dimensions I've determined from this photo, which shows such a warning light with bracket in the White Room of the Orbiter Access Arm (OAA), on its walls many folks have immortalized themself, as one can see. 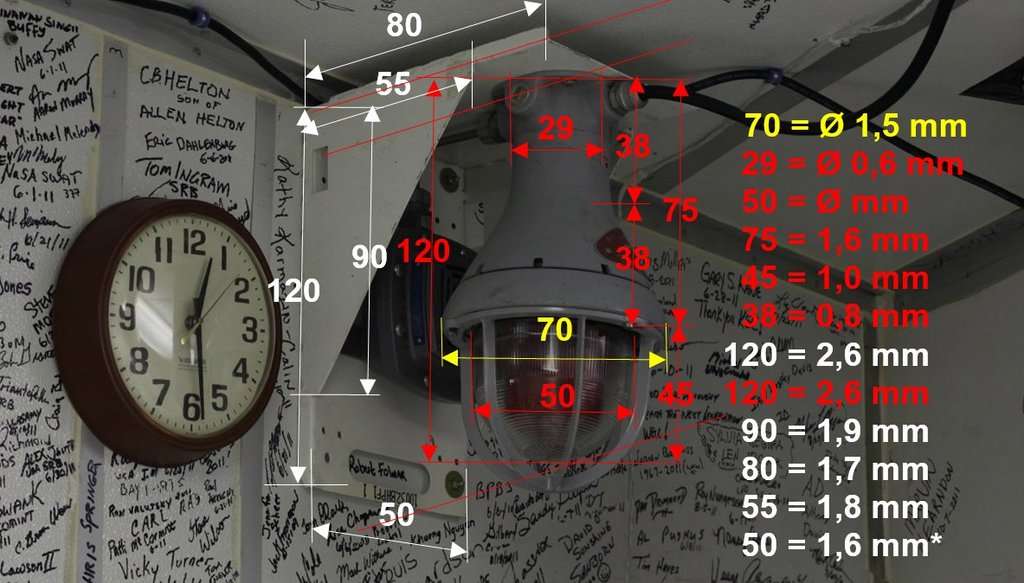 Source: NASA As you can see on it, the dimensions of these lamps without a screen are a lot smaller than those of the other lamps with a screen, which is why I've also used the smallest ferrules (0,25 mm2) that come closest to the original.  Only a Mini-LED (0401) fits into this mini ferrule, which is glued in with UV glue after the sleeve has been cut to length. 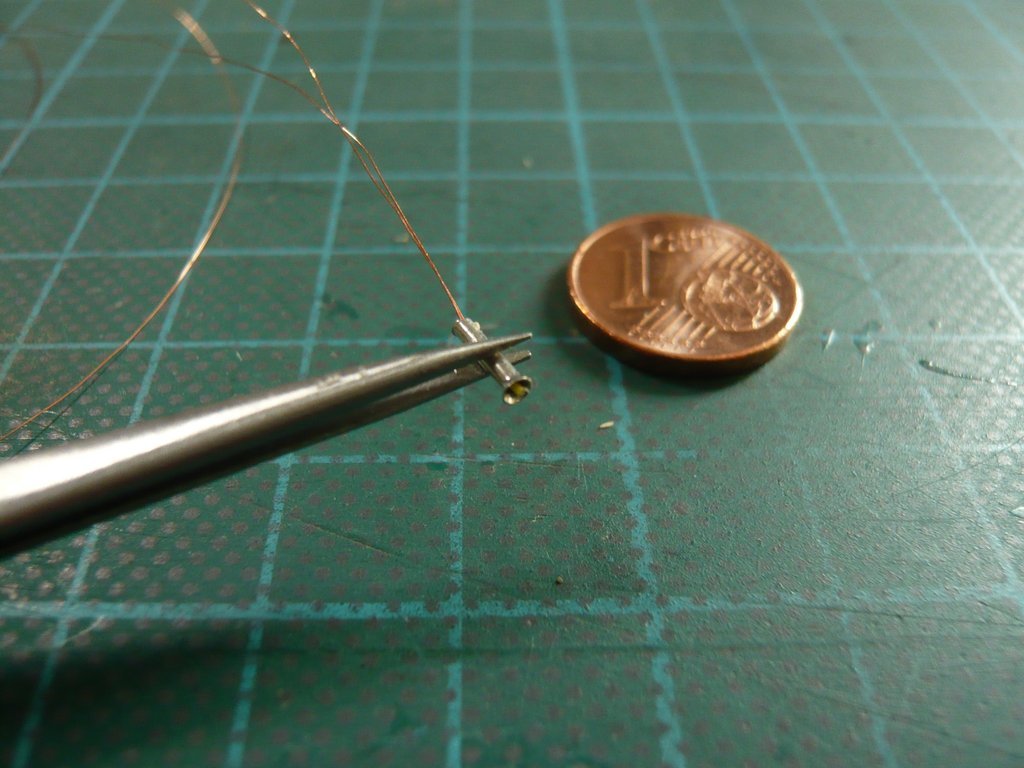 It's good that I can regulate the current of each lamp circuit using the Multi-current bank of my friend (McPhönix), since the LED with 8,5 mA lights up much too strongly,  which looks already better with 1,5 mA and can even be regulated down to 0,5 mA.  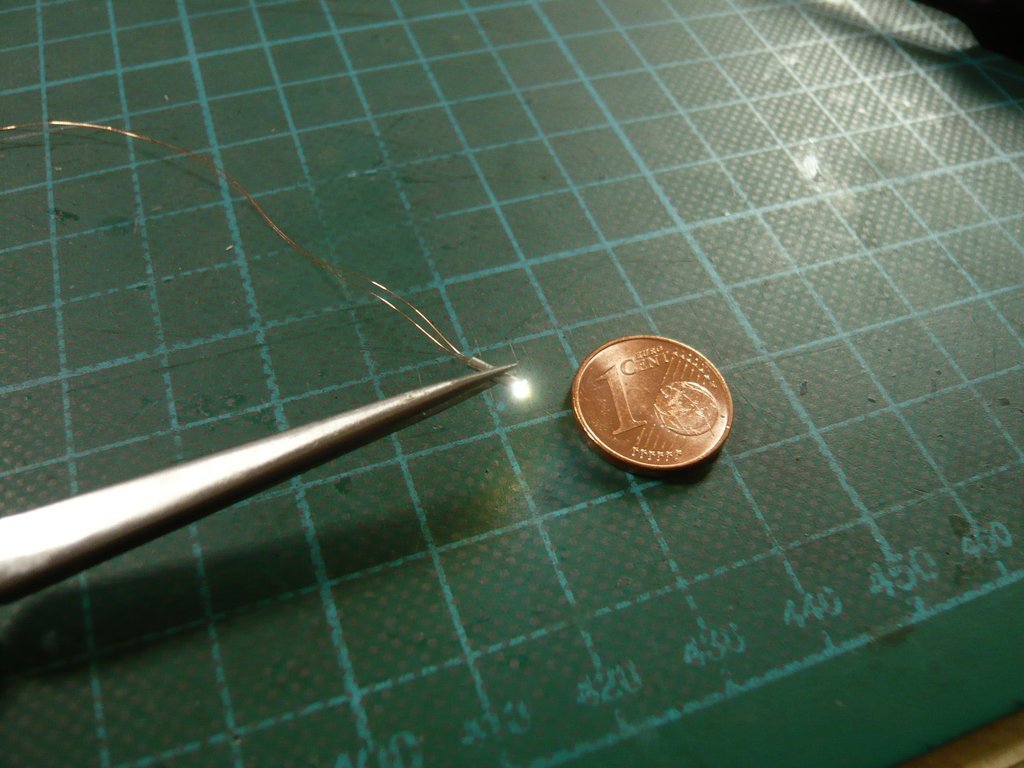 A first separation test with a ferrule impaled on a toothpick (as before with the larger ferrules) unfortunately went bad, 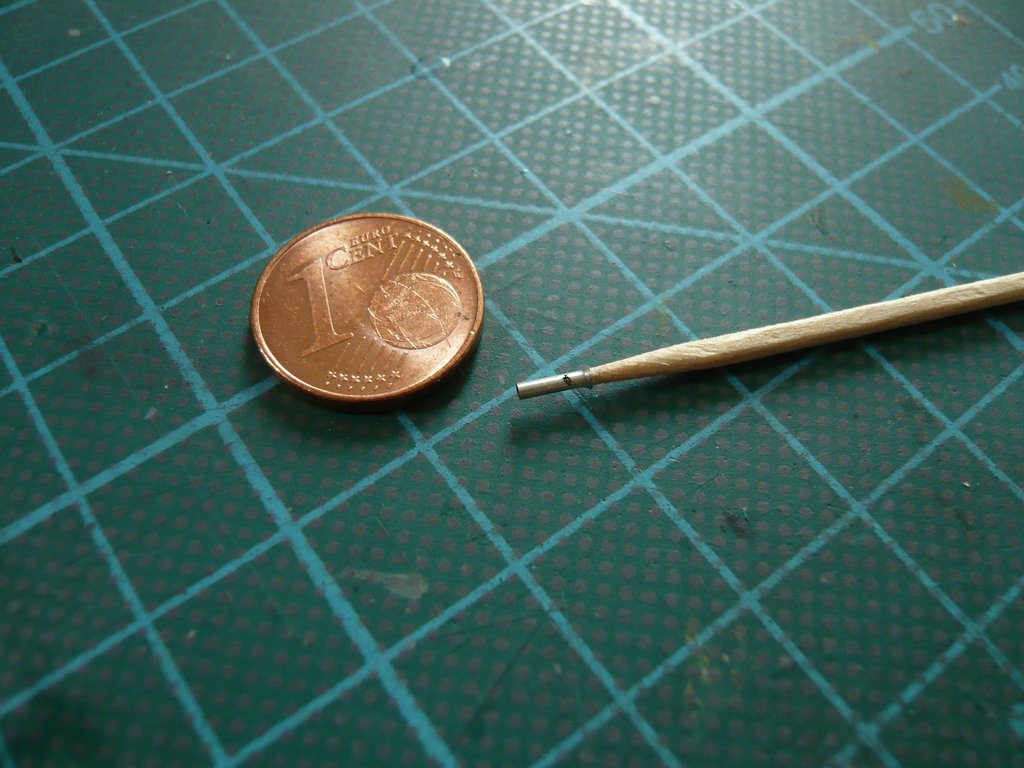 because the 3 mm long wooden tip sticking in the sleeve simply does not offer a stable hold,  which is why I had to think of another, more stable technique. which is why I had to think of another, more stable technique.  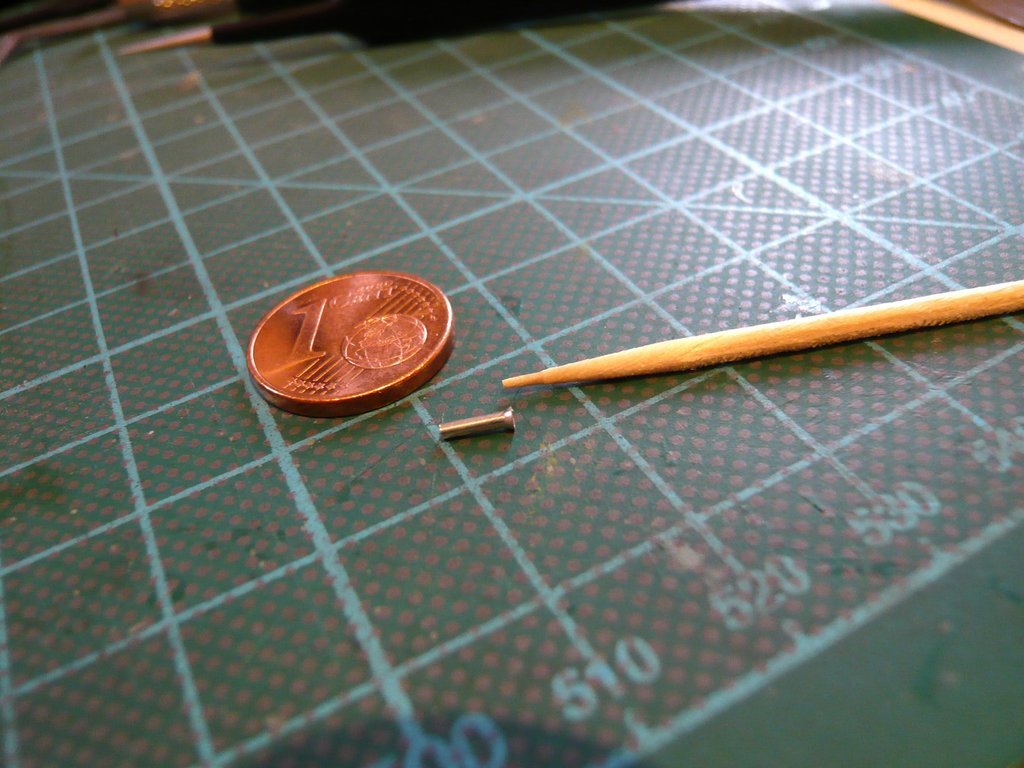 As a possible solution, I've thought of a steel wire with a suitable diameter (Øi 0,6 mm) onto which the sleeve (Øi 0,7 mm) is attached, which in turn is held in a stable device and carefully pushed against the cutting disc.  For this I've used a Mini hand drill chuck, which was clamped with the clamped wire in my small vice. 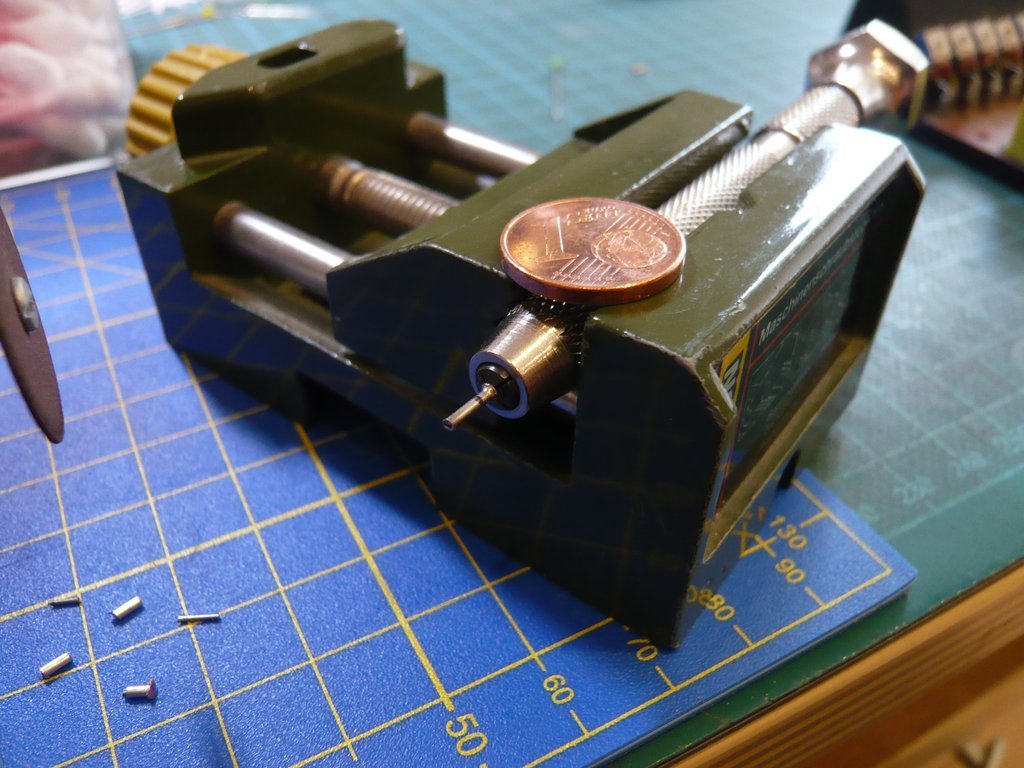 When cutting, I've held the sleeve at the end with the pliers and pushed it together with the vice against the cutting disc, whereby this time the sparks sprayed. 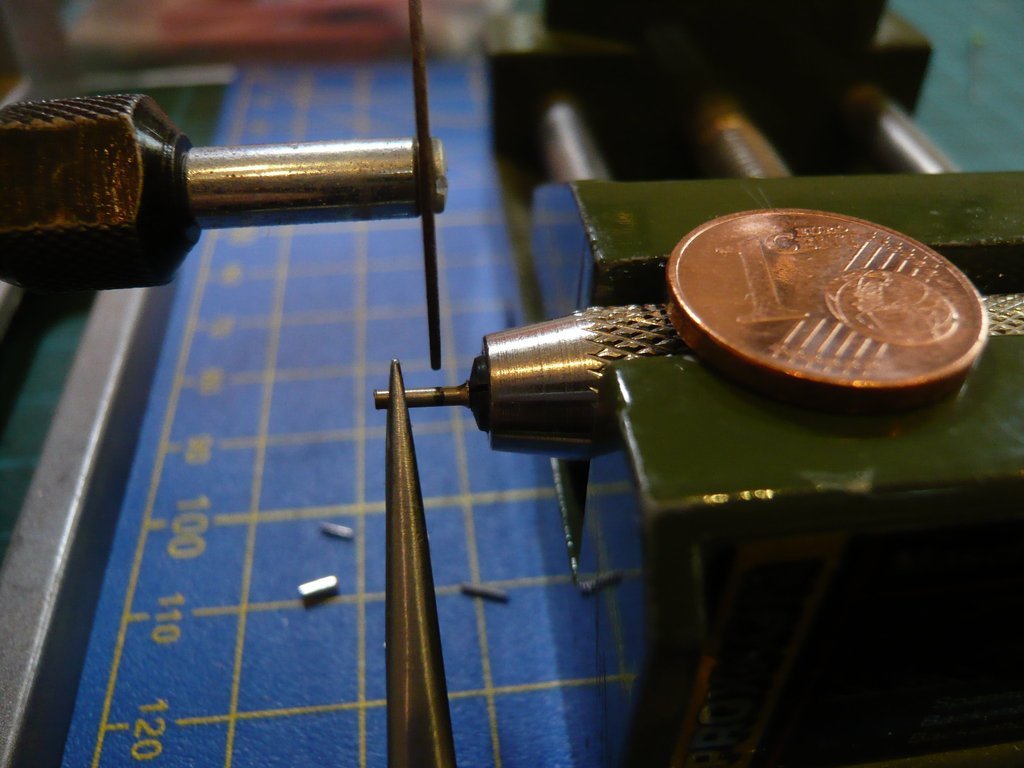
__________________
Greetings from Germany Manfred Under construction: Launch Pad 39A with Challenger STS-6 (1:144)
|
|
#2485
08-07-2021, 05:23 PM
|
||||
|
||||
|
The separation went without any problems, so that the shade could easily be removed from the wire stub.
 For deburring, the shade was again impaled on a toothpick and filed all around. 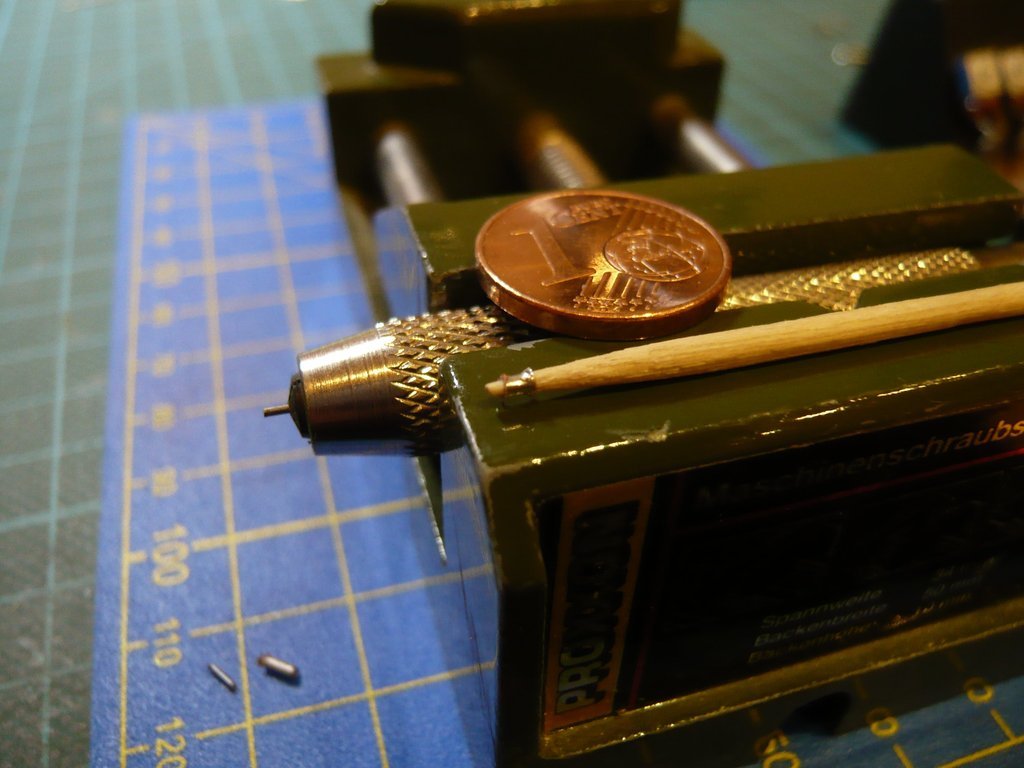 Here one can see again the size difference between the lampshades, 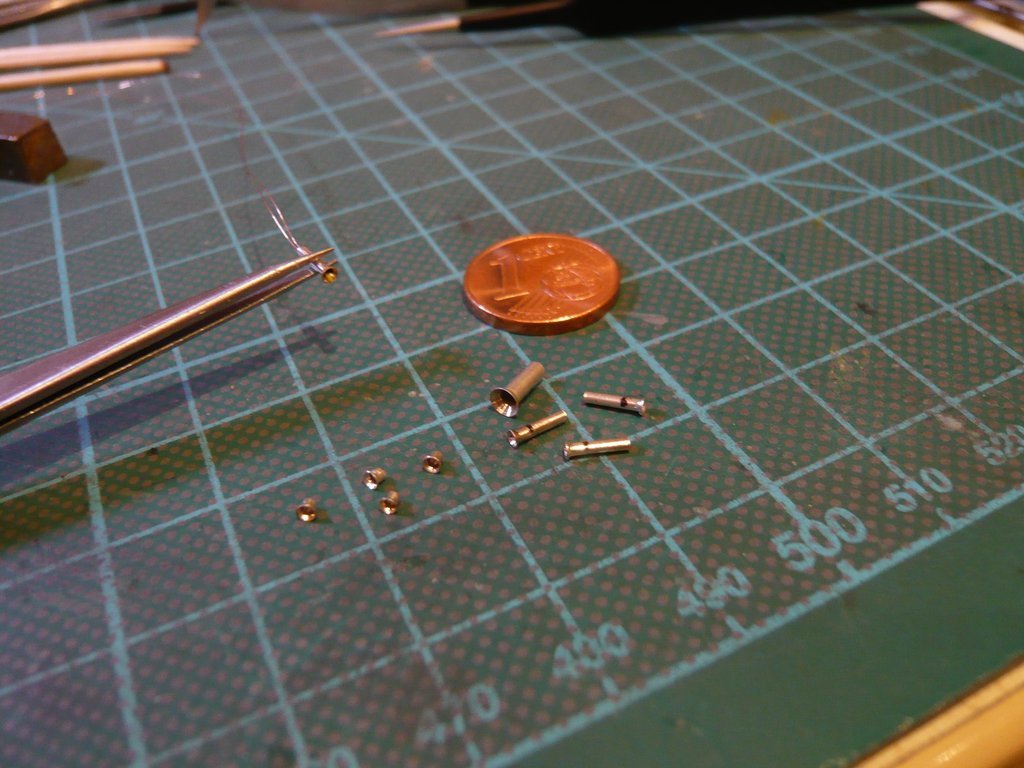 which can now be manufactured in the required piece number.
__________________
Greetings from Germany Manfred Under construction: Launch Pad 39A with Challenger STS-6 (1:144)
|
|
#2486
08-23-2021, 06:27 AM
|
||||
|
||||
|
Hello everybody,
recently my ARC friend Joe (crackerjazz) got in touch and reported that he had started to make the necessary changes to the 3D model of the Motor/Gearcase unit. To do this, he wanted to reinforce the too thin walls, ribs, brake disc holders etc. to 0,3 mm and hollow out some areas, as well as fill in undercuts that could possibly break off during printing. Here is the comparison of the Tension lock over the cover of the Service opening of the motor in the previous filigree design,  Source: ARC Forums (crackerjazz) as well as here in the modified and 'filled-out version', which is still optically acceptable, especially since these tiny details should hardly be recognizable later on the Crawler anyway.  Source: ARC Forums (crackerjazz) So let's see how it goes on.
__________________
Greetings from Germany Manfred Under construction: Launch Pad 39A with Challenger STS-6 (1:144)
|
|
#2487
08-23-2021, 07:03 AM
|
||||
|
||||
|
Hello everybody,
 my ARC friend Joe (crackerjazz) has pleasantly surprised me with the fact that he has modified his 3D model so quickly in accordance with Shapeways' guidelines, I'm totally thrilled, the wait was worth it. my ARC friend Joe (crackerjazz) has pleasantly surprised me with the fact that he has modified his 3D model so quickly in accordance with Shapeways' guidelines, I'm totally thrilled, the wait was worth it. Here one can see the comparison of the previous version with the too thin walls complained about by Shapeways (0,24 mm),  Source: ARC Forums (crackerjazz) and here the modified model with the wall thicknesses increased to 0,3 mm.  Source: ARC Forums (crackerjazz) Doing this he had a fatal mishap in the hustle and bustle because he had lost the original file with the hollowed-out gearcase, which has not been saved due to a computer crash.  Therefore, for better or worse, he had to start all over again and manually hollow out the model section by section,  what one can see in this interesting series of images. what one can see in this interesting series of images.  Sources: ARC Forums (crackerjazz)     And from this Motor-Gearbox-Combi which has meanwhile been uploaded to Shapeways, I've initially ordered a copy in the quality Smoothest Fine Detail Plastic as well as in Smooth Fine Detail Plastic in order to be able to assess the print quality of the parts.  Hopefully this 3D model will now pass the Shapeways' aptitude test, which is why it is time to keep all fingers crossed.  And as I've just seen at SW, this time the model has survived the first two stages Processing and Pre-Production  and is now In Production, which is why I'm very curious about the results. and is now In Production, which is why I'm very curious about the results.
__________________
Greetings from Germany Manfred Under construction: Launch Pad 39A with Challenger STS-6 (1:144)
|
|
#2488
08-24-2021, 09:45 AM
|
||||
|
||||
|
Hello everybody,
News of the day: My Shapeways order is now on its way!  The tension is rising ... The tension is rising ... My prototype is ready for comparison. 
__________________
Greetings from Germany Manfred Under construction: Launch Pad 39A with Challenger STS-6 (1:144)
|
|
#2489
08-27-2021, 04:59 PM
|
||||
|
||||
|
Hello everybody,
today the time had come, and when the parcel messenger rang, it was clear to me that it could only be Shapeways' 3D prints.  I had let printed both versions, both the finer and more expensive quality Smoothest Fine Detail Plastic (XSFDP, 10.01) and the cheaper Smooth Fine Detail Plastic (SFDP, 7.51 ), in order to be able to assess the print quality of the parts. First of all, here is the comparison of the XSFDP quality with my scratched Motor-Gearbox-Combi, which of course looks much better at first glance, right?  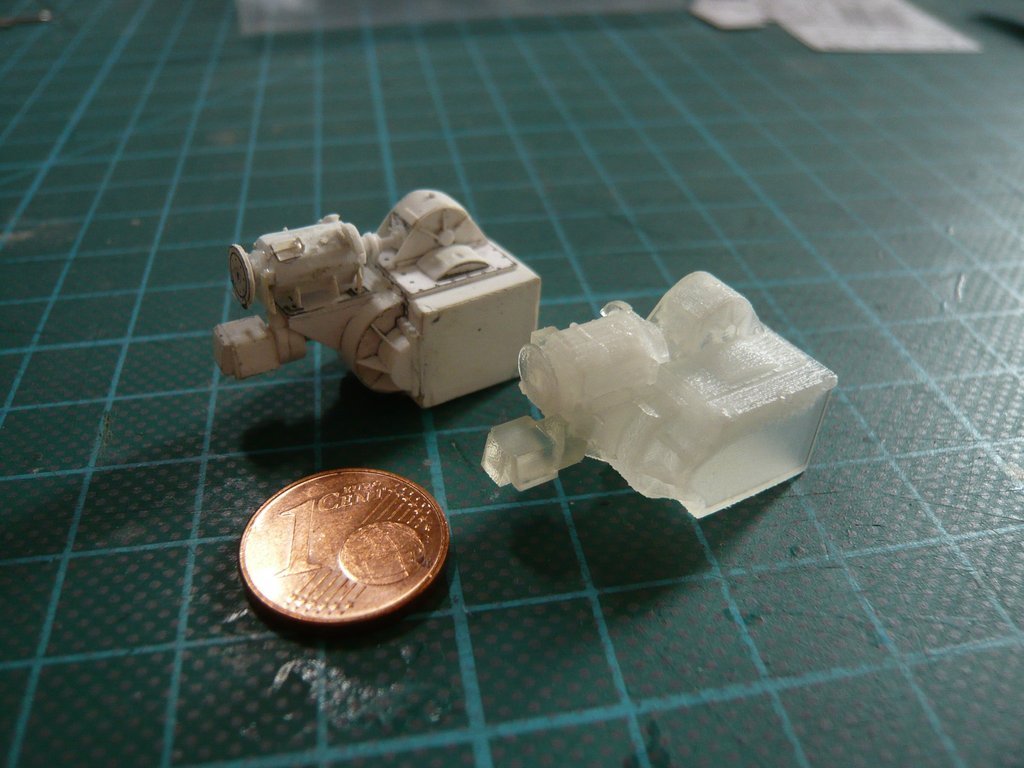 Joking aside, but this is mainly due to the transparent look of the SW plastic, on which the details, edges, etc. only become clearly visible after the priming/painting, but is also strongly related to the lighting conditions. On closer inspection under the magnifying glass, however, I noticed a few things, which cannot convince me yet, which I have marked in the following image.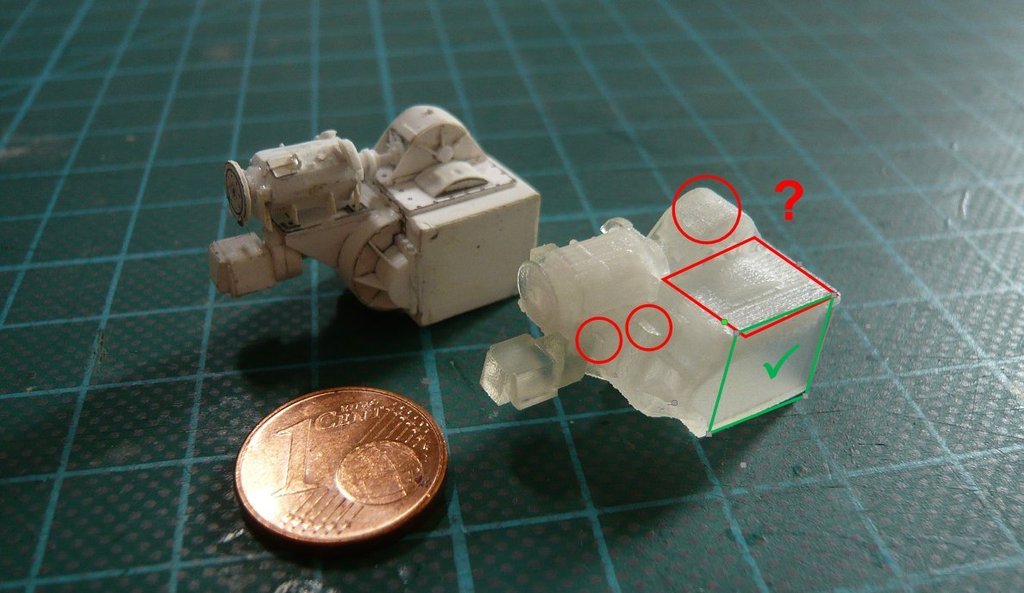 First there are these small circled icicles that have no place there, why I've cut off them.  Furthermore, I don't like the red marked rough surface, and that with the finest quality!!!  In my opinion, this can be related to the printing direction, an effect that I noticed already in earlier prints, because the side marked in green, which is perpendicular to it, is slick. But these are precisely the two sides that are barely or not at all visible after installation in the trucks. In contrast, the surface of the Combi should be as smooth as possible, I think. In my opinion, this can be related to the printing direction, an effect that I noticed already in earlier prints, because the side marked in green, which is perpendicular to it, is slick. But these are precisely the two sides that are barely or not at all visible after installation in the trucks. In contrast, the surface of the Combi should be as smooth as possible, I think.But my friend Joe (crackerjazz) would be able to take this into account before uploading and change the arrangement for accordingly, which I want to discuss with him again. I suspect that the part was lying on its side when it was printed and that is why these steps were created, what still astonishes me. On this photo at backlight one can see the details of the finer XSFDP quality much better, but which are really very small. 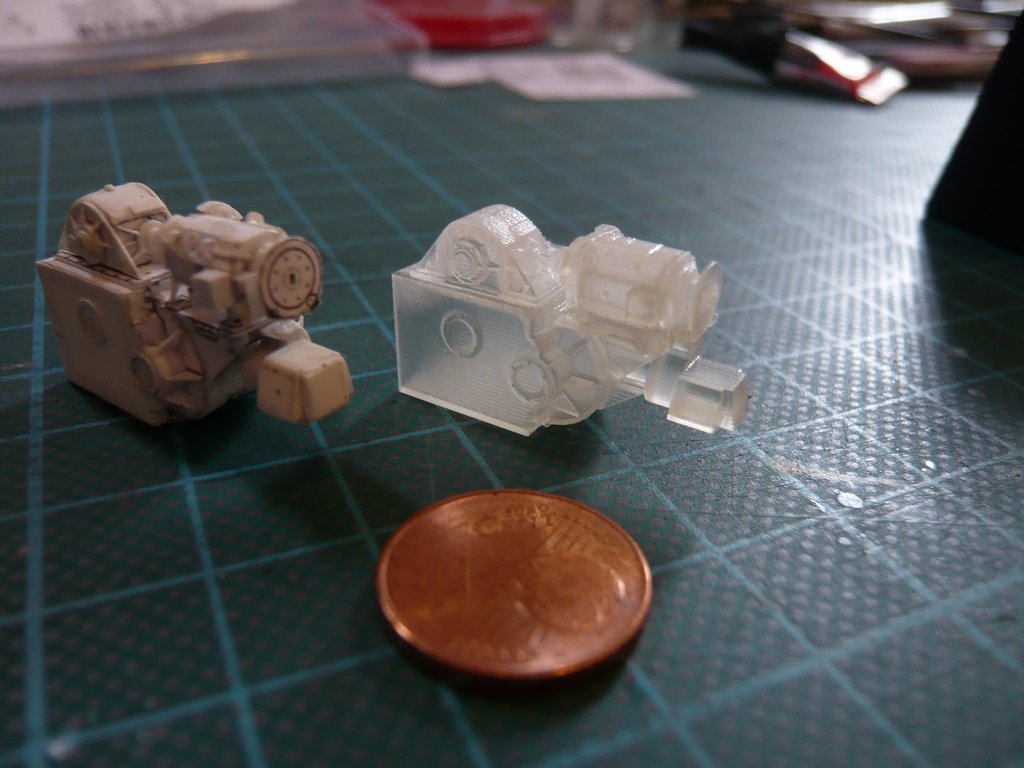 In the following two images, the SFDP quality (left in the picture) can now also be seen, in which the previously observed roughness is, as expected, more pronounced and the details less well developed. 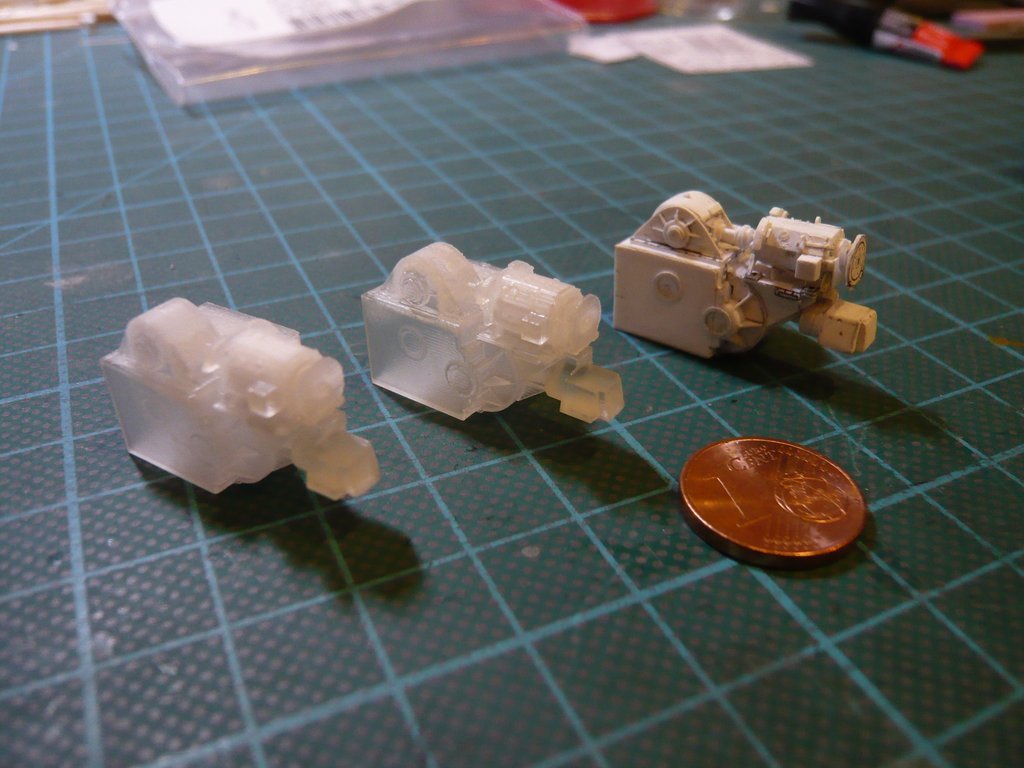 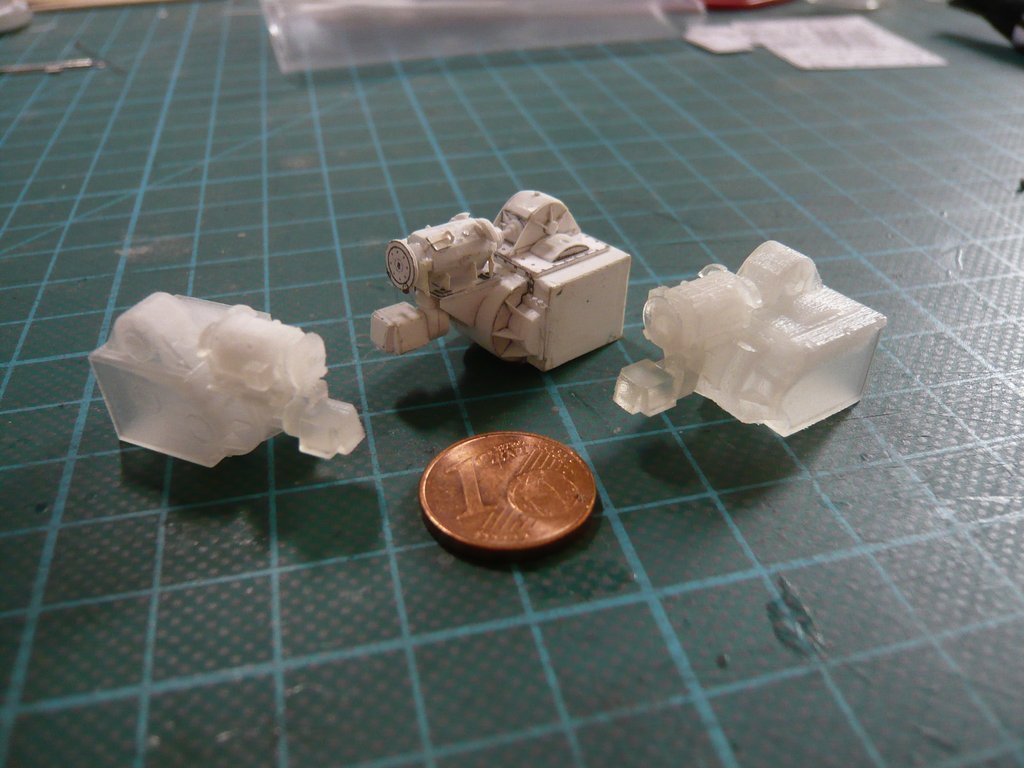 There is one thing I definitely have to discuss with Joe, because so far that's only half the battle, namely the Motor-Gearbox-Combi-L in the left version (right in the NASA image!), of which 8 units are required. The right version, Motor-Gearbox-Combi-R, of which I also need 8 units, my Joe now also has to upload Shapeways so I can let them be printed. And this L and R designation he has to take into account in Shapeways' item title so that one knows what to order. 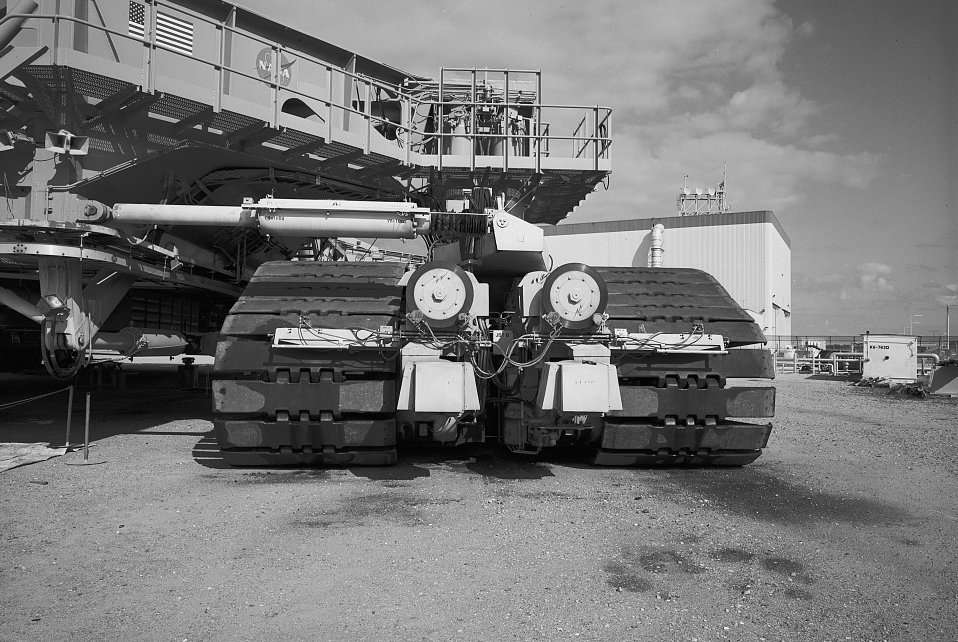 Source: Library of Congress (HAER FL-8-11-C-14) I hope for doing that he just has to mirror his previous Model L in his CAD Program to get Model R, as I've done in my PaintShop Pro, what then looks like this. 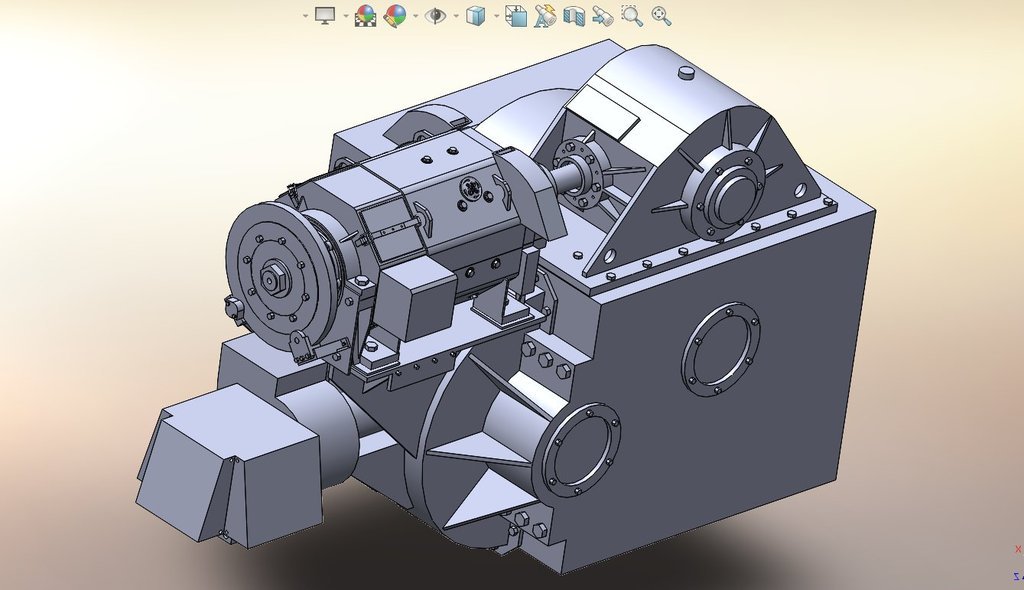 Source: ARC Forums (crackerjazz) But I'm sure, that Joe will still manage this too.
__________________
Greetings from Germany Manfred Under construction: Launch Pad 39A with Challenger STS-6 (1:144)
|
|
#2490
08-31-2021, 10:36 AM
|
||||
|
||||
|
Hello everybody,
regarding the mirroring of the left version of the Motor-Gearbox-Combi (Model L) suggested by me, my friend Joe (crackerjazz) brought the objection that we shouldn't mirror the Disc brake shoes due to their different shape. For the right Combi version (Model R) he only wanted to shift the Cable Box to the other side of the motor, but which is a fallacy, since the Motor-Gearbox geometry is not symmetrical,  as one can see in this image. as one can see in this image. 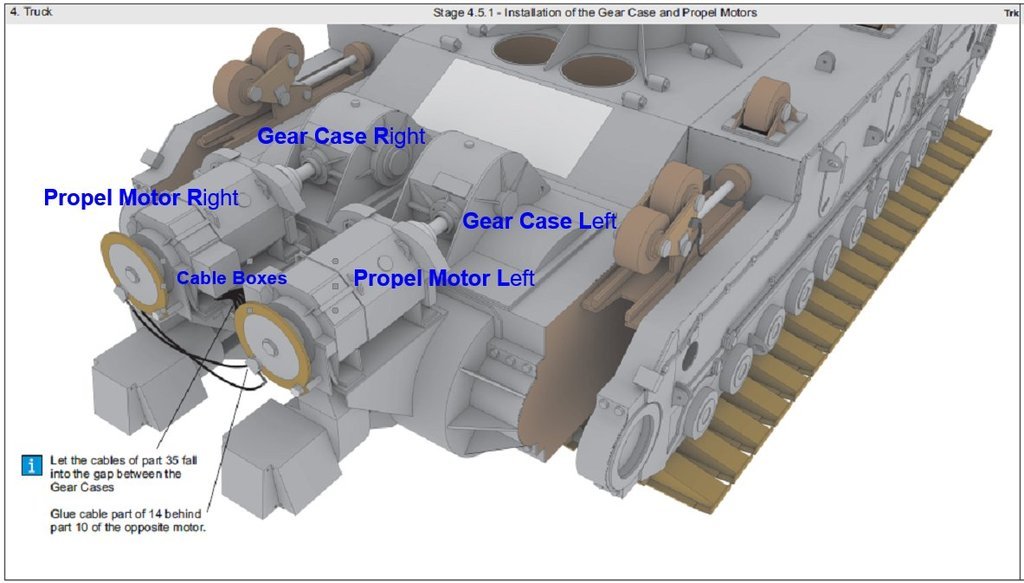 Source: MicroArtwork (cyana) In contrast this is the correct arrangement of the two Combis L & R between the trucks, with both motors and the inner sides of the gearboxes sitting next to each other. 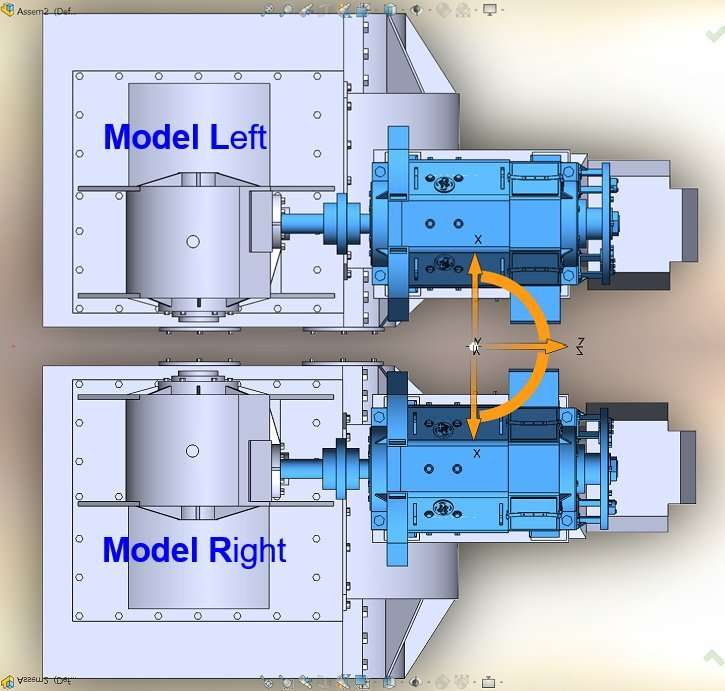 Source: ARC Forums (crackerjazz) Therefore, the mirroring of the Model L suggested by me is the simplest and the correct solution for Model R, but with the small restriction that the disc brake shoes of one motor are not arranged correctly. But I can live with that, especially since they are so small that one can hardly perceive these details. Source: ARC Forums (crackerjazz) I've informed him of this incorrect set of facts regarding the Motor-Gearbox geometry, because he has to distinguish between the two Model versions L & R when uploading the 3D models to Shapeways, so that I can then order them correctly. Now I'm waiting for him to change that.
__________________
Greetings from Germany Manfred Under construction: Launch Pad 39A with Challenger STS-6 (1:144)
|
 |
|
|


 Linear Mode

