


|
|
|
#11
 10-06-2010, 02:01 PM
|
||||
|
||||
|
But this ship can't sink..
I assure you, she can.. and she will,
no matter what the order in the wheelhouse is.. Hard to starboard or to port..because this Titanic model doesn't have a rudder to respond to the orders given in the wheelhouse..  There is no rudder part in the paper kit; There is no rudder part in the paper kit;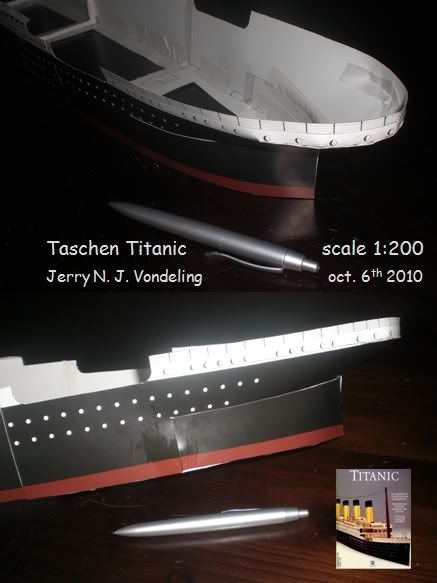 Also making the stern fit wasn't that easy.. as you can see in the attached pictures. It doesn't look as nice as I thought it would.. I had done some "repairs" after the pictures were taken. As for a Titanic without a rudder... well after designing parts for the smaller Titanic and - related models.. I upscaled a 1:1200 rudder to 1:200; 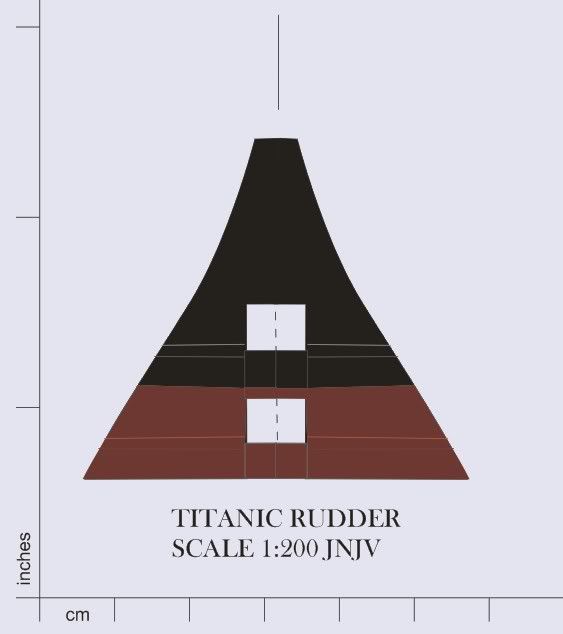 I have not tried to fit it myself yet, but after taking the measurements I think it will fit. You can take this image and resize it to the correct measurements using the centimeters or inches on the scale next to the design (I didn't know how to create an image wich could be downloaded at the correct size directly) Jerry 
|
|
#12
10-06-2010, 05:39 PM
|
||||
|
||||
|
Hey Jerry !! I have had this model in a book for a few years, i have looked at the pages and not once did i notice the rudder missing
 After you pointed this out, i had another look through to see if there is anything else to think about. I can't for the life of me think why they made a separate piece of card with "Liverpool" printed on it - that could have been so easily printed directly on the hull - yes it gives a dimension to it, but the shape is crude {i bet you will up-grade that piece} and at this scale, the inclusion of a separate anchor would have been nice {another up-grade}. With all that said, she's still a nice model, but if you or anyone else crave detail and perfection, then we would have to spend some cash on a FLY MODEL version - a serious piece of kit there my friend, and detail to the max....DREAM The stern is always going to cause grief, even more so i imagine with the thickness of the card used in the model.. you can only do what the design allows or try a scan of the part - then there would probably be colour matching issues. Looking forward to your next instalment Jerry After you pointed this out, i had another look through to see if there is anything else to think about. I can't for the life of me think why they made a separate piece of card with "Liverpool" printed on it - that could have been so easily printed directly on the hull - yes it gives a dimension to it, but the shape is crude {i bet you will up-grade that piece} and at this scale, the inclusion of a separate anchor would have been nice {another up-grade}. With all that said, she's still a nice model, but if you or anyone else crave detail and perfection, then we would have to spend some cash on a FLY MODEL version - a serious piece of kit there my friend, and detail to the max....DREAM The stern is always going to cause grief, even more so i imagine with the thickness of the card used in the model.. you can only do what the design allows or try a scan of the part - then there would probably be colour matching issues. Looking forward to your next instalment Jerry  P.S Great looking rudder you have come up with P.S Great looking rudder you have come up with 
|
|
#13
10-06-2010, 11:59 PM
|
||||
|
||||
|
Good morning Peter, This morning I found out I had made a mistake, there's a rudder included in the book after all.. (part 62) it's somewhere back in the book. (I have two copies of the book, one for building the model and one for the collection) But I have been thinking of redesigning some parts. Such as the anchor crane on the bow. It has the wrong shape, but also I am thinking of building it 3d instead of flat. the same goes for the masts, they shouldn't be flat and square, but round. I also think, but I could be wrong, they are to short. But a part that is missing.. as you can see on the front of the book.. the crows nest.. Maybe other parts come to mind while building it. I have seen the Gomix Fly model It would be a nice model to build indeed..
|
|
#14
10-07-2010, 06:04 AM
|
||||
|
||||
|
Hi Jerry... i couldn't see the wood for the trees
") i see it now THANKS Totally agree with the masts and that the look out { crows nest }that IS missing - should be easy to make one from scratch though.. The air vents need to be up-graded too, i made them from scratch on my up-scaled model - i made two tubes and cut them at right angles finally gluing them together at the angled cuts. If i get round to building this, i will put the rope ladder to the look out post {crows nest} for better effect. If you think of anything else that requires some scratch work or up-grades along the way, will be good to mention and try to include here. i see it now THANKS Totally agree with the masts and that the look out { crows nest }that IS missing - should be easy to make one from scratch though.. The air vents need to be up-graded too, i made them from scratch on my up-scaled model - i made two tubes and cut them at right angles finally gluing them together at the angled cuts. If i get round to building this, i will put the rope ladder to the look out post {crows nest} for better effect. If you think of anything else that requires some scratch work or up-grades along the way, will be good to mention and try to include here.
|
|
#15
10-07-2010, 12:18 PM
|
||||
|
||||
|
Your welcome Peter! I will be adding a crows nest indeed. I have been thinking about scratchbuilding the air vents as well. I thought about using a bendable kind of tube, but I might go with the way you build them. Today the first decks have been installed..
The anchor crane is there.. (not yet installed) but there is no anchor to use it for.. 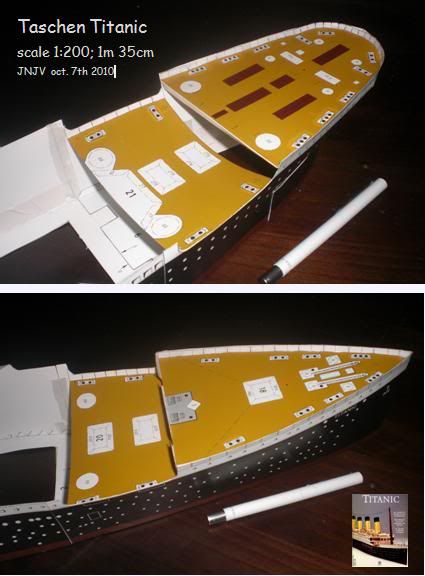 I will see if I am going to correct that or not.. I have thought about several things.. but I will see about them during construction.. Maybe I will build the model as it is and perhaps adding/updating parts after finishing the build. Also, because the stern section gave some problems before it did now.. I will take a look into that later. I must admit I cheated a bit.. I used double sided tape between the parts to hold them in place during the settling of the glue. I haven't forgotten to cut the holes for the mast. I don't know yet, if the masts are being replace, what their size will be. Jerry P.s the bend in the aft welldeck will be corrected when other parts are installed.
|
| Google Adsense |
|
#16
10-07-2010, 05:45 PM
|
||||
|
||||
|
She's starting to take shape now Jerry. You know the anchor situation !!! well, i have seen some necklaces with anchors attached, perhaps they would serve the purpose, and with the right size chain to match.... umm, maybe a realistic looking set up then ! I think you should go with the masts you had in mind, they would certainly look better then the ones in the model, and yes they do need to be taller - the antenna wires don't have enough clearance going over the top of the stacks - The dividers are also in the wrong place by looking at the picture on the front of the book, but i think you know that anyway Jerry. Great work thus far, and look forward to the next up-date.
|
|
#17
10-08-2010, 01:07 AM
|
||||
|
||||
|
This is a quite a build! I have that famous Fly Model 1:200 Titanic on my ever growing to-do-pile, and starting to seriously consider it as my next build.
__________________
Recently finished: St. Peter's & Vatican - 1:3900 - Micromodels
|
|
#19
10-08-2010, 09:38 AM
|
||||
|
||||
|
For sale at:
modellservice - der Kartonmodellshop - RMS TITANIC (1912) 1:200 Modelllänge: 140cm! übersetzt and GPM - modele kartonowe
__________________
Recently finished: St. Peter's & Vatican - 1:3900 - Micromodels
|
|
#20
10-10-2010, 03:18 PM
|
||||
|
||||
|
Well perhaps I will do that Fly model one day.. But first I'll finish this one..
Today I've been building on this Titanic and the smaller 1:1200 Britannic prototype for the RMS version on wich also some changes are made. Here's an update on the Taschen Titanic, the welldecks; 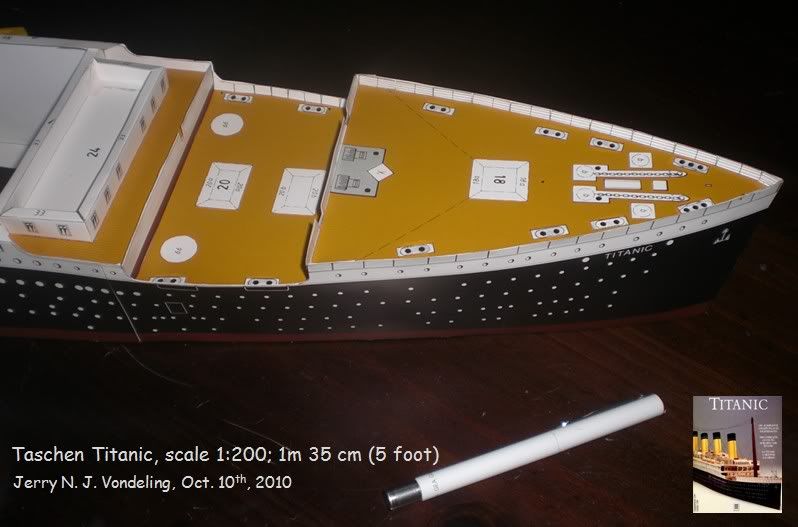 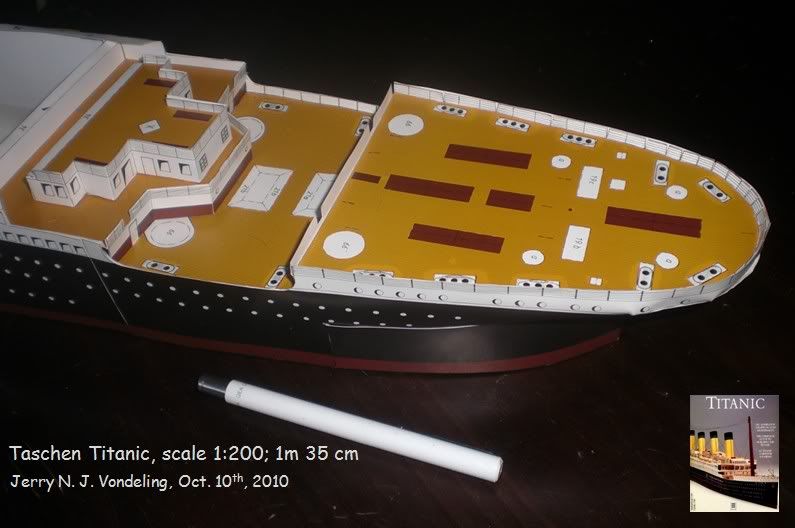 As you can see, I am not completely following the instructions, before adding the deckhousing on the welldecks, I first want to close the entire deck.. Jerry
|
| Google Adsense |
 |
|
|


 Linear Mode

